WhatsApp Business API | Integration with Rasa
Hi there!
In this tutorial, you will learn to enable WhatsApp communication on a simple Rasa assistant with the tyntec Conversations API. This integration allows your assistant to receive WhatsApp text messages and reply to them with ease.
You will need
-
- Your tyntec API key from your tyntec account
-
- Your WABA phone number that has been assigned to you by tyntec
-
- A mobile phone with WhatsApp installed that’s not associated with your WABA
-
- Rasa Open Source installed
-
- Your favorite text editor or IDE with Python and YAML highlighting
-
- An ngrok account and the binary installed
-
- Postman installed
Step One: Create an assistant
Let’s create artificial intelligence! This step is optional if you are starting with Rasa Open Source. Continue with step 2 if you already have your Assistant.
- Create a new project with an initial model by running the following command:
<div class="geshifilter"><pre class="php geshifilter-php">$ rasa init
Welcome to Rasa<span class="sy0">!</span> 🤖

To get started quickly<span class="sy0">,</span> an initial project will be created<span class="sy0">.</span>
<span class="kw1">If</span> you need some help<span class="sy0">,</span> check out the documentation at https<span class="sy0">:</span><span class="co1">//rasa.com/docs/rasa.</span>
Now let<span class="st_h">'s start! 👇🏽

? Please enter a path where the project will be created [default: current directory] ./my-great-assistant
? Path '</span><span class="sy0">./</span>my<span class="sy0">-</span>great<span class="sy0">-</span>assistant<span class="st_h">' does not exist 🧐. Create path?  Yes
Created project directory at '</span><span class="sy0">/</span>home<span class="sy0">/</span>john<span class="sy0">-</span>doe<span class="sy0">/</span>my<span class="sy0">-</span>great<span class="sy0">-</span>assistant<span class="st_h">'.
Finished creating project structure.
? Do you want to train an initial model? 💪🏽  Yes
Training an initial model...
The configuration for pipeline and policies was chosen automatically. It was written into the config file at '</span><span class="sy0">./</span>my<span class="sy0">-</span>great<span class="sy0">-</span>assistant<span class="sy0">/</span>config<span class="sy0">.</span>yml<span class="st_h">'.
Training NLU model...
[...]
NLU model training completed.
Training Core model...
[...]
Core model training completed.
Your Rasa model is trained and saved at '</span><span class="sy0">/</span>home<span class="sy0">/</span>john<span class="sy0">-</span>doe<span class="sy0">/</span>my<span class="sy0">-</span>great<span class="sy0">-</span>assistant<span class="sy0">/</span>models<span class="sy0">/</span><span class="nu0">20210930</span><span class="sy0">-</span><span class="nu0">155824</span><span class="sy0">.</span>tar<span class="sy0">.</span>gz<span class="st_h">'.
? Do you want to speak to the trained assistant on the command line? 🤖  No
Ok 👍🏼. If you want to speak to the assistant, run '</span>rasa shell<span class="st_h">' at any time inside the project directory.</span></pre></div>
2. Change your current working directory:
<span class="geshifilter"><code class="php geshifilter-php">$ cd my<span class="sy0">-</span>great<span class="sy0">-</span>assistant</code></span>You’ve created an assistant that automatically handles interactions.
Step Two: Add a WhatsApp connector
In this step, you connect the assistant to the tyntec Conversations API with a custom channel connector. The connector can process incoming WhatsApp messages, pass them to your assistant, and reply on WhatsApp.
1. Create a file addons/tyntec.py with the following content:
<div class="geshifilter"><pre class="php geshifilter-php">import json
import logging

import rasa<span class="sy0">.</span>core<span class="sy0">.</span>channels<span class="sy0">.</span>channel
import requests
import sanic
import sanic<span class="sy0">.</span>response


def _compose_tyntec_send_whatsapp_text_request<span class="br0">(</span>apikey<span class="sy0">,</span> from_<span class="sy0">,</span> to<span class="sy0">,</span> text<span class="br0">)</span><span class="sy0">:</span>
    <span class="kw1">return</span> requests<span class="sy0">.</span>Request<span class="br0">(</span>
        method<span class="sy0">=</span><span class="st0">"POST"</span><span class="sy0">,</span>
        url<span class="sy0">=</span><span class="st0">"https://api.tyntec.com/conversations/v3/messages"</span><span class="sy0">,</span>
        headers<span class="sy0">=</span><span class="br0">{</span>
            <span class="st0">"Accept"</span><span class="sy0">:</span> <span class="st0">"application/json"</span><span class="sy0">,</span>
            <span class="st0">"apikey"</span><span class="sy0">:</span> apikey<span class="br0">}</span><span class="sy0">,</span>
        json<span class="sy0">=</span><span class="br0">{</span>
            <span class="st0">"from"</span><span class="sy0">:</span> from_<span class="sy0">,</span>
            <span class="st0">"to"</span><span class="sy0">:</span> to<span class="sy0">,</span>
            <span class="st0">"channel"</span><span class="sy0">:</span> <span class="st0">"whatsapp"</span><span class="sy0">,</span>
            <span class="st0">"content"</span><span class="sy0">:</span> <span class="br0">{</span>
                <span class="st0">"contentType"</span><span class="sy0">:</span> <span class="st0">"text"</span><span class="sy0">,</span>
                <span class="st0">"text"</span><span class="sy0">:</span> text<span class="br0">}</span><span class="br0">}</span><span class="br0">)</span>


def _parse_tyntec_webhook_request<span class="br0">(</span>body<span class="br0">)</span><span class="sy0">:</span>
    try<span class="sy0">:</span>
        id_ <span class="sy0">=</span> body<span class="br0">[</span><span class="st0">"messageId"</span><span class="br0">]</span>
        event <span class="sy0">=</span> body<span class="br0">[</span><span class="st0">"event"</span><span class="br0">]</span>
        from_ <span class="sy0">=</span> body<span class="br0">[</span><span class="st0">"from"</span><span class="br0">]</span>
        channel <span class="sy0">=</span> body<span class="br0">[</span><span class="st0">"channel"</span><span class="br0">]</span>
        content_type <span class="sy0">=</span> body<span class="br0">[</span><span class="st0">"content"</span><span class="br0">]</span><span class="br0">[</span><span class="st0">"contentType"</span><span class="br0">]</span>
        content_text <span class="sy0">=</span> body<span class="br0">[</span><span class="st0">"content"</span><span class="br0">]</span><span class="br0">[</span><span class="st0">"text"</span><span class="br0">]</span>
    except KeyError<span class="sy0">:</span>
        raise ValueError<span class="br0">(</span><span class="st0">"body not a tyntec WhatsApp text message event"</span><span class="br0">)</span>

    <span class="kw1">if</span> event <span class="sy0">!=</span> <span class="st0">"MoMessage"</span> or channel <span class="sy0">!=</span> <span class="st0">"whatsapp"</span> or content_type <span class="sy0">!=</span> <span class="st0">"text"</span><span class="sy0">:</span>
        raise ValueError<span class="br0">(</span><span class="st0">"body not a WhatsApp text message event"</span><span class="br0">)</span>

    <span class="kw1">return</span> _TyntecWhatsAppTextMessage<span class="br0">(</span>id_<span class="sy0">,</span> from_<span class="sy0">,</span> content_text<span class="br0">)</span>


<span class="kw2">class</span> _TyntecWhatsAppTextMessage<span class="sy0">:</span>
    def __init__<span class="br0">(</span><span class="kw2">self</span><span class="sy0">,</span> id_<span class="sy0">,</span> from_<span class="sy0">,</span> text<span class="br0">)</span><span class="sy0">:</span>
        <span class="kw2">self</span><span class="sy0">.</span>id <span class="sy0">=</span> id_
        <span class="kw2">self</span><span class="sy0">.</span>from_ <span class="sy0">=</span> from_
        <span class="kw2">self</span><span class="sy0">.</span>text <span class="sy0">=</span> text


<span class="kw2">class</span> TyntecInputChannel<span class="br0">(</span>rasa<span class="sy0">.</span>core<span class="sy0">.</span>channels<span class="sy0">.</span>channel<span class="sy0">.</span>InputChannel<span class="br0">)</span><span class="sy0">:</span>
    def __init__<span class="br0">(</span><span class="kw2">self</span><span class="sy0">,</span> waba<span class="sy0">,</span> tyntec_apikey<span class="sy0">,</span> requests_session<span class="sy0">=</span>None<span class="br0">)</span><span class="sy0">:</span>
        <span class="kw1">if</span> requests_session is None<span class="sy0">:</span>
            requests_session <span class="sy0">=</span> requests<span class="sy0">.</span>Session<span class="br0">(</span><span class="br0">)</span>

        <span class="kw2">self</span><span class="sy0">.</span>requests_session <span class="sy0">=</span> requests_session
        <span class="kw2">self</span><span class="sy0">.</span>tyntec_apikey <span class="sy0">=</span> tyntec_apikey
        <span class="kw2">self</span><span class="sy0">.</span>waba <span class="sy0">=</span> waba

    <span class="sy0">@</span>classmethod
    def from_credentials<span class="br0">(</span>cls<span class="sy0">,</span> credentials<span class="br0">)</span><span class="sy0">:</span>
        <span class="kw1">return</span> cls<span class="br0">(</span>credentials<span class="br0">[</span><span class="st0">"waba"</span><span class="br0">]</span><span class="sy0">,</span> credentials<span class="br0">[</span><span class="st0">"apikey"</span><span class="br0">]</span><span class="br0">)</span>

    <span class="sy0">@</span>classmethod
    def name<span class="br0">(</span>cls<span class="br0">)</span><span class="sy0">:</span>
        <span class="kw1">return</span> <span class="st0">"tyntec"</span>

    def blueprint<span class="br0">(</span><span class="kw2">self</span><span class="sy0">,</span> on_new_message<span class="br0">)</span><span class="sy0">:</span>
        custom_webhook <span class="sy0">=</span> sanic<span class="sy0">.</span>Blueprint<span class="br0">(</span><span class="st0">"tyntec"</span><span class="br0">)</span>

        <span class="sy0">@</span>custom_webhook<span class="sy0">.</span>route<span class="br0">(</span><span class="st0">"/"</span><span class="sy0">,</span> methods<span class="sy0">=</span><span class="br0">[</span><span class="st0">"GET"</span><span class="br0">]</span><span class="br0">)</span>
        async def health<span class="br0">(</span>request<span class="br0">)</span><span class="sy0">:</span>
            <span class="kw1">return</span> sanic<span class="sy0">.</span>response<span class="sy0">.</span>json<span class="br0">(</span><span class="br0">{</span><span class="st0">"status"</span><span class="sy0">:</span> <span class="st0">"ok"</span><span class="br0">}</span><span class="br0">)</span>

        <span class="sy0">@</span>custom_webhook<span class="sy0">.</span>route<span class="br0">(</span><span class="st0">"/webhook"</span><span class="sy0">,</span> methods<span class="sy0">=</span><span class="br0">[</span><span class="st0">"POST"</span><span class="br0">]</span><span class="br0">)</span>
        async def receive<span class="br0">(</span>request<span class="br0">)</span><span class="sy0">:</span>
            try<span class="sy0">:</span>
                text_message <span class="sy0">=</span> _parse_tyntec_webhook_request<span class="br0">(</span>request<span class="sy0">.</span>json<span class="br0">)</span>
            except ValueError<span class="sy0">:</span>
                request_json <span class="sy0">=</span> json<span class="sy0">.</span>dumps<span class="br0">(</span>request<span class="sy0">.</span>json<span class="br0">)</span>
                logging<span class="sy0">.</span>warning<span class="br0">(</span>f<span class="st0">"Unsupported event skipped: {request_json}"</span><span class="br0">)</span>
                <span class="kw1">return</span> sanic<span class="sy0">.</span>response<span class="sy0">.</span>text<span class="br0">(</span>f<span class="st0">"Unsupported event skipped: {request_json}"</span><span class="br0">)</span>

            await on_new_message<span class="br0">(</span>
                rasa<span class="sy0">.</span>core<span class="sy0">.</span>channels<span class="sy0">.</span>channel<span class="sy0">.</span>UserMessage<span class="br0">(</span>
                    text_message<span class="sy0">.</span>text<span class="sy0">,</span>
                    TyntecOutputChannel<span class="br0">(</span><span class="kw2">self</span><span class="sy0">.</span>waba<span class="sy0">,</span> <span class="kw2">self</span><span class="sy0">.</span>tyntec_apikey<span class="sy0">,</span> <span class="kw2">self</span><span class="sy0">.</span>requests_session<span class="br0">)</span><span class="sy0">,</span>
                    text_message<span class="sy0">.</span>from_<span class="sy0">,</span>
                    input_channel<span class="sy0">=</span><span class="kw2">self</span><span class="sy0">.</span>name<span class="br0">(</span><span class="br0">)</span><span class="sy0">,</span>
                    message_id<span class="sy0">=</span>text_message<span class="sy0">.</span>id<span class="br0">)</span><span class="br0">)</span>

            <span class="kw1">return</span> sanic<span class="sy0">.</span>response<span class="sy0">.</span>text<span class="br0">(</span><span class="st0">"OK"</span><span class="br0">)</span>

        <span class="kw1">return</span> custom_webhook


<span class="kw2">class</span> TyntecOutputChannel<span class="br0">(</span>rasa<span class="sy0">.</span>core<span class="sy0">.</span>channels<span class="sy0">.</span>channel<span class="sy0">.</span>OutputChannel<span class="br0">)</span><span class="sy0">:</span>
    def __init__<span class="br0">(</span><span class="kw2">self</span><span class="sy0">,</span> waba<span class="sy0">,</span> tyntec_apikey<span class="sy0">,</span> requests_session<span class="br0">)</span><span class="sy0">:</span>
        <span class="kw2">self</span><span class="sy0">.</span>requests_session <span class="sy0">=</span> requests_session
        <span class="kw2">self</span><span class="sy0">.</span>tyntec_apikey <span class="sy0">=</span> tyntec_apikey
        <span class="kw2">self</span><span class="sy0">.</span>waba <span class="sy0">=</span> waba

    <span class="sy0">@</span>classmethod
    def name<span class="br0">(</span>cls<span class="br0">)</span><span class="sy0">:</span>
        <span class="kw1">return</span> <span class="st0">"tyntec"</span>

    async def send_text_message<span class="br0">(</span><span class="kw2">self</span><span class="sy0">,</span> recipient_id<span class="sy0">,</span> text<span class="sy0">,</span> <span class="sy0">**</span>kwargs<span class="br0">)</span><span class="sy0">:</span>
        request <span class="sy0">=</span> _compose_tyntec_send_whatsapp_text_request<span class="br0">(</span><span class="kw2">self</span><span class="sy0">.</span>tyntec_apikey<span class="sy0">,</span> <span class="kw2">self</span><span class="sy0">.</span>waba<span class="sy0">,</span> recipient_id<span class="sy0">,</span> text<span class="br0">)</span>
        prepared_request <span class="sy0">=</span> request<span class="sy0">.</span>prepare<span class="br0">(</span><span class="br0">)</span>

        response <span class="sy0">=</span> <span class="kw2">self</span><span class="sy0">.</span>requests_session<span class="sy0">.</span>send<span class="br0">(</span>prepared_request<span class="br0">)</span>
        response<span class="sy0">.</span>raise_for_status<span class="br0">(</span><span class="br0">)</span></pre></div>
Step Three: Configure and run the assistant
Now, you will configure and run the assistant.
1. Add the following associative array entry to the credentials.yml file and replace WABA with your WABA phone number and APIKEY with your tyntec API key:
<div class="geshifilter"><pre class="php geshifilter-php">addons<span class="sy0">.</span>tyntec<span class="sy0">.</span>TyntecInputChannel<span class="sy0">:</span>
  waba<span class="sy0">:</span> <span class="st0">"WABA"</span>  <span class="co2"># replace WABA with your WABA phone number
</span>  apikey<span class="sy0">:</span> <span class="st0">"APIKEY"</span>  <span class="co2"># replace APIKEY with your tyntec API key</span></pre></div>
2. Start the assistant:
<span class="geshifilter"><code class="php geshifilter-php">$ rasa run</code></span>3. Create a publicly accessible URL using ngrok in another terminal:
<span class="geshifilter"><code class="php geshifilter-php">$ path<span class="sy0">/</span>to<span class="sy0">/</span>ngrok http <span class="nu0">5005</span></code></span>4. Copy the displayed public URL (such as https://843fc8776770.ngrok.io).
Note: This setup is suitable only for development. For production use, follow the official documentation “Deploy Your Rasa Assistant” to deploy your assistant. It includes methods such as Helm charts, deploying your Kubernetes cluster, or Docker Compose.
Step Four: Let the Conversations API know about your assistant
Let the tyntec Conversations API know where to deliver WhatsApp messages from your customers or users. You’re going to subscribe to the assistant’s webhook via an API call in Postman.
1. From the api-collection/conversations/v3 directory, import the Conversations V3.5.postman_collection.json into Postman.
2. Authorize Postman with your tyntec API key and your WABA phone number. Right-click the collection and select Edit. Then go to Variables and set the apikey variable to your tyntec API key. Also, set the whatsAppBusinessNumber variable to your WABA phone number.
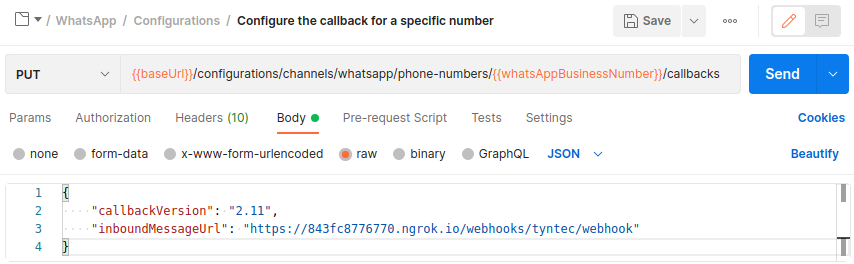
3. Let’s set up a webhook! Open the WhatsApp folder. Inside, open the Configurations folder and select the Configure the callback for a specific number request and change the inboundMessageUrl in the body to the assistant’s /webhooks/tyntec/webhook endpoint URL (for example, https://843fc8776770.ngrok.io/webhooks/tyntec/webhook). This request will subscribe the URL to incoming message events.
4. Hit the Send button. You should receive a 2xx status in the response if everything is okay.
Cool! Now the Conversations API knows where to deliver WhatsApp messages from your customers.
Step Five: Test your assistant
Nothing more is needed to publish your assistant through WhatsApp. Now you can test it!
1. From your test device with WhatsApp installed, write a message to your WhatsApp Business Account Number and wait for the Rasa assistant’s response.

Cool! Your Rasa assistant can now talk with anyone on WhatsApp!
More?
Utilizing Rasa’s platform you can make your assistant smarter. Look at the official Handle Business Logic tutorial and level up your assistant. For example, you may want the assistant to collect specific information such as customer phone numbers.
By overriding the TyntecOutputChannel’s methods (for example, send_image_url or send_attachment), your assistant can reply with a snappy meme using an image message or with a funny cat video using a video message. Moreover, you send replies with buttons in cooperation with WhatsApp interactive messages. Look at the documentation of the TyntecOutputChannel’s base class OutputChannel for more information about all the methods that can be overridden.
If you want to protect the assistant’s /webhooks/tyntec/webhook endpoint against unauthorized messages, you can register the webhook with a custom header containing a bearer token. Then, you check the request headers in the blueprint’s receive function before parsing the request body and throw an error response if the request does not include the token.
Once you have built an assistant that can handle the most important happy path stories, you can use a Rasa X tool to improve your assistant. It can help you to listen to your users and use those insights to improve your AI.