WhatsApp Business API | Integration for the Microsoft Bot Framework
Do you want to have your Microsoft bot more accessible? What about adding WhatsApp as one of the channel options? If that sounds good, look no further.
In this tutorial, you will learn how to integrate a simple Echo bot built from the Microsoft Bot Framework with the WhatsApp channel in the tyntec Conversations API. This integration allows your bot to receive WhatsApp messages and reply to them with ease.
You will need
-
- Your tyntec API key from your tyntec account.
-
- Your WABA phone number that has been assigned to you by tyntec.
-
- A mobile phone with the WhatsApp application not associated with your WABA.
-
- Your favourite text editor or IDE with TypeScript highlighting.
-
- Node.js installed.
-
- Yeoman and its generator for Microsoft Bot Framework installed.
-
- An ngrok account and the binary installed.
-
- Postman installed.
Step One: Build an Echo bot
Let’s create artificial intelligence!
1. Use Yeoman to generate an Echo bot.
<div class="geshifilter"><pre class="javascript geshifilter-javascript">$ yo botbuilder
Welcome to the Microsoft Bot Builder generator v4.15.0.

<span class="me1">Detailed</span> documentation can be found at https<span class="sy0">:</span><span class="co1">//aka.ms/botbuilder-generator</span>

<span class="sy0">?</span> What<span class="st0">'s the name of your bot? my-chat-bot
? What will your bot do? Demonstrate integration of the tyntec Conversations API and the Microsoft Bot Framework
? What programming language do you want to use? TypeScript
? Which template would you like to start with? Echo Bot - https://aka.ms/bot-template-echo
? Looking good.  Shall I go ahead and create your new bot? Y</span></pre></div>
2. Change your current working directory to the bot folder. It has the same name as your bot.
<span class="geshifilter"><code class="php geshifilter-php">$ cd my<span class="sy0">-</span>chat<span class="sy0">-</span>bot</code></span>Step Two: Install the WhatsApp adapter
Connect the bot to the tyntec Conversations API. You are going to add a new endpoint that is able to process WhatsApp messages.
1. Install the WhatsApp adapter.
<div class="geshifilter"><pre class="php geshifilter-php">$ npm install botbuilder<span class="sy0">-</span>adapter<span class="sy0">-</span>tyntec<span class="sy0">-</span>whatsapp</pre></div>2. Add a new /api/whatsapp/messages endpoint to the src/index.ts file:
<div class="geshifilter"><pre class="php geshifilter-php">import axios from <span class="st_h">'axios'</span><span class="sy0">;</span>
import <span class="br0">{</span> TyntecWhatsAppAdapter <span class="br0">}</span> from <span class="st_h">'botbuilder-adapter-tyntec-whatsapp'</span><span class="sy0">;</span>

<span class="kw2">const</span> axiosInstance <span class="sy0">=</span> axios<span class="sy0">.</span>create<span class="br0">(</span><span class="br0">)</span><span class="sy0">;</span>

<span class="kw2">const</span> whatsAppAdapter <span class="sy0">=</span> <span class="kw2">new</span> TyntecWhatsAppAdapter<span class="br0">(</span><span class="br0">{</span>
	axiosInstance<span class="sy0">,</span>
	tyntecApikey<span class="sy0">:</span> process<span class="sy0">.</span>env<span class="sy0">.</span>TyntecApikey
<span class="br0">}</span><span class="br0">)</span><span class="sy0">;</span>

server<span class="sy0">.</span>post<span class="br0">(</span><span class="st_h">'/api/whatsapp/messages'</span><span class="sy0">,</span> async <span class="br0">(</span>req<span class="sy0">,</span> res<span class="br0">)</span> <span class="sy0">=></span> <span class="br0">{</span>
	await whatsAppAdapter<span class="sy0">.</span>processActivity<span class="br0">(</span>req<span class="sy0">,</span> res<span class="sy0">,</span> <span class="br0">(</span>context<span class="br0">)</span> <span class="sy0">=></span> myBot<span class="sy0">.</span>run<span class="br0">(</span>context<span class="br0">)</span><span class="br0">)</span><span class="sy0">;</span>
<span class="br0">}</span><span class="br0">)</span><span class="sy0">;</span></pre></div>
3. Remove the speak argument from the call of the MessageFactory.text method in the src/bot.ts file
<div class="geshifilter"><pre class="php geshifilter-php">
this<span class="sy0">.</span>onMessage<span class="br0">(</span>async <span class="br0">(</span>context<span class="sy0">,</span> <a href="http://www.php.net/next"><span class="kw3">next</span></a><span class="br0">)</span> <span class="sy0">=></span> <span class="br0">{</span>
             <span class="kw2">const</span> replyText <span class="sy0">=</span> `<span class="kw1">Echo</span><span class="sy0">:</span> $<span class="br0">{</span> context<span class="sy0">.</span>activity<span class="sy0">.</span>text <span class="br0">}</span>`<span class="sy0">;</span>
<span class="sy0">-</span>            await context<span class="sy0">.</span>sendActivity<span class="br0">(</span>MessageFactory<span class="sy0">.</span>text<span class="br0">(</span>replyText<span class="sy0">,</span> replyText<span class="br0">)</span><span class="br0">)</span><span class="sy0">;</span>
<span class="sy0">======================================</span>
<span class="sy0">+</span>            await context<span class="sy0">.</span>sendActivity<span class="br0">(</span>MessageFactory<span class="sy0">.</span>text<span class="br0">(</span>replyText<span class="br0">)</span><span class="br0">)</span><span class="sy0">;</span>
             await <a href="http://www.php.net/next"><span class="kw3">next</span></a><span class="br0">(</span><span class="br0">)</span><span class="sy0">;</span>
         <span class="br0">}</span><span class="br0">)</span><span class="sy0">;</span></pre></div>
Step Three: Configure and run the bot
Now, you will configure and run the bot.
1. Add the following environment variable to the .env file:
- TyntecApikey – your tyntec API key
2. Start the bot.
<span class="geshifilter"><code class="php geshifilter-php">$ npm start</code></span>3. Create a publicly accessible URL using ngrok.
<span class="geshifilter"><code class="php geshifilter-php">$ path<span class="sy0">/</span>to<span class="sy0">/</span>ngrok http <span class="nu0">3978</span></code></span>4. Copy the displayed public URL (such as https://843fc8776770.ngrok.io).
Note: This setup is suitable only for development. For production use, you have to deploy your app properly!
Step Four: Register the bot’s webhook
Let the tyntec Conversations API know where to deliver WhatsApp messages from customers or your users. You’re going to subscribe to the bot’s webhook via an API call in Postman.
1. From the api-collection/conversations/v3 directory, import the Conversations V3.7.postman_collection.json into Postman.
2. Authorize Postman with your tyntec API key and your WABA phone number. Right-click the collection and select Edit. Then go to Variables and set the apiKey variable to your tyntec API key. Also, set the wabaNumber variable to your WABA phone number.
3. Let’s set up the webhook! Open the WhatsApp folder. Inside, open the Configurations folder and select the Configure the callback for a specific number request and change the inboundMessageUrl in the body to the public URL of your api/whatsapp/messages endpoint (for example, https://843fc8776770.ngrok.io/api/whatsapp/messages). This request will subscribe to your URL to incoming message events.
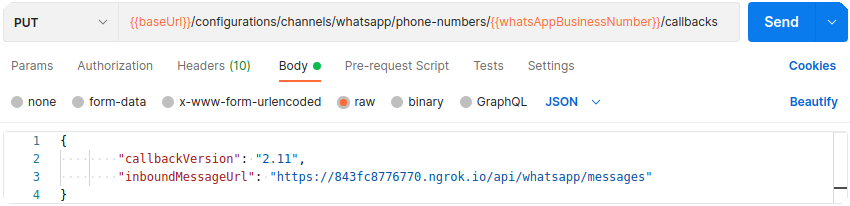
4. Hit the Send button. You should receive a 2xx status in the response if everything is okay.
Cool! Now Conversations API knows where to deliver WhatsApp messages from your customers.
Step Five: Try it out!
Now you can test all the functionalities.
1. Grab your phone and send a warm message to your WhatsApp Business Account number. In a few moments, you will see a reply from your own Echo bot.
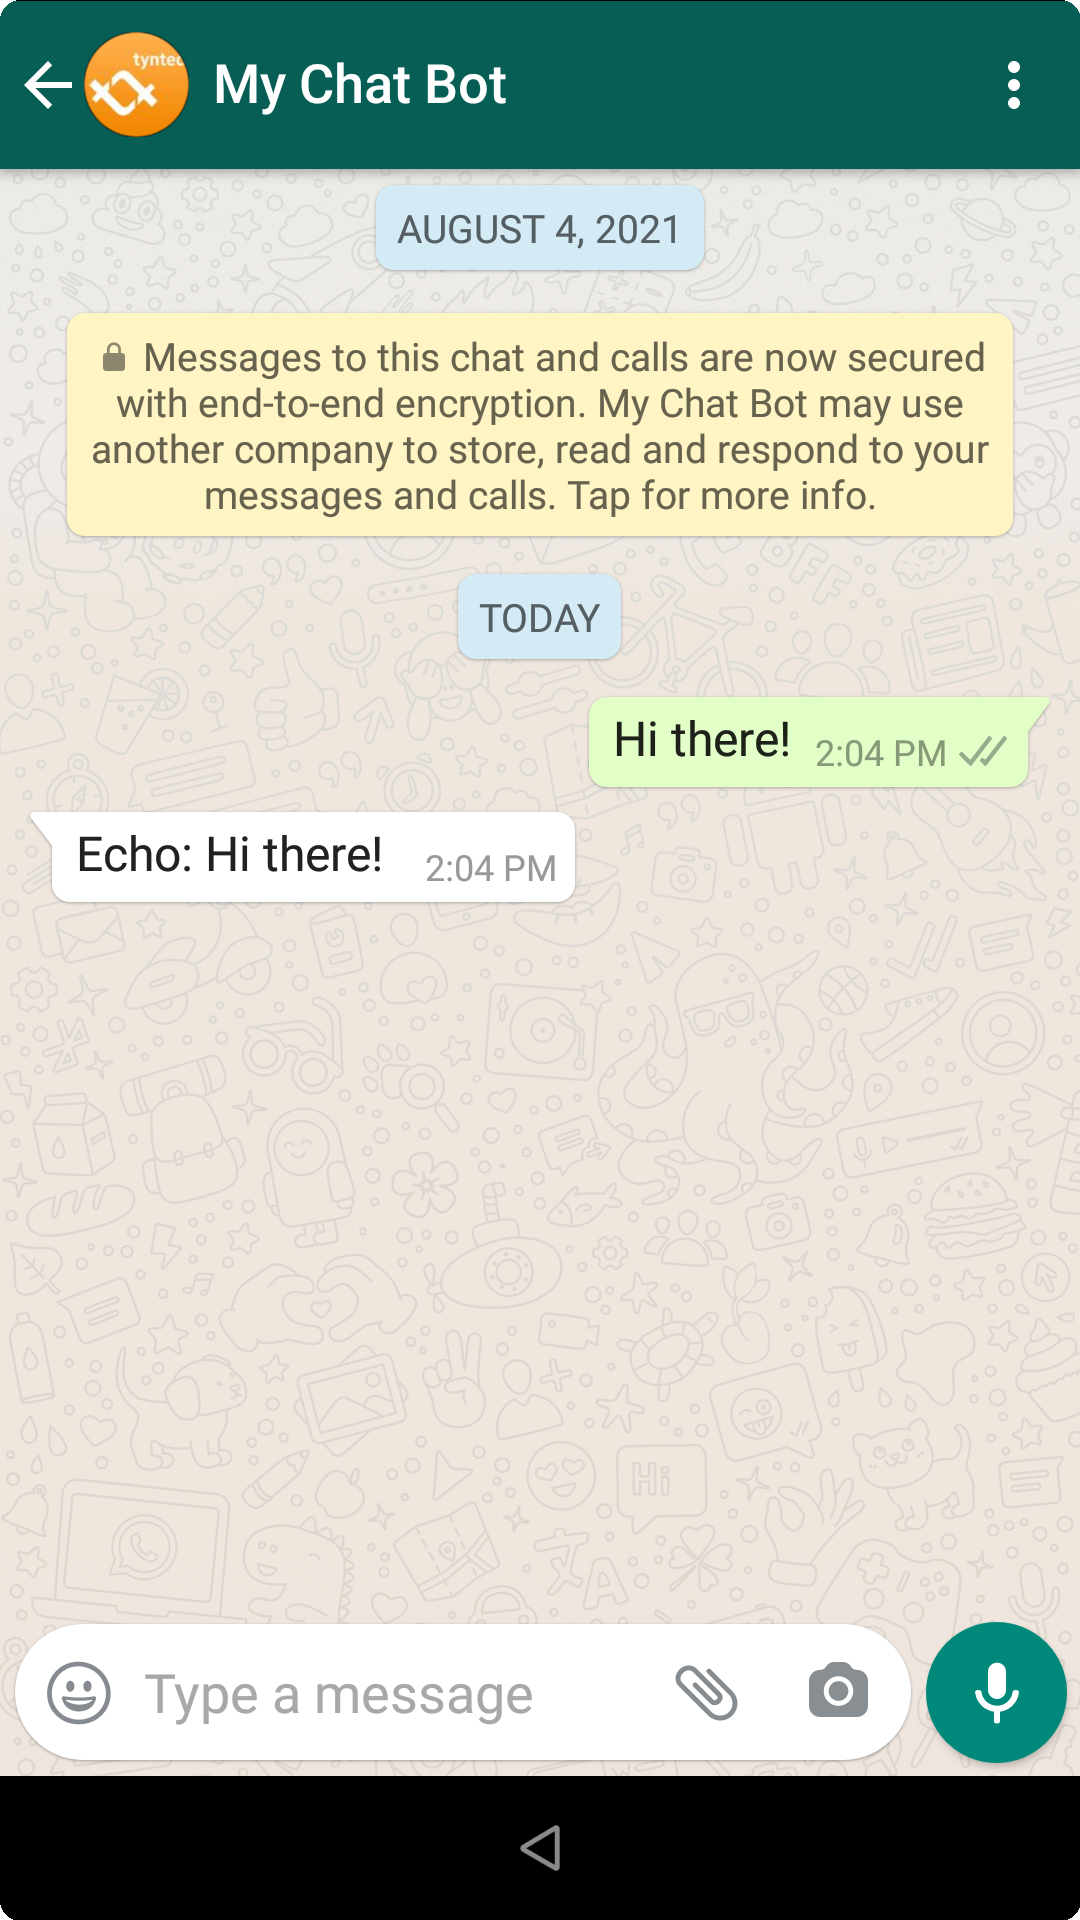
Voila! Your Microsoft bot now can interact with your WhatsApp contacts!
More?
For example, you may want to reply with a snappy meme using an image message or with a funny cat video using a video message. The adapter supports audio, document, image, sticker, template, text, and video messages.
To test a more sophisticated bot, you can generate the Core Bot using the Yeoman generator and connect it to the WhatsApp adapter.
For production use, you can deploy your bot following the deployment tutorial.
In order to protect the bot’s api/whatsapp/messages endpoint against unauthorized messages, you can register the webhook with a custom header containing a bearer token. Then, you can override the adapter’s parseTyntecWebhookRequest method and check the request headers before parsing the request body. See the API Reference for more information: https://github.com/tyntec/botbuilder-adapter-tyntec-whatsapp/tree/master/docs