WhatsApp Business API | Integration for Slack
Hi there!
Would you like to see WhatsApp messages from your customers and respond to them in your Slack?
In this tutorial, you will learn to integrate WhatsApp with Slack threads. The integration will allow you to receive WhatsApp messages in a Slack channel and respond to them in threads right from the Slack channel. A new thread will be created for each customer phone number and the thread will be used to converse with this particular customer.
You will need
-
- Your WABA phone number that has been approved by tyntec
-
- A phone with WhatsApp as a testing customer
-
- Your tyntec API key from your tyntec account
-
- A Slack workspace
-
- Node.js and your favourite text editor or IDE with JavaScript highlighting
-
- MongoDB installed locally for development
-
- A ngrok account and the binary installed for development
Step One: Get your integration app ready
For your quick start with integrations, we’ve prepared a sample integration app. Let’s look at what the code does. Notice these important pieces of the code:
- /routes handle callback endpoints, which are:
- /tyntec/forwardWAMessage, which receives WhatsApp messages from tyntec and sends them to the Slack API.
- /slack/, which handles slash commands.
- /slack/forwardSlackMessage, which receives messages from Slack and calls tyntec’s Conversations API to send them to WhatsApp.
- /models contain database schemas.
- server.js does basic management and binds the logic together.
Let’s just quickly get your app running:
1. Clone the api-samples repository and go to the wa-integrations/slack folder.
2. Install dependencies (and the nodemon module if you don’t have it yet):
<div class="geshifilter"><pre class="php geshifilter-php">npm install
npm install nodemon</pre></div>
3. Run ngrok in a terminal to expose your local server on the internet:
<div class="geshifilter"><pre class="php geshifilter-php">ngrok http <span class="nu0">3000</span></pre></div>4. Copy .env-example to .env and set environment variables in .env:
- WABA_NUMBER — your WABA number in the international format without the leading +/00
- TYNTEC_API_KEY — your API key from tyntec to authenticate calls to Conversations API
- SLACK_BOT_TOKEN — you’ll set this one later
- MONGO_URL — optional MongoDB location (defaults to the local instance mongodb://127.0.0.1:27017/tyntec)
- PORT — optional server port (defaults to 3000)
5. And finally, start the app in another terminal:
<div class="geshifilter"><pre class="php geshifilter-php">nodemon server<span class="sy0">.</span>js</pre></div>So you have all the API endpoints in your app ready and running!
Note: This setup is suitable only for development. For production use, you have to deploy your app properly!
Step Two: Subscribe your webhook in tyntec
Let tyntec know where to deliver WhatsApp messages from customers. You’re going to subscribe your webhook via an API call in Postman.
1. Download our Postman collection, unpack and import it in Postman.
2. Right-click the collection and select Edit.
3. Go to Variables and set the apikey value to your tyntec API key.
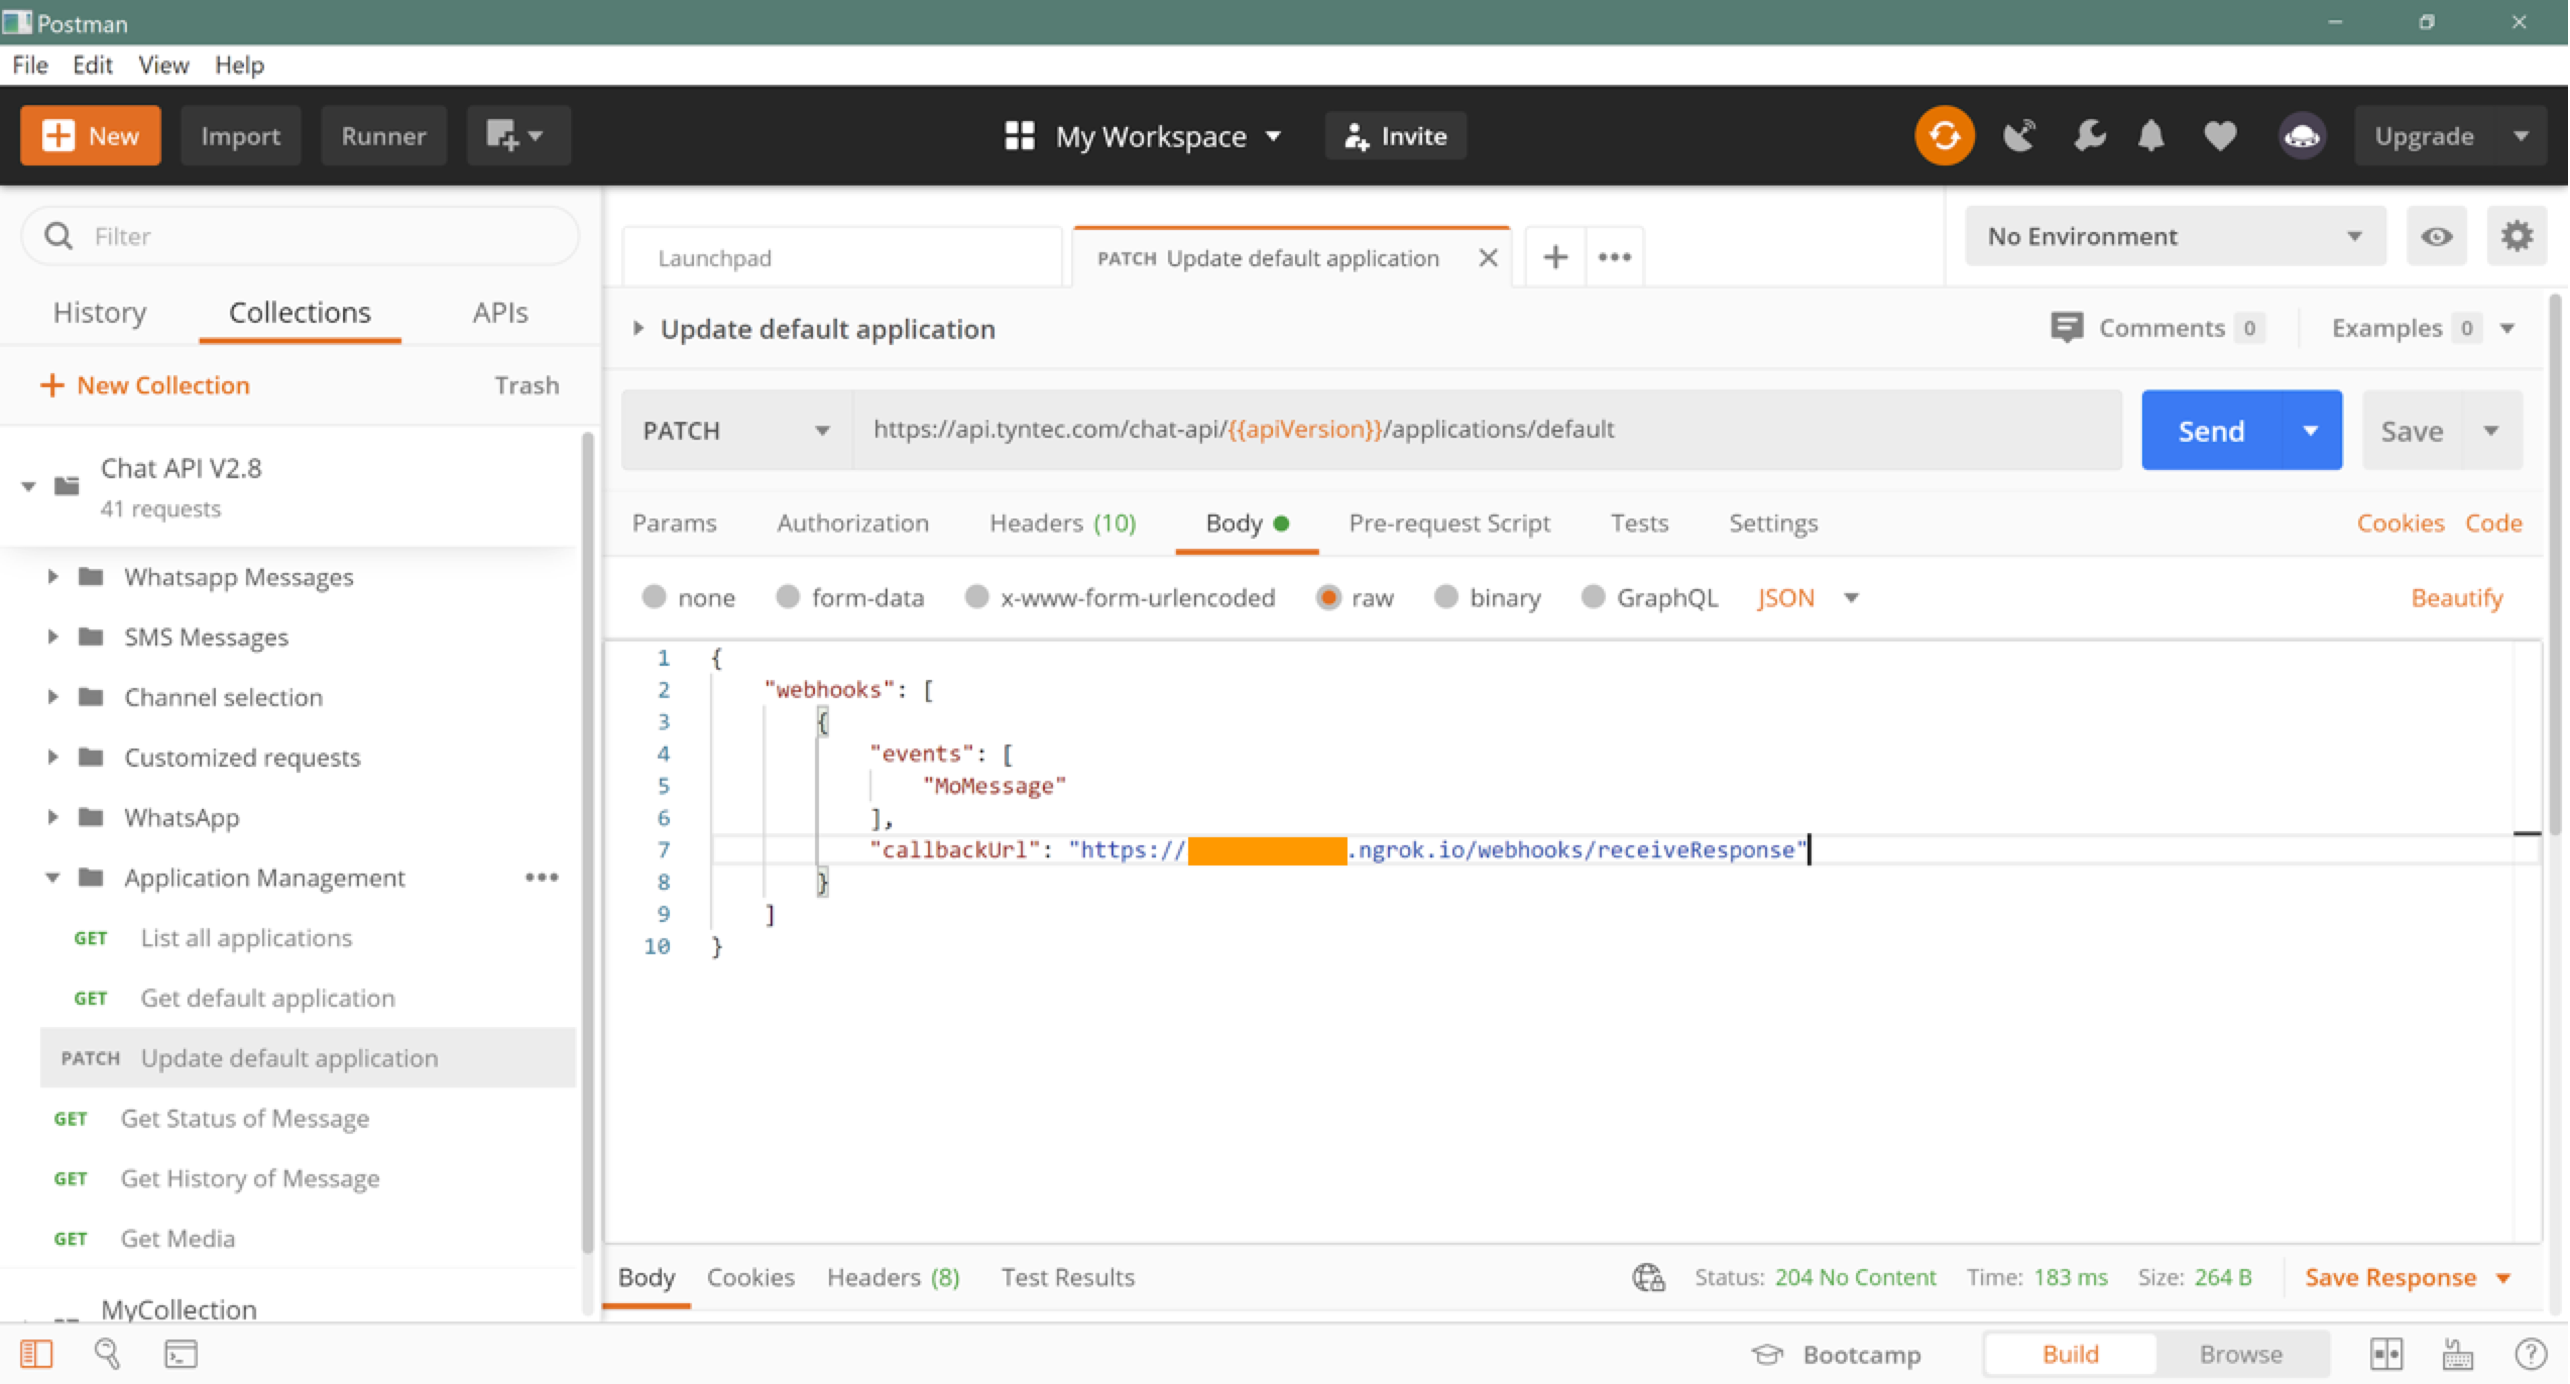
4. Go back to your collection and in the folder Application Management open the patch Update default application (see the reference for details).
5. Edit the Body to update the callbackUrl with your webhook for the MoMessage event. The request body should look like this:
<div class="geshifilter"><pre class="php geshifilter-php"><span class="br0">{</span>
  <span class="st0">"webhooks"</span><span class="sy0">:</span> <span class="br0">[</span><span class="br0">{</span>
    <span class="st0">"events"</span><span class="sy0">:</span> <span class="br0">[</span>
      <span class="st0">"MoMessage"</span>
    <span class="br0">]</span><span class="sy0">,</span>
    <span class="st0">"callbackUrl"</span><span class="sy0">:</span> <span class="st0">"https://<YOUR_SERVER>/tyntec/forwardWAMessage"</span>
  <span class="br0">}</span><span class="br0">]</span>
<span class="br0">}</span></pre></div>
Now hit Send and you should get the 204 status if everything was okay.
Cool! Now tyntec knows where to deliver WhatsApp messages from your customers.
Step Three: Configure Slack
Let’s connect your app with Slack. You are going to create an app, subscribe your webhooks through it, set scopes of permissions for it, install it in your Slack workspace, and finally add it to the channel. Phew, let’s do it!
1. Create a Slack app.
Go to http://api.slack.com > Your apps and hit the Create add App button.
Enter a name for your app and select a Slack workspace.
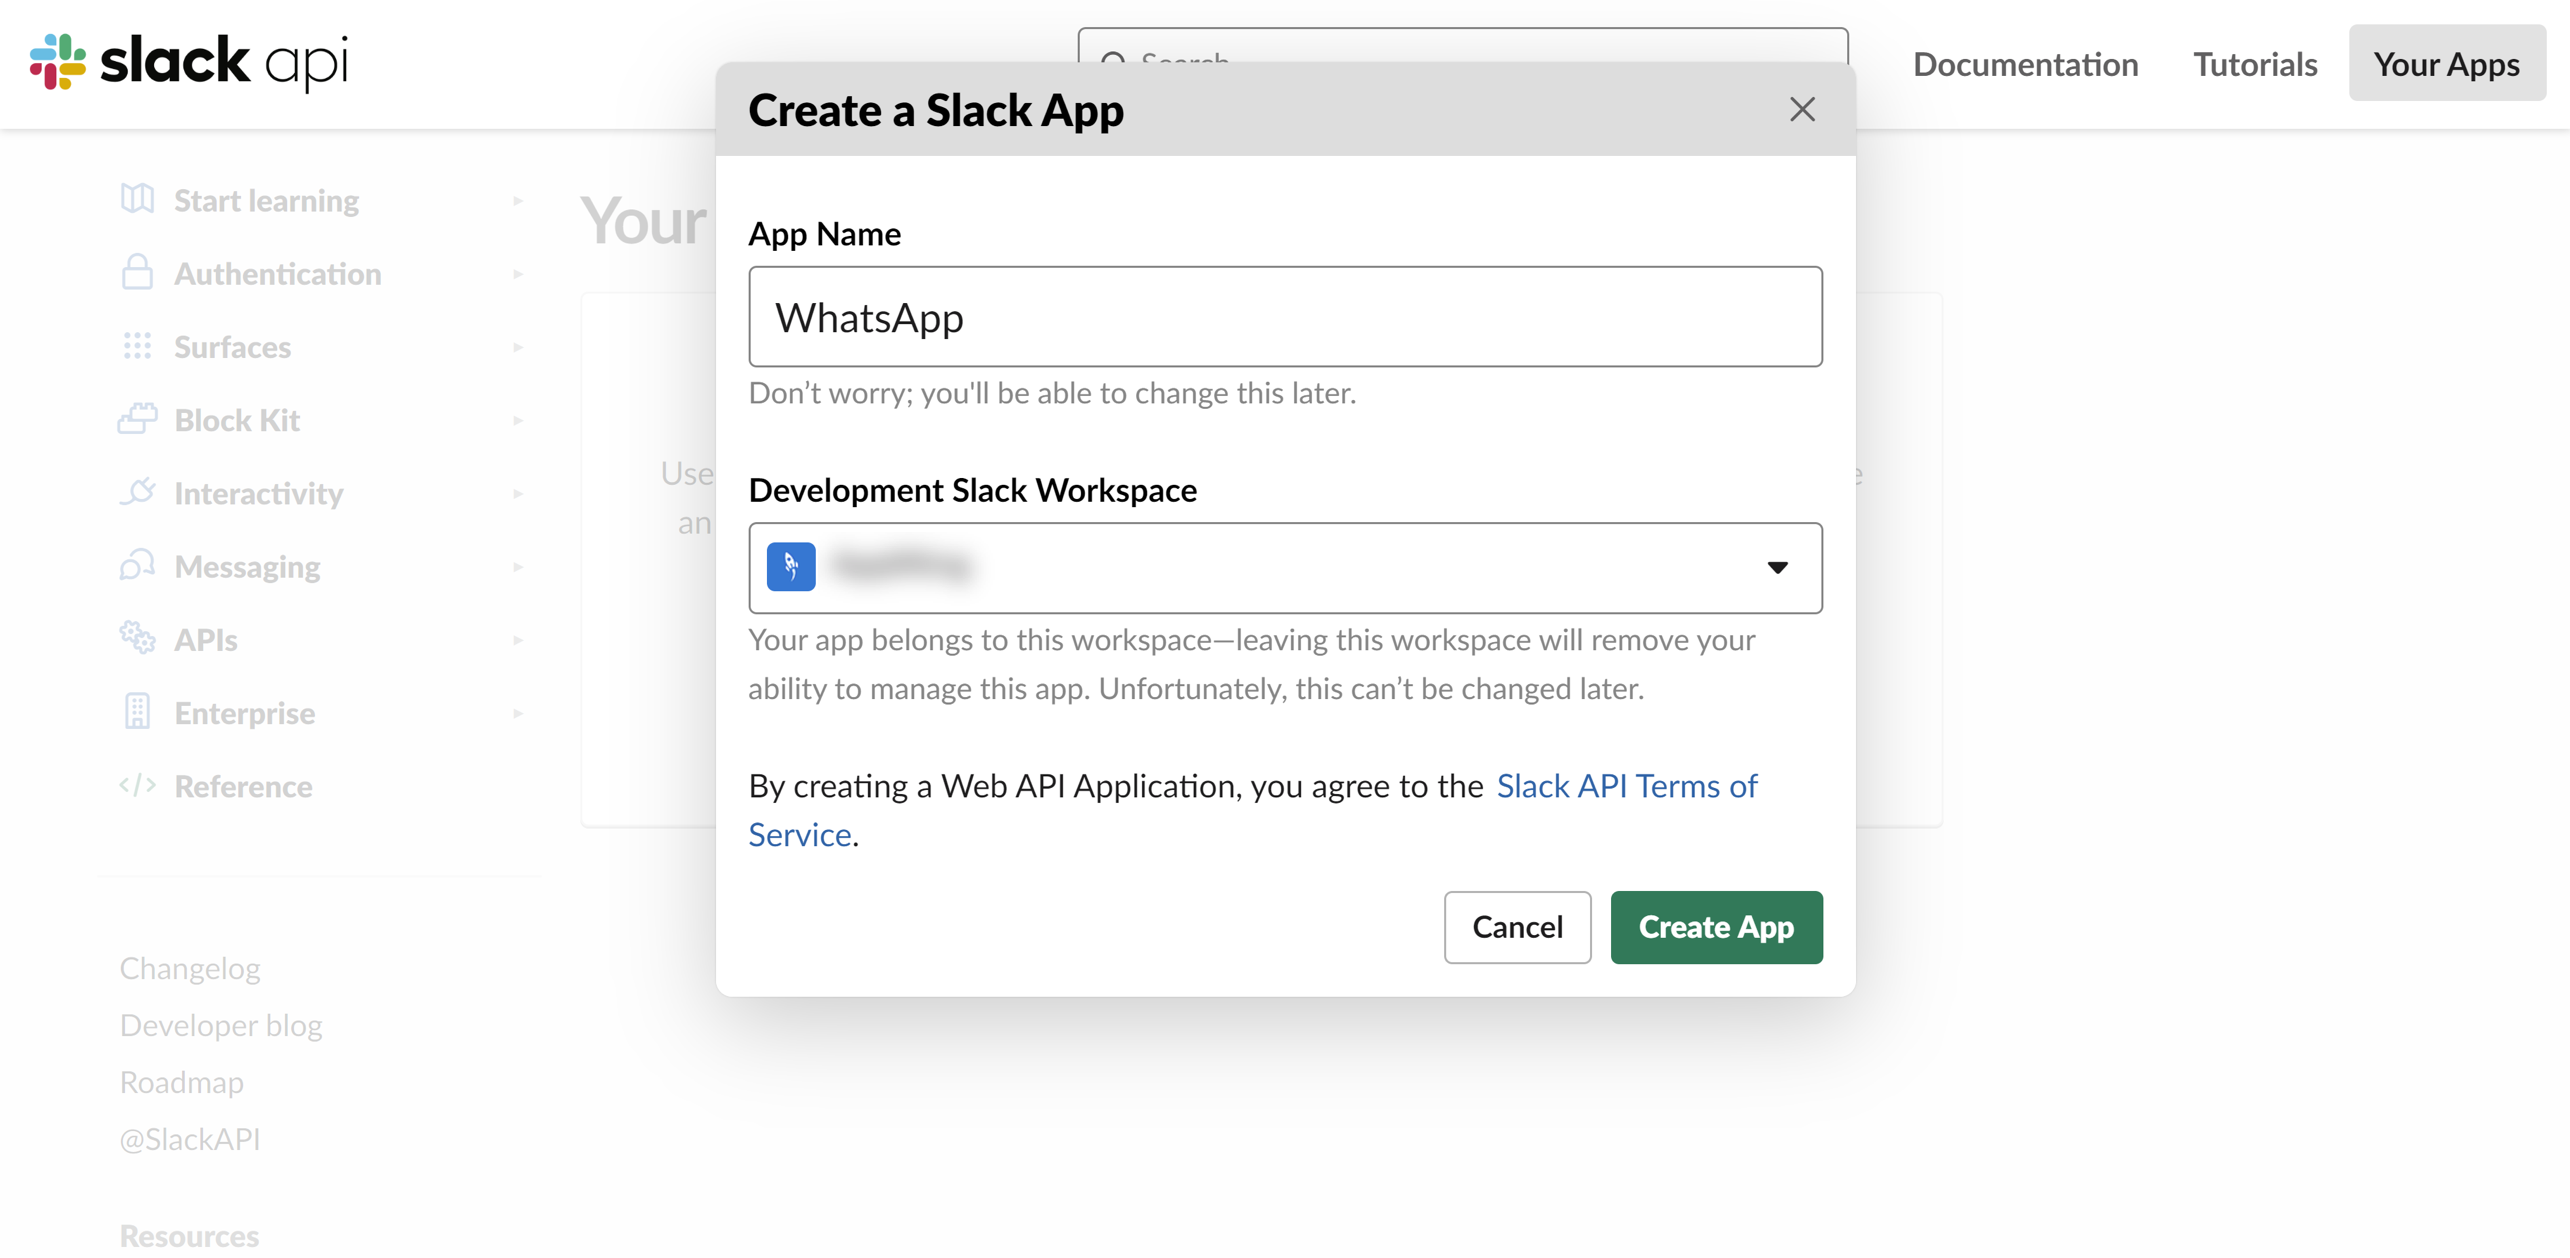
You may add a logo and set a color for your app in Basic Information > Display Information.
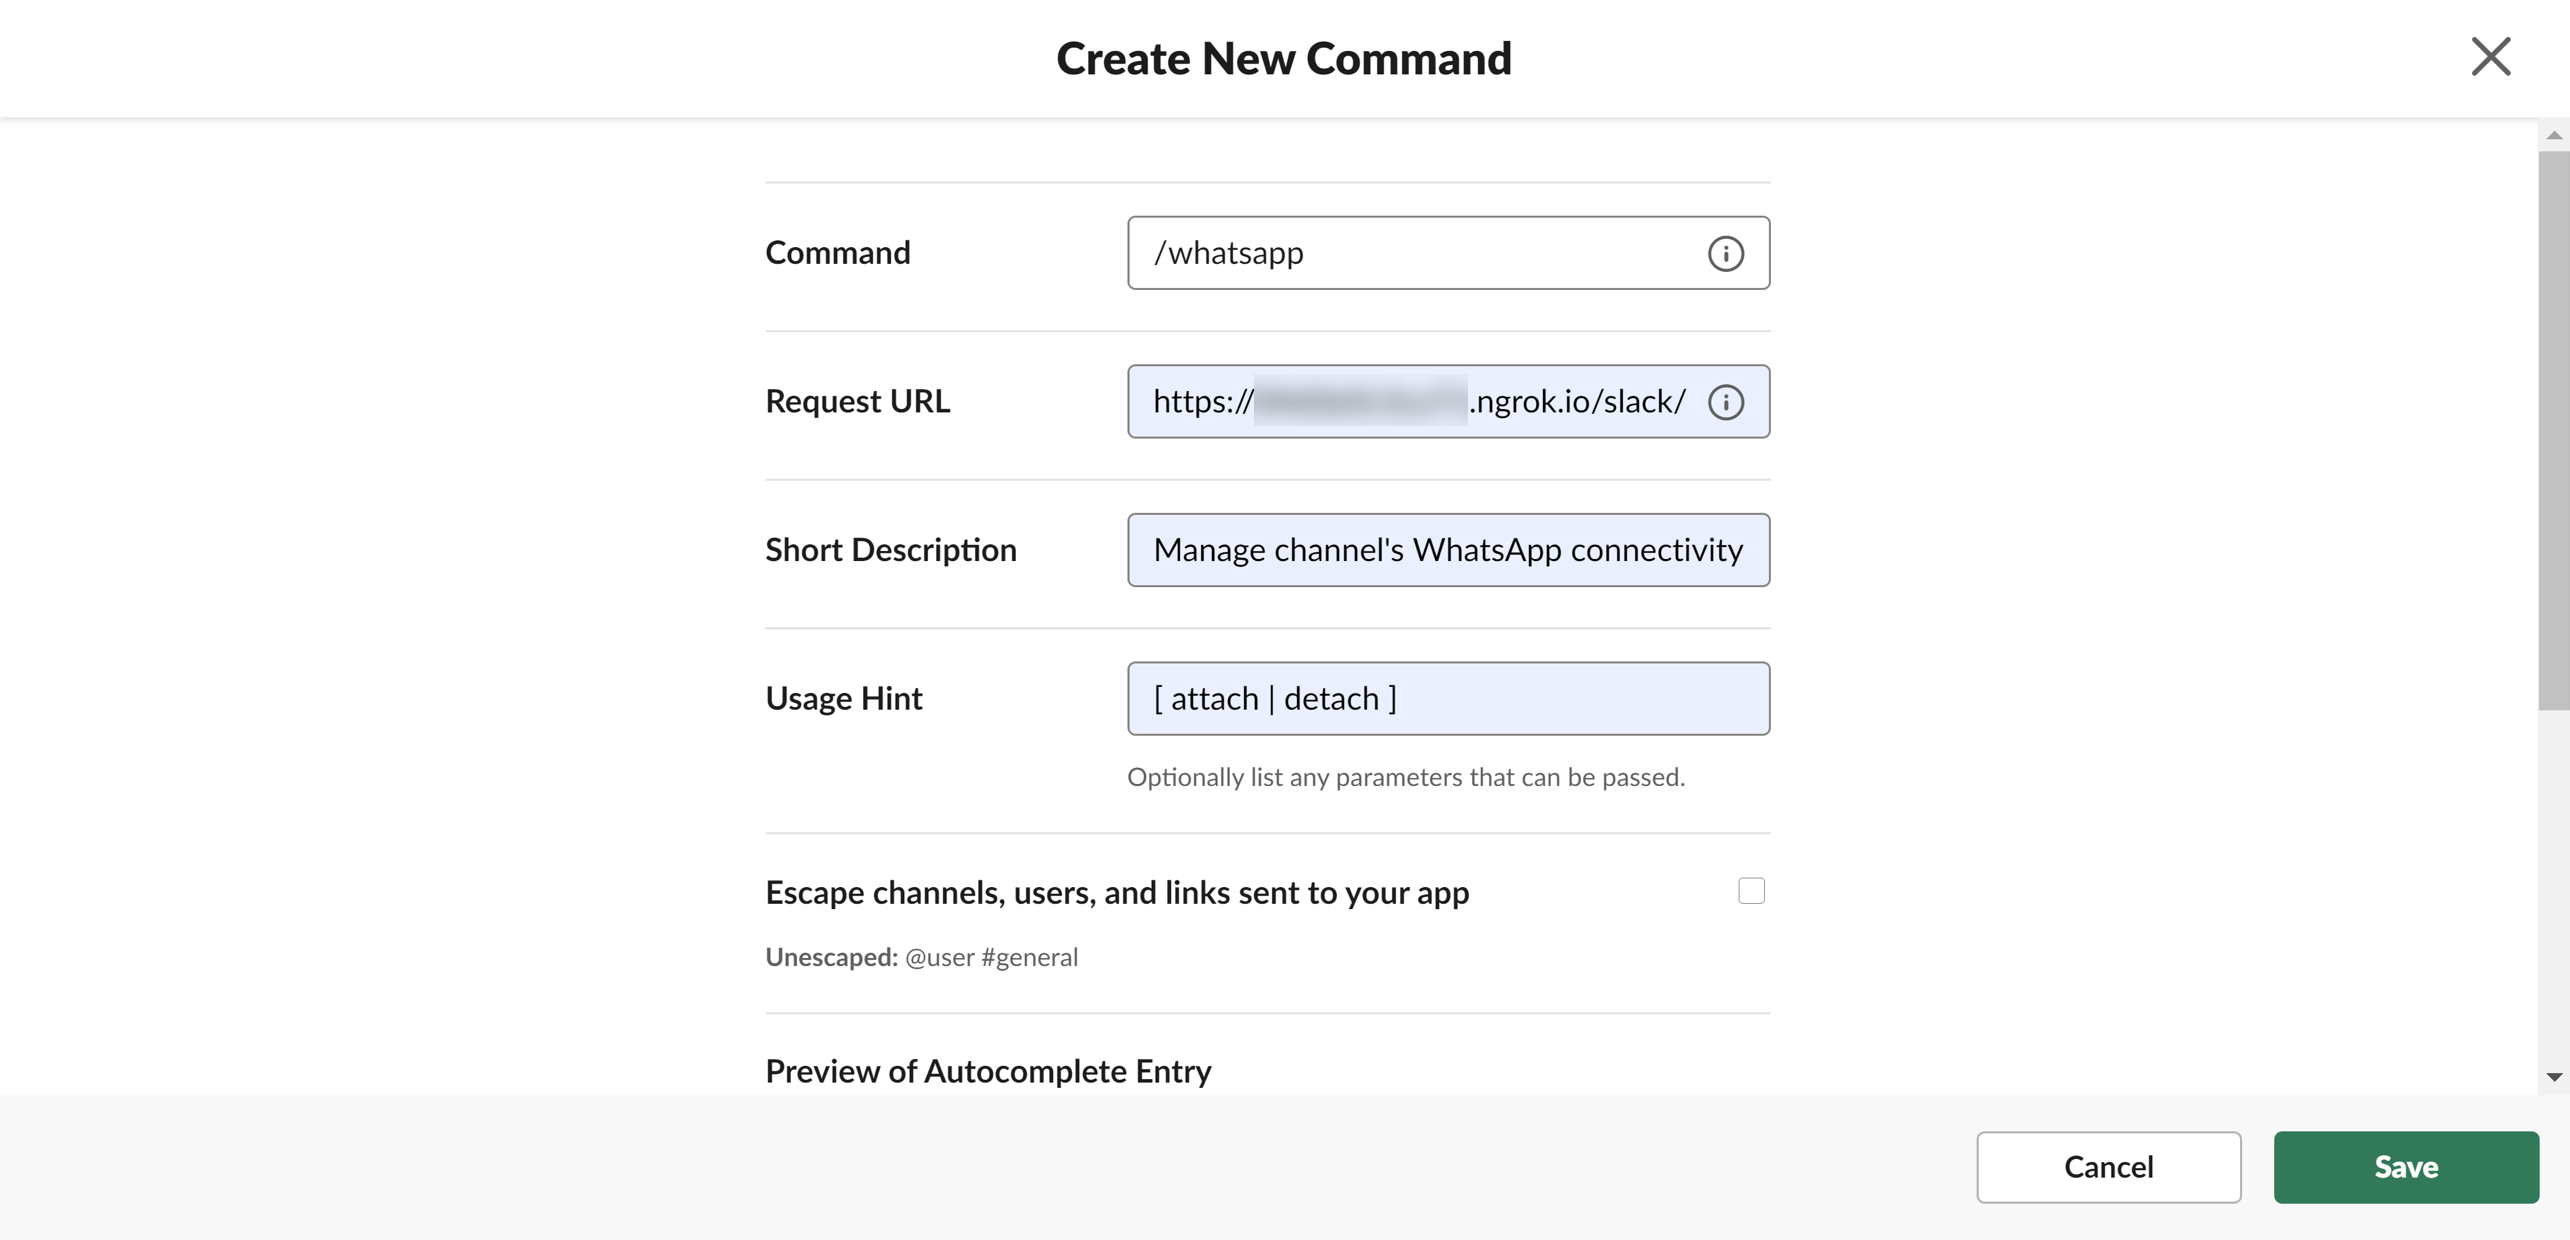
2. Define a slash command, which will help you to manage the connectivity of your app through a channel (such as initiating it).
Go to [Features] Slash Commands > Create New Command.
- Command: /whatsapp
- Request URL: https://<YOUR_SERVER>/slack/
- You may add a description and usage hint.
And Save the command.
Slack adds a bot user for you automatically. You may beautify its display name in [Features] App Home.
3. Subscribe your second Slack webhook to events. Go to [Features] Event Subscriptions, switch on Enable events, and enter your Request URL for message events subscription:
https://<YOUR_SERVER>/slack/forwardSlackMessage
Slack should verify your Request URL and display Verified next to it to acknowledge that as shown below. (Your app must be running for this to happen.)
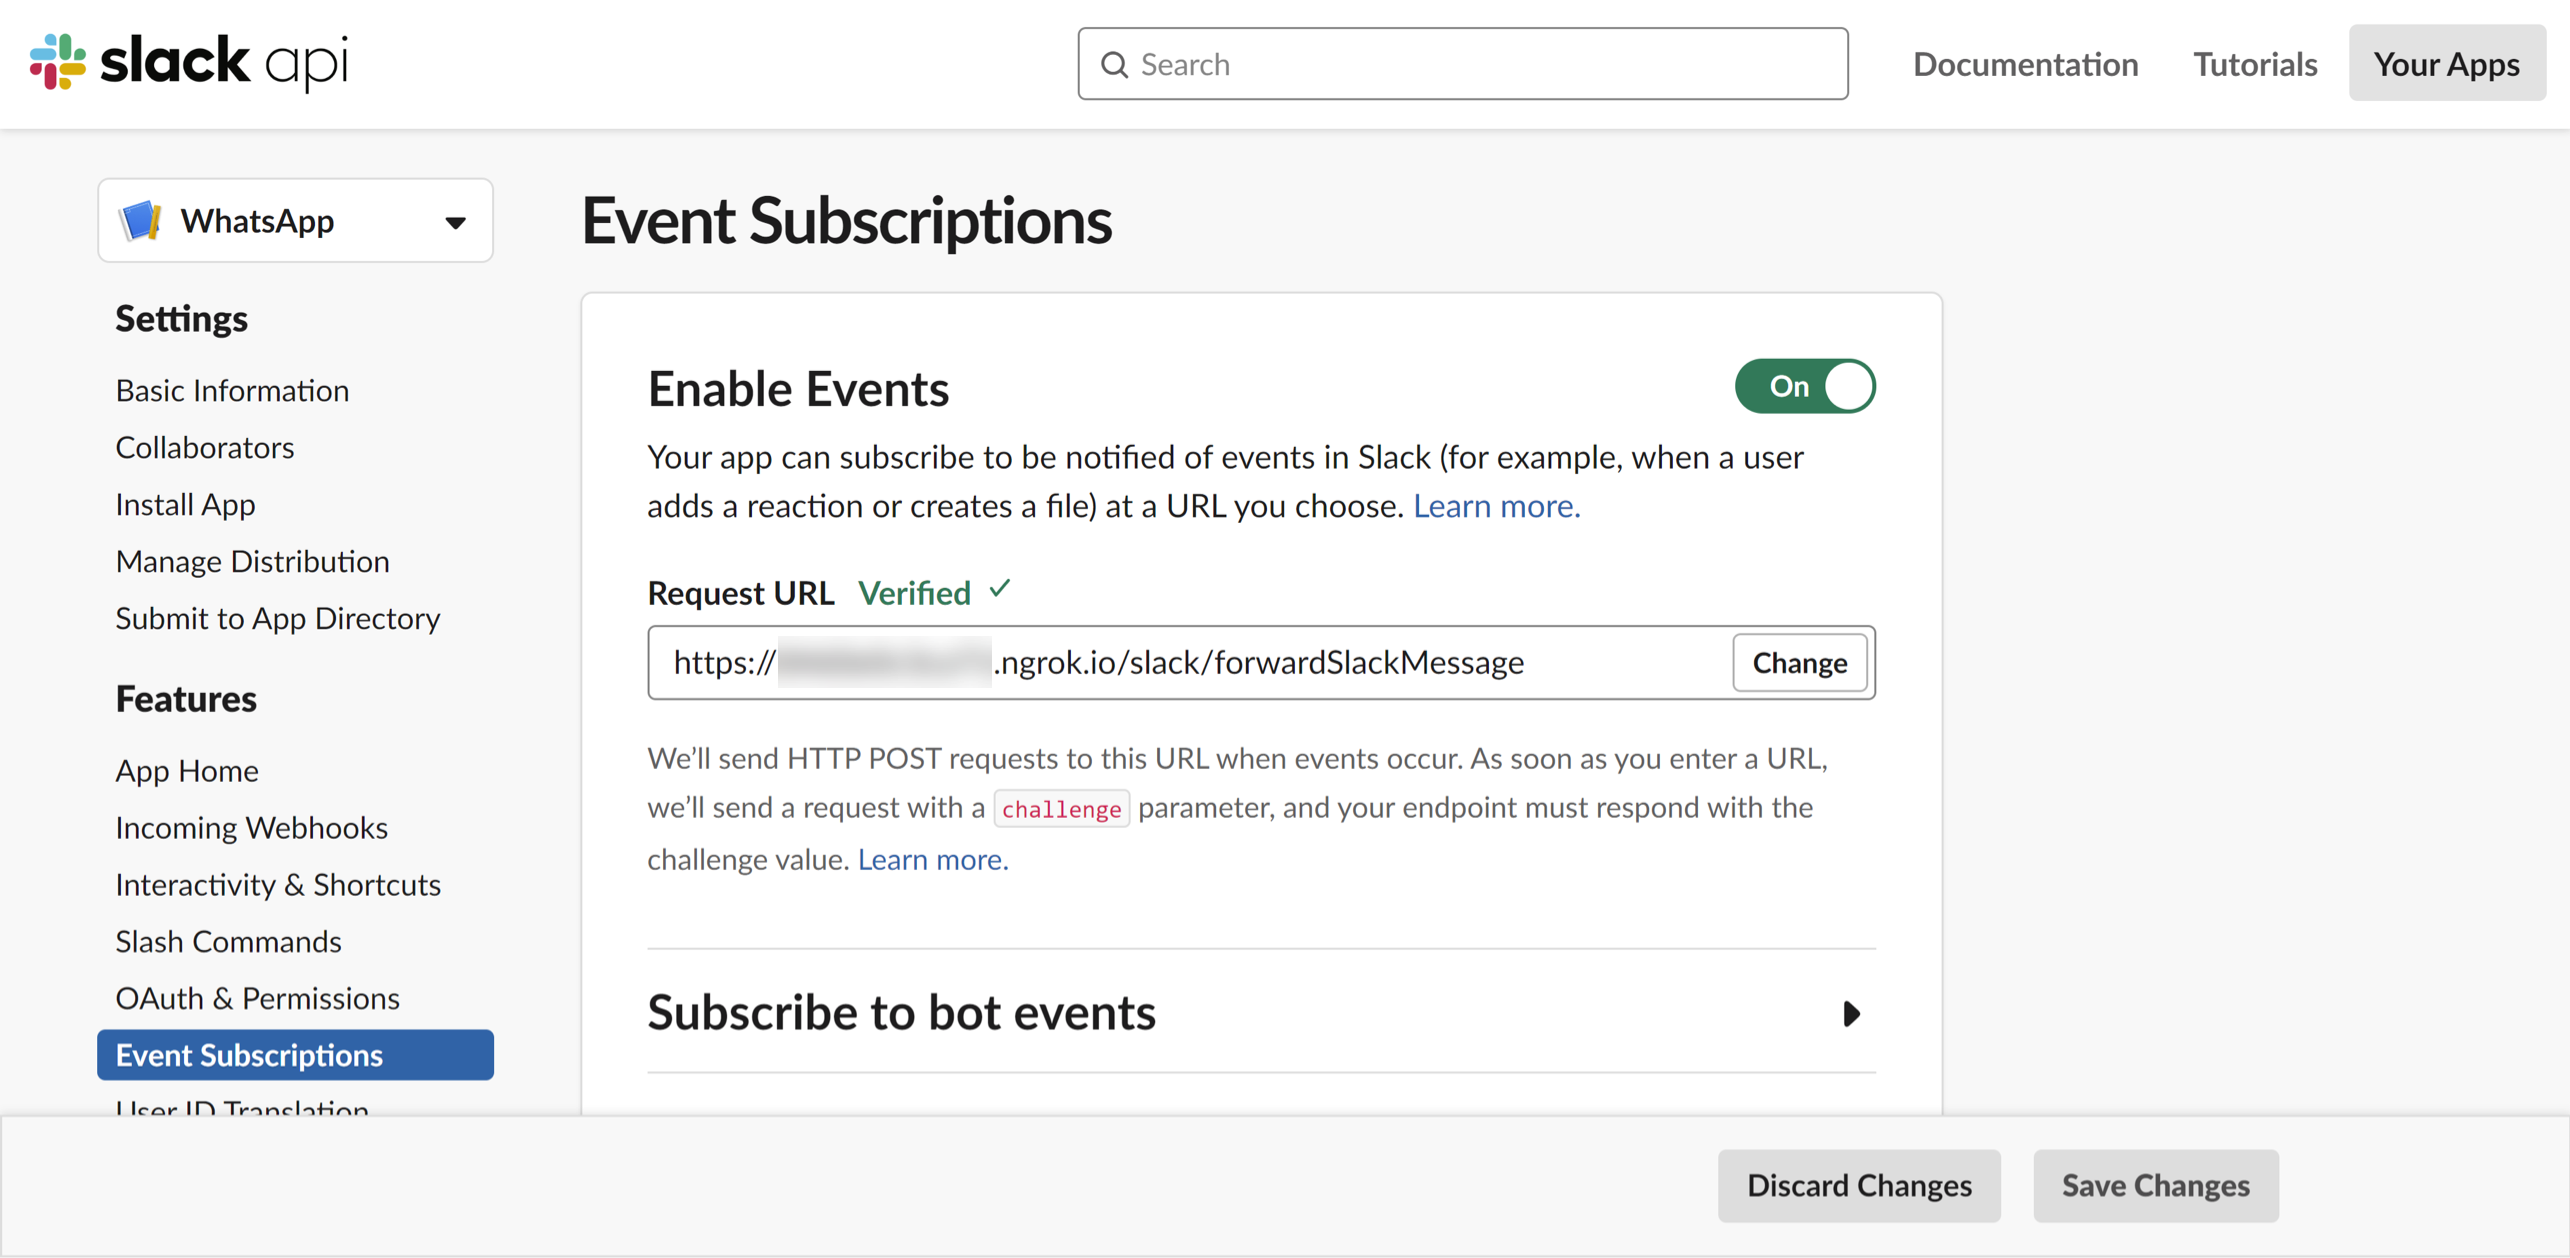
Subscribe to bot events message.channels and message.groups (these will allow your app to work in both public or private channel) and Save Changes.
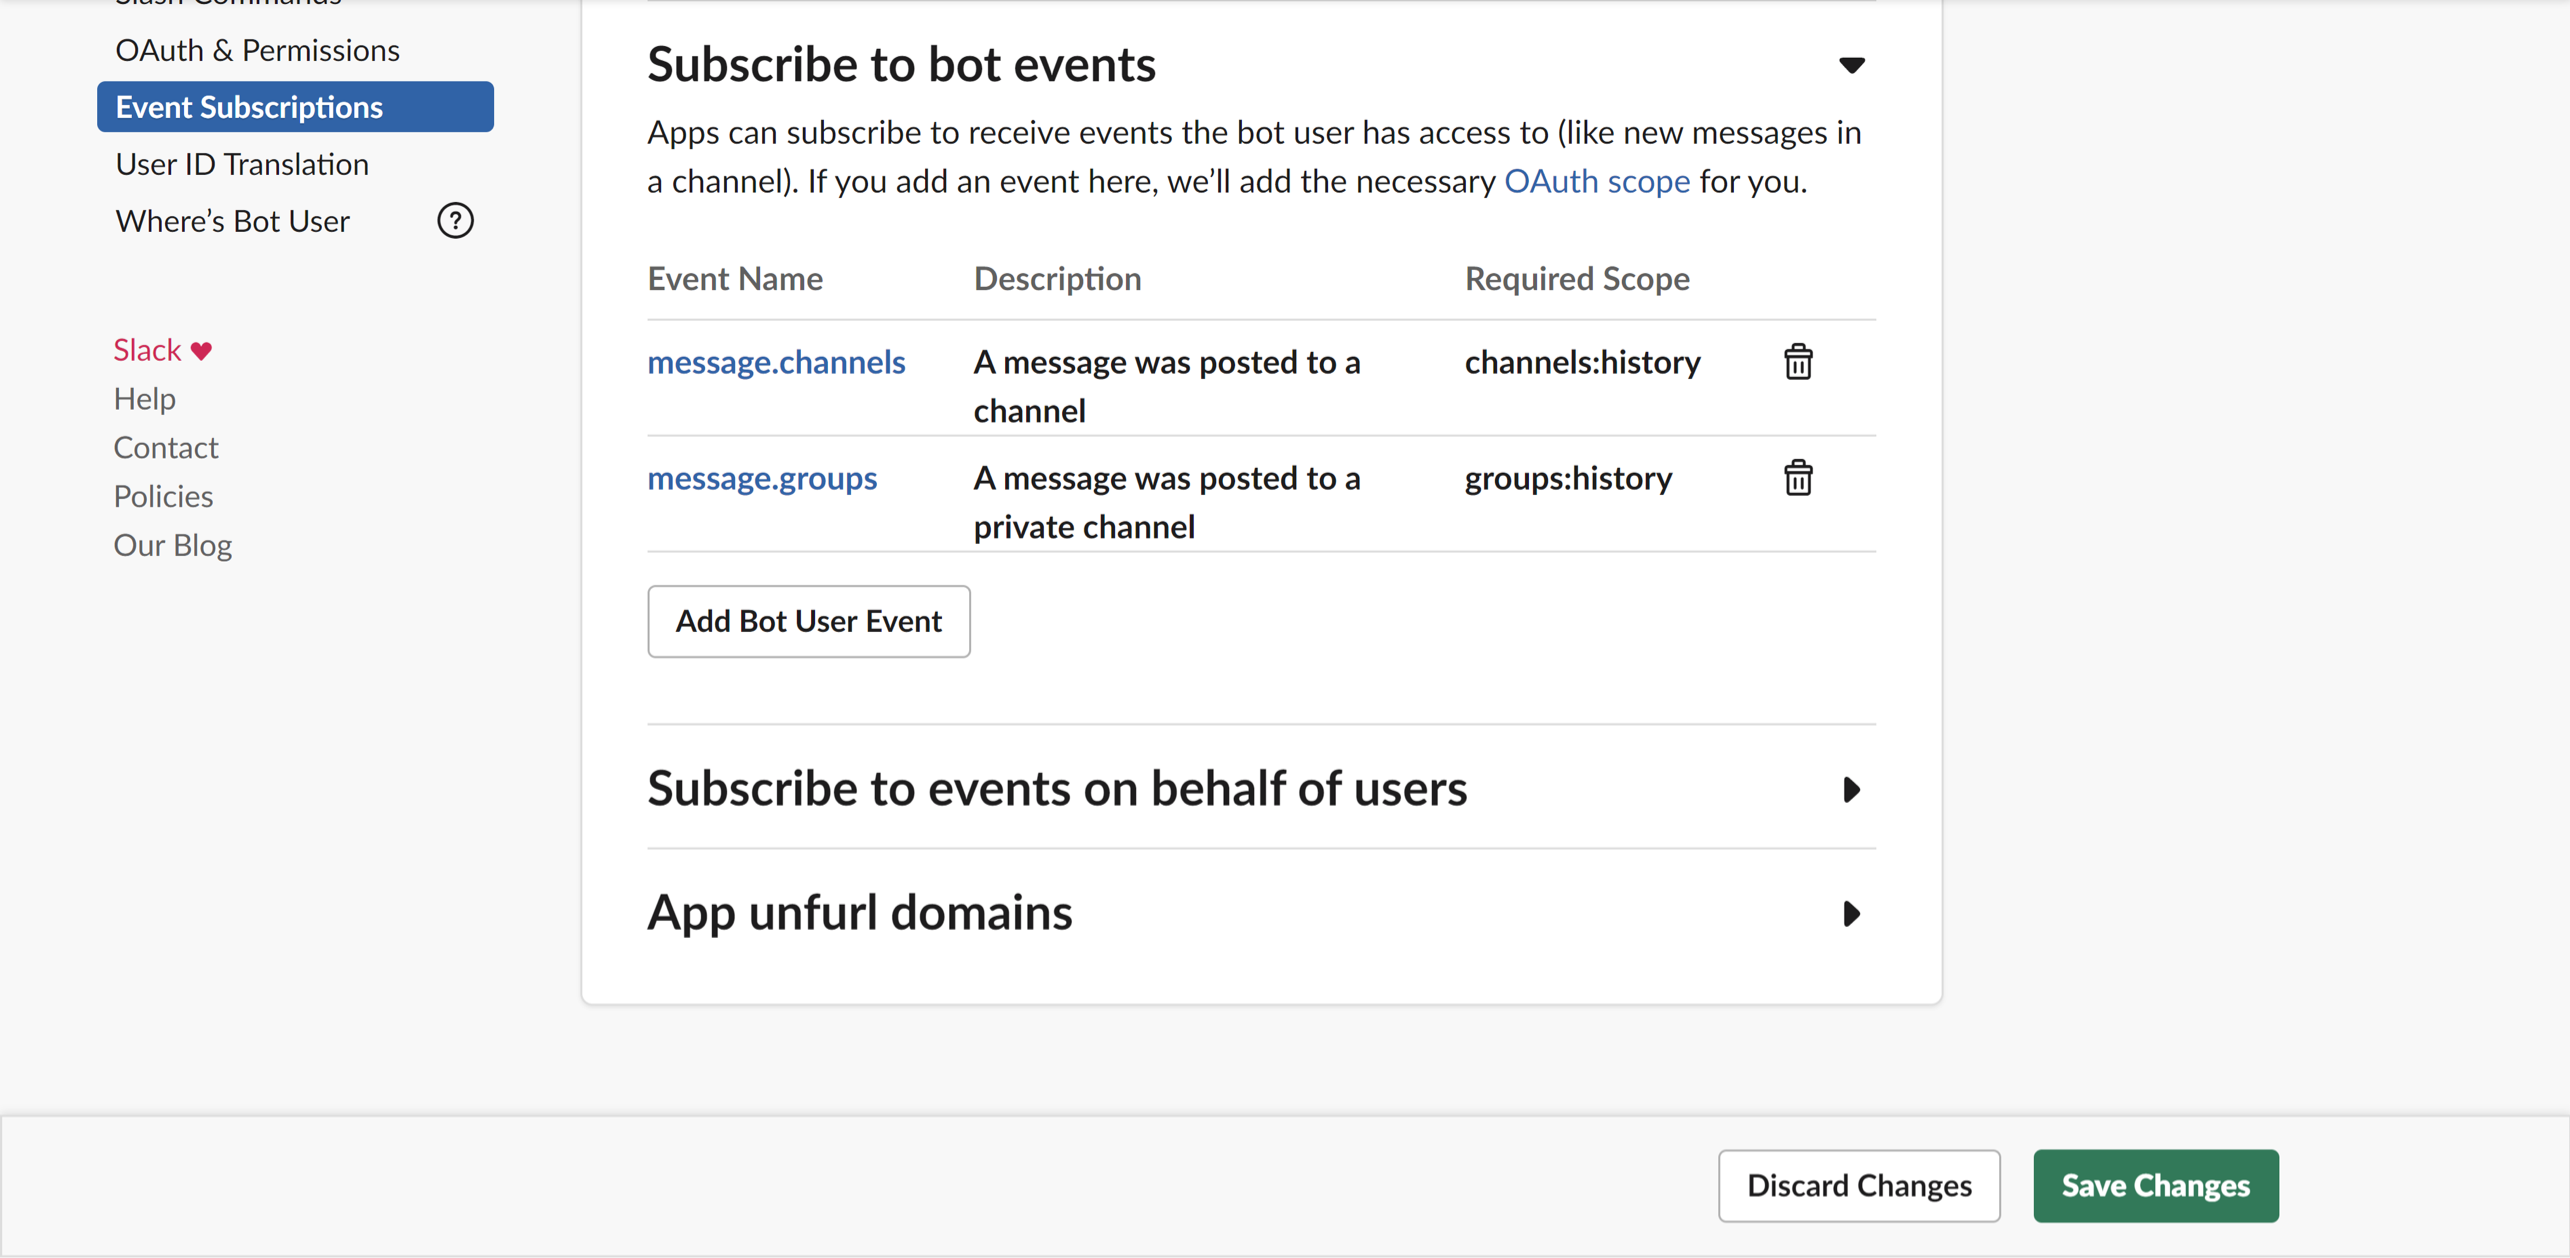
Slack will add the required scopes for these events to your app automatically.
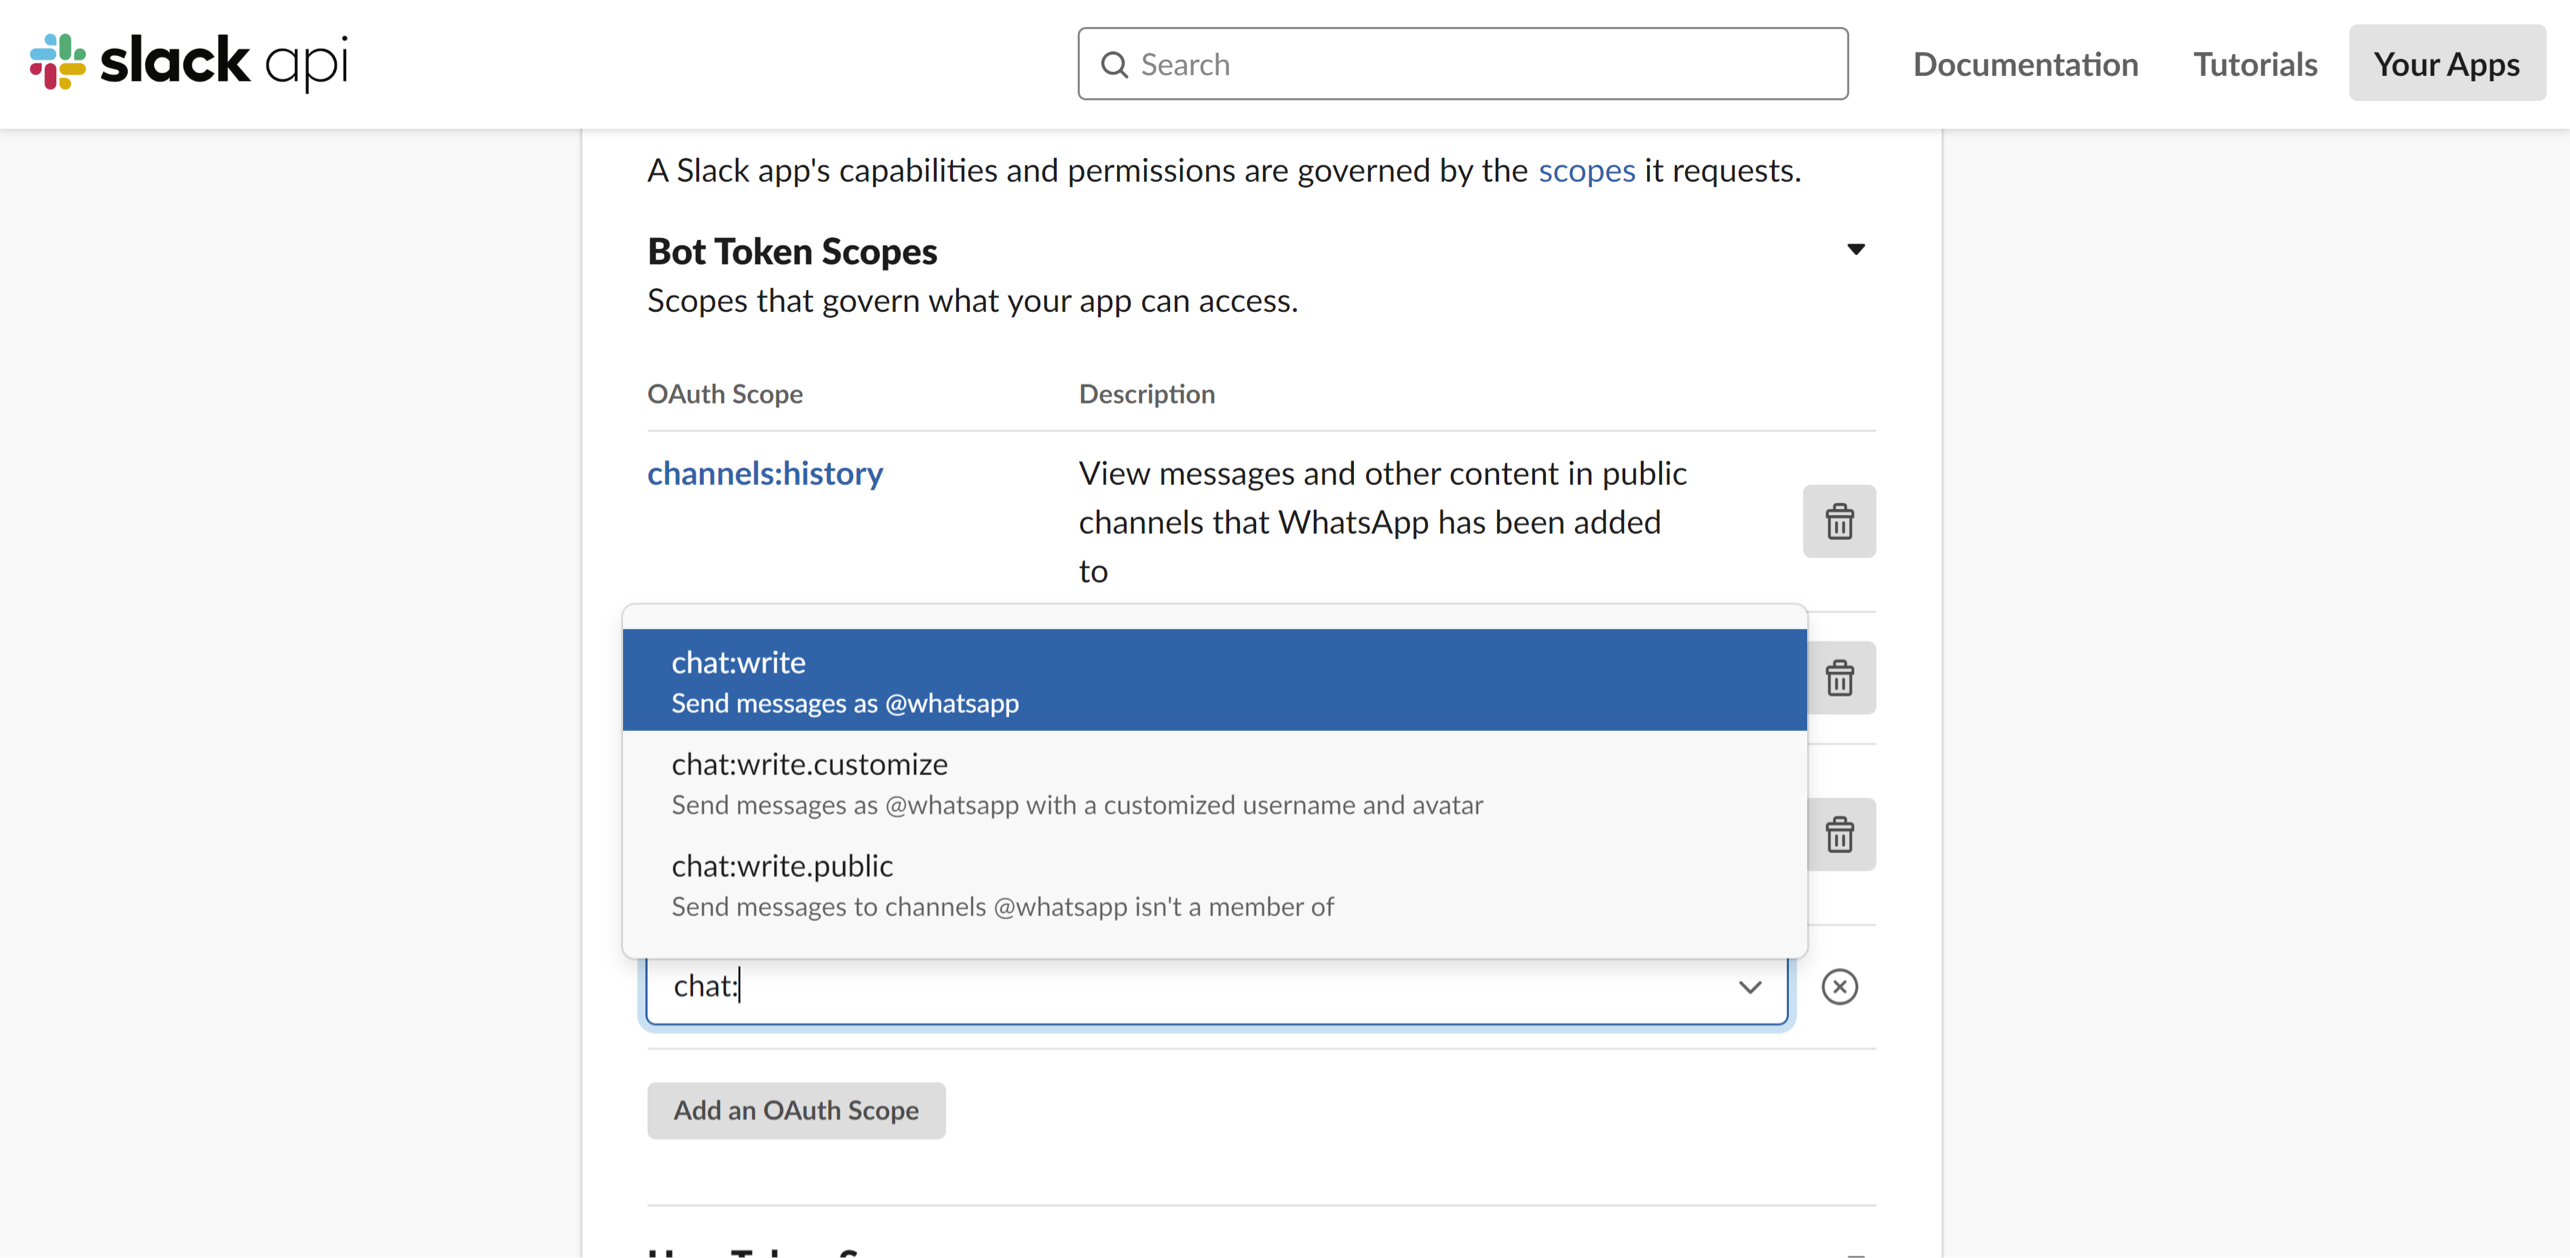
4. Enable your bot to send messages to Slack. Go to OAuth & Permissions > Scopes, to Bot Token Scopes, add chat:write permission.
5. Let’s install your app in your workspace! Go to [Settings] Install App and hit the Install App button. Allow the requested permissions.
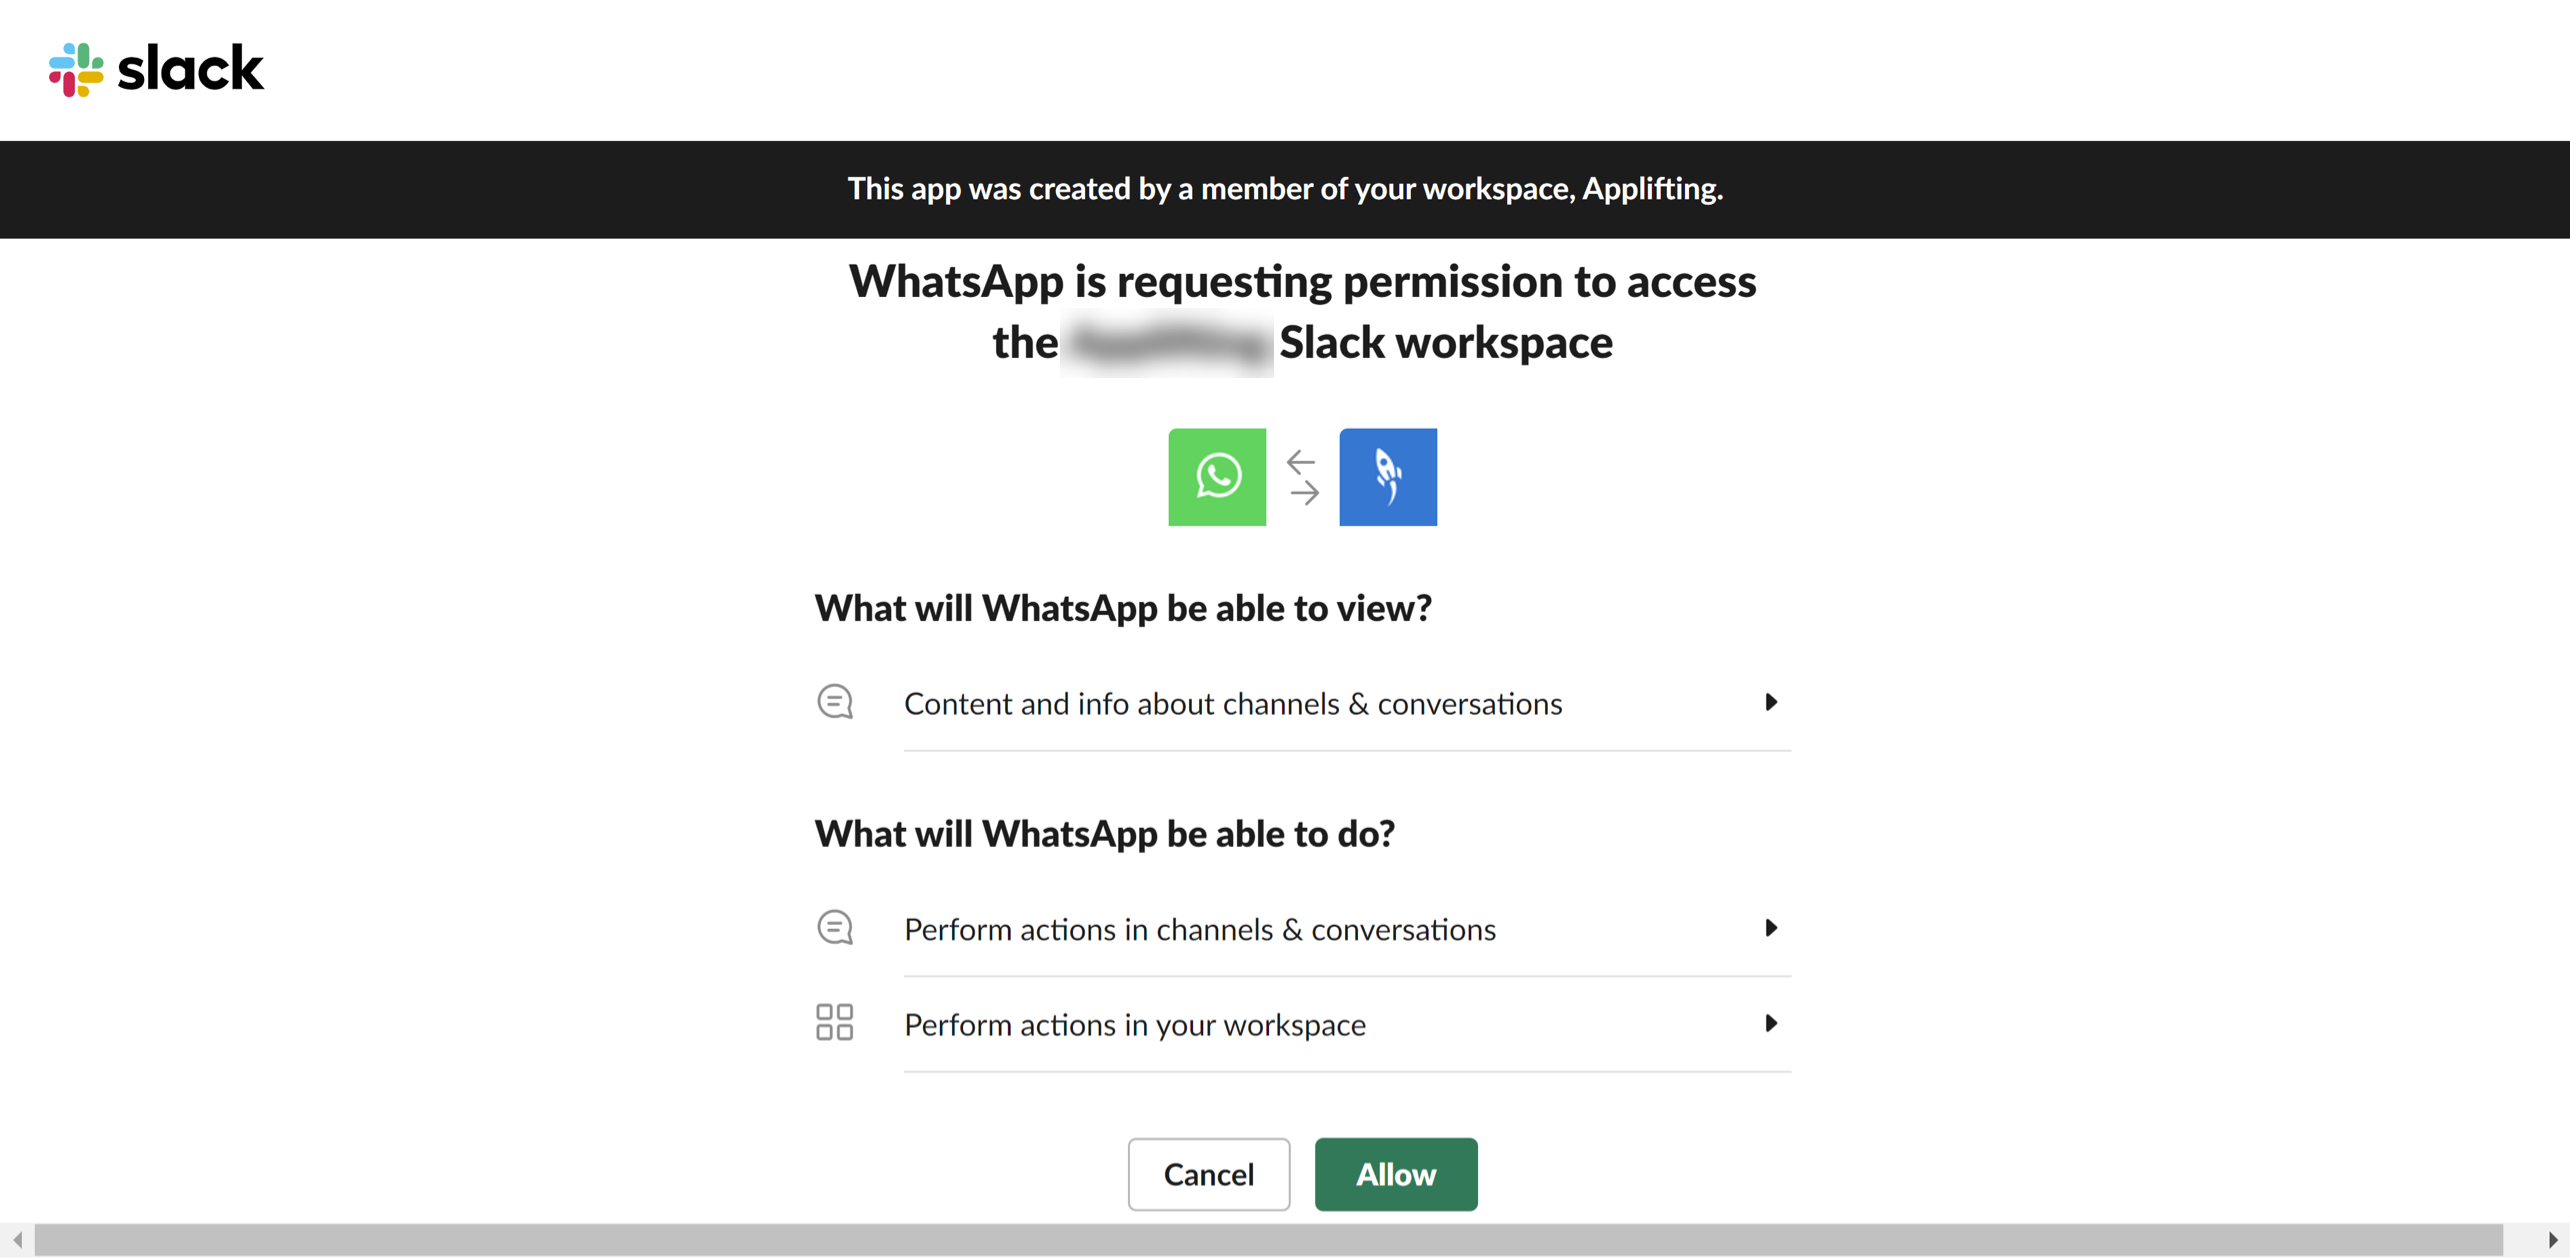
Slack will display OAuth tokens. Copy the Bot User Token.
6. Edit your .env file and set SLACK_BOT_TOKEN to the Bot User Token value you’ve copied from Slack API.
…and reload the environment variables using the rs command, which will restart your app:
<div class="geshifilter"><pre class="php geshifilter-php">rs</pre></div>7. Now you need to add your app to your channel.
In the header of your channel, click the Add an app link, find your app, and hit the Add button.
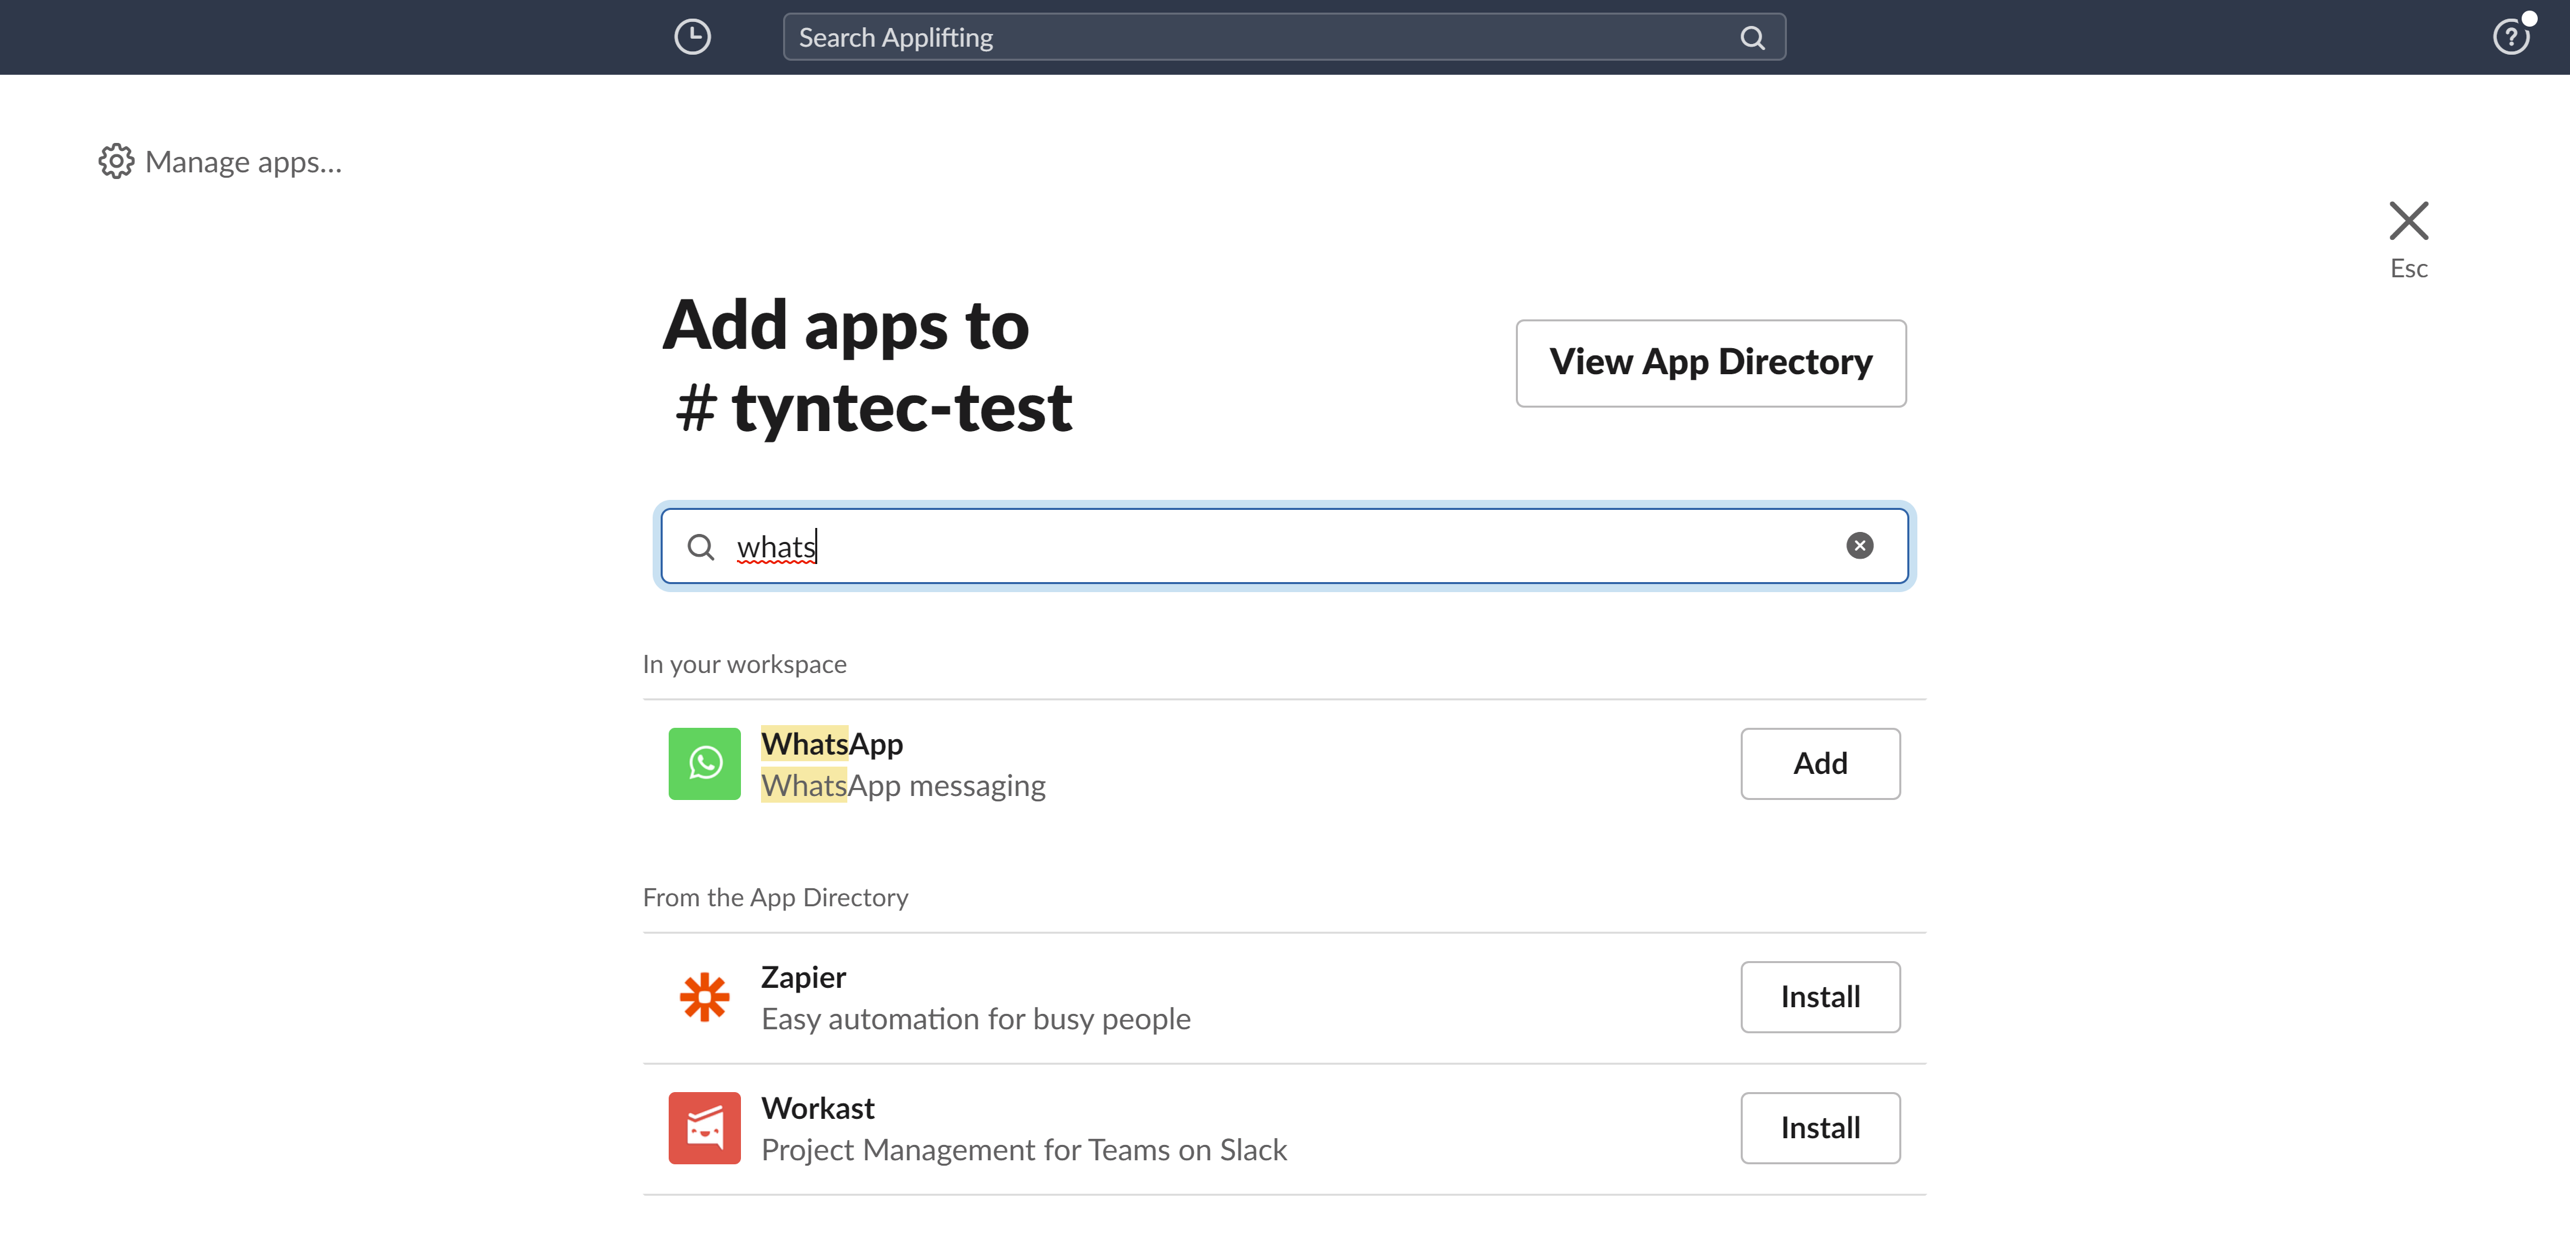
The app should report as added.
8. Let your app know that it will be using this channel, initiate it.
Type the initiation slash command in the Message… input field:
<div class="geshifilter"><pre class="php geshifilter-php"><span class="sy0">/</span>whatsapp </pre></div>The app should acknowledge that it has been attached to the channel (initiated), like this:
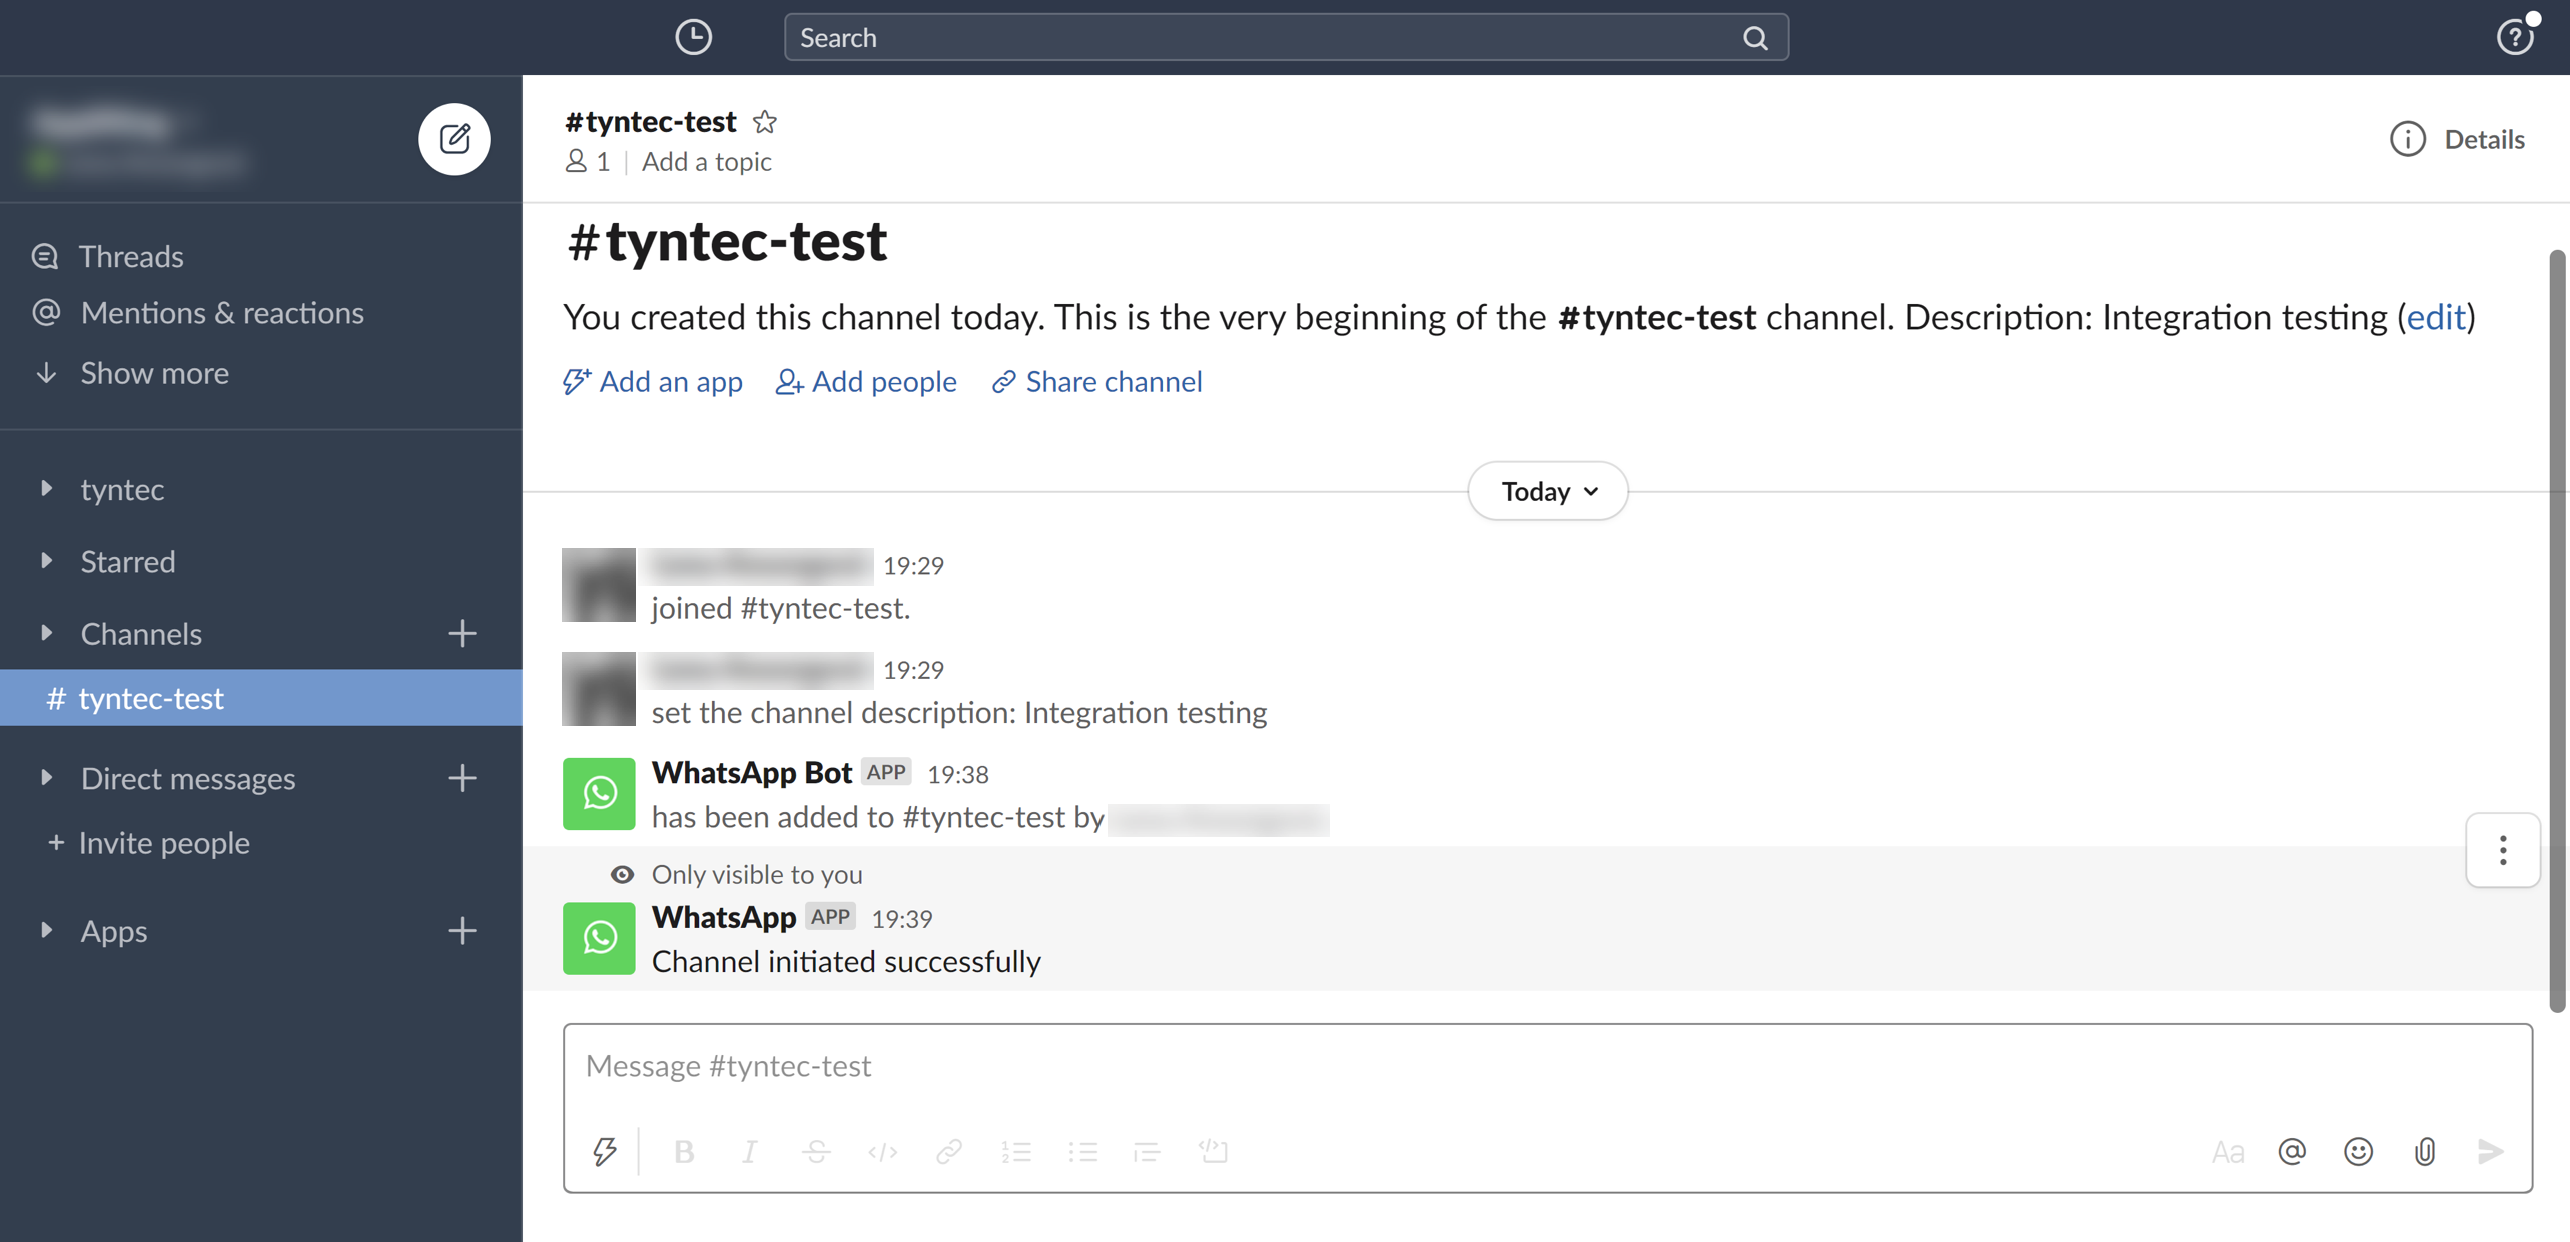
Congrats! You’re all set in Slack!
Step Four: Try it out!
It’s testing time!
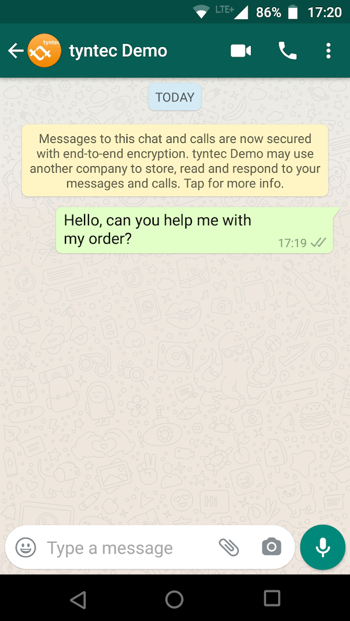
1. Play a customer, grab your phone and send your WABA a message.
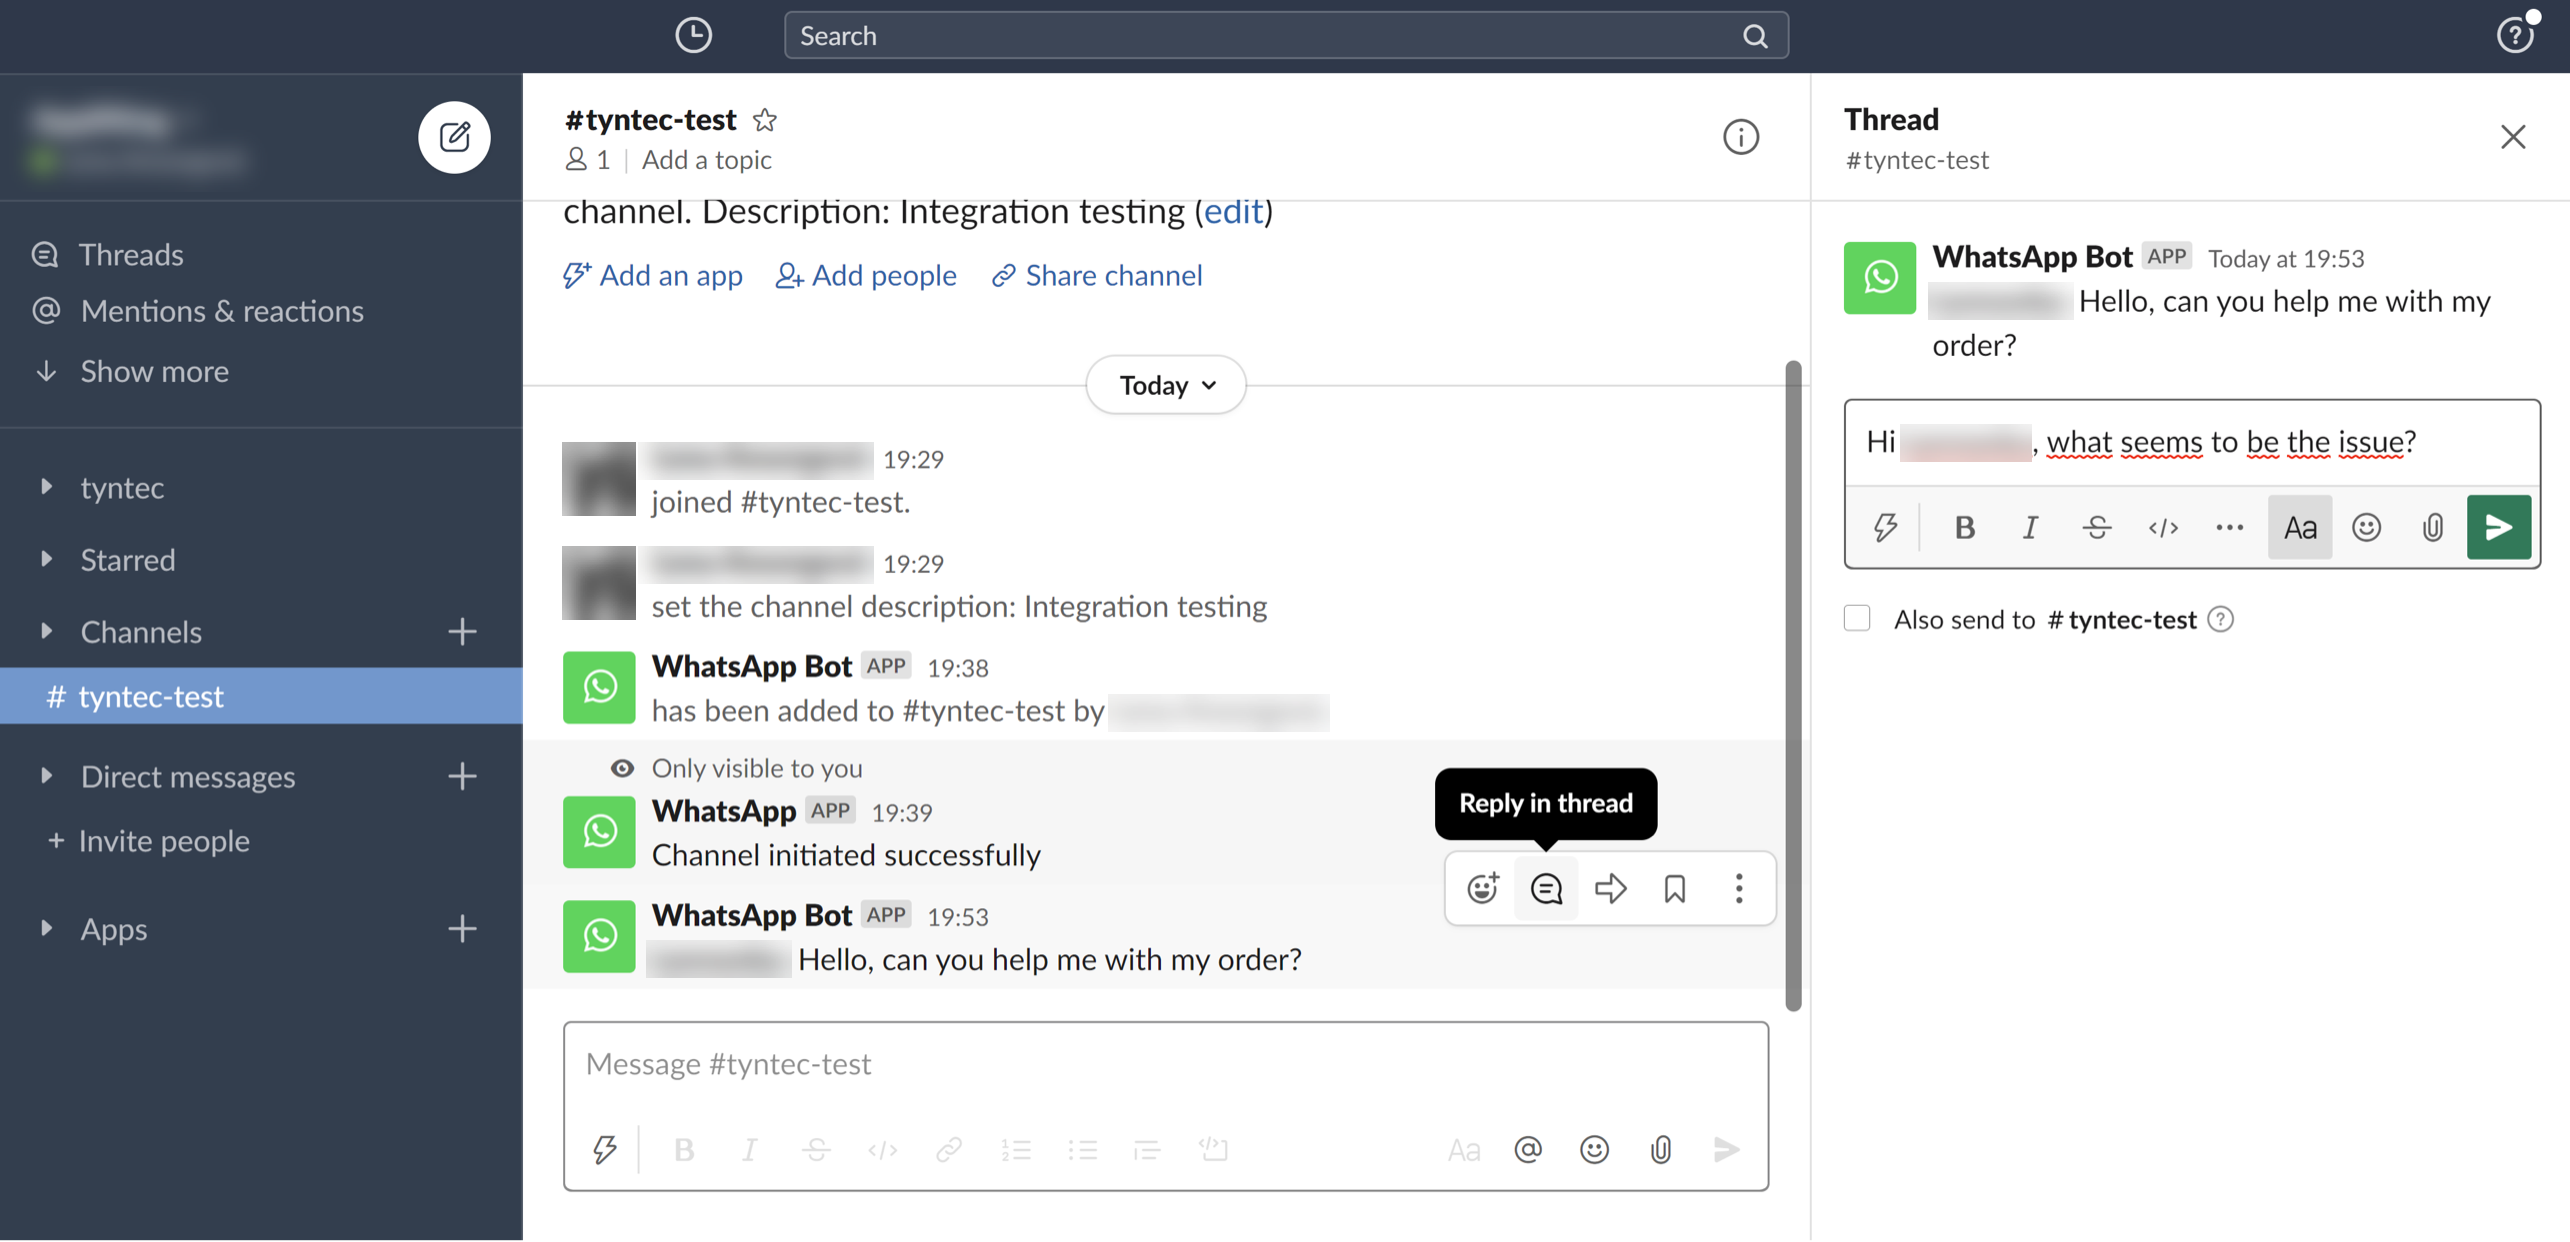
2. Voila! You should see it in your Slack channel. Use Reply in thread to reply to the customer as shown below.
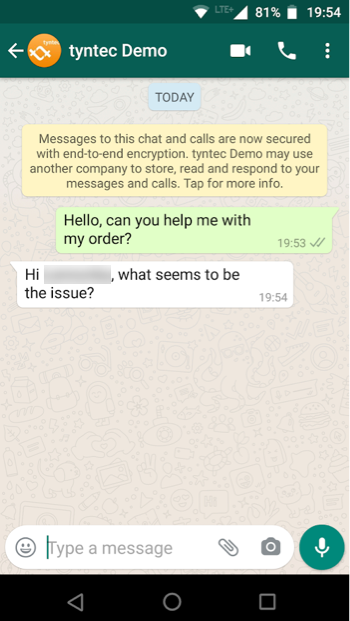
3. And voila, you should have received it in the customer WhatsApp!
Tip: You may use the slash command to close a conversation. For example:
<div class="geshifilter"><pre class="php geshifilter-php"><span class="sy0">/</span>whatsapp close Customer Name</pre></div>This will allow the app to open a new thread later, when the same customer sends you a message next time.
Congratulations on your integration!
More?
You may, for example, post the message as a new thread after 24 hours since the last customer message automatically. This would require adding a timestamp of the last customer message to the models/contacts.js database schema and extending the function that handles the endpoint /tyntec/forwardWAMessages with a check of the time difference.
Or you could extend your slash commands to send template messages, let’s say something like this:
<div class="geshifilter"><pre class="php geshifilter-php"><span class="sy0">/</span>whatsapp send <span class="st0">"Customer Name"</span> appointment_confirmation <span class="st0">"April 1"</span> <span class="st0">"8:00 AM"</span></pre></div>For this use case, you would need to enhance parsing of slash command arguments in the function that handles the /slack/ endpoint, of course, and add a new function that will call the tyntec API to send template messages.