
Conversations Inbox – Admin Guide
Thanks for choosing tyntec Conversations Inbox to communicate with your customers and teams on the messaging channels they prefer. This Admin Guide is to help you get started faster with easy-to-follow steps to customize your settings, set business hours, add agents and teams, edit agent permissions, and add channels – all from one simple, unified interface.
This guide is for the admins of Conversations Inbox. If you’re a user (agent), please check out this guide.
What are Key features of tyntec Conversations Inbox?
Here’re key features you can access right from the Conversations Inbox toolbox:
Omnichannel Communications
Send and reply to digital messaging channels such as SMS, WhatsApp and Viber, all communications from a single dashboard.
Customer Data
Add contacts and lists within the tool or access/sync with CRM for customer data.
Automation
Scale faster while freeing up agent’s time by setting up Auto Replies and Quick Replies.
Multi-agent
Empower agents to assign cases to other agents, teams or bots for faster, better handling.
Multi-bots
Connect as many bots as you need to provide self-service for your customers.
Insights
Improve performance by using instant KPI reports within the tool itself.
How to get access to tyntec Conversations Inbox?
Get started: First step with tyntec Conversations Inbox
As an administrator, you can manage several different system settings.
We will show you how to set them up one by one.
Set up business hours
Set business hours to show the customer the times and days during which they can contact you. This will be the public information that each customer can display on the communication channel you connect it to.
1. Select Settings.
2. Click Business hours.
3. Click Add.
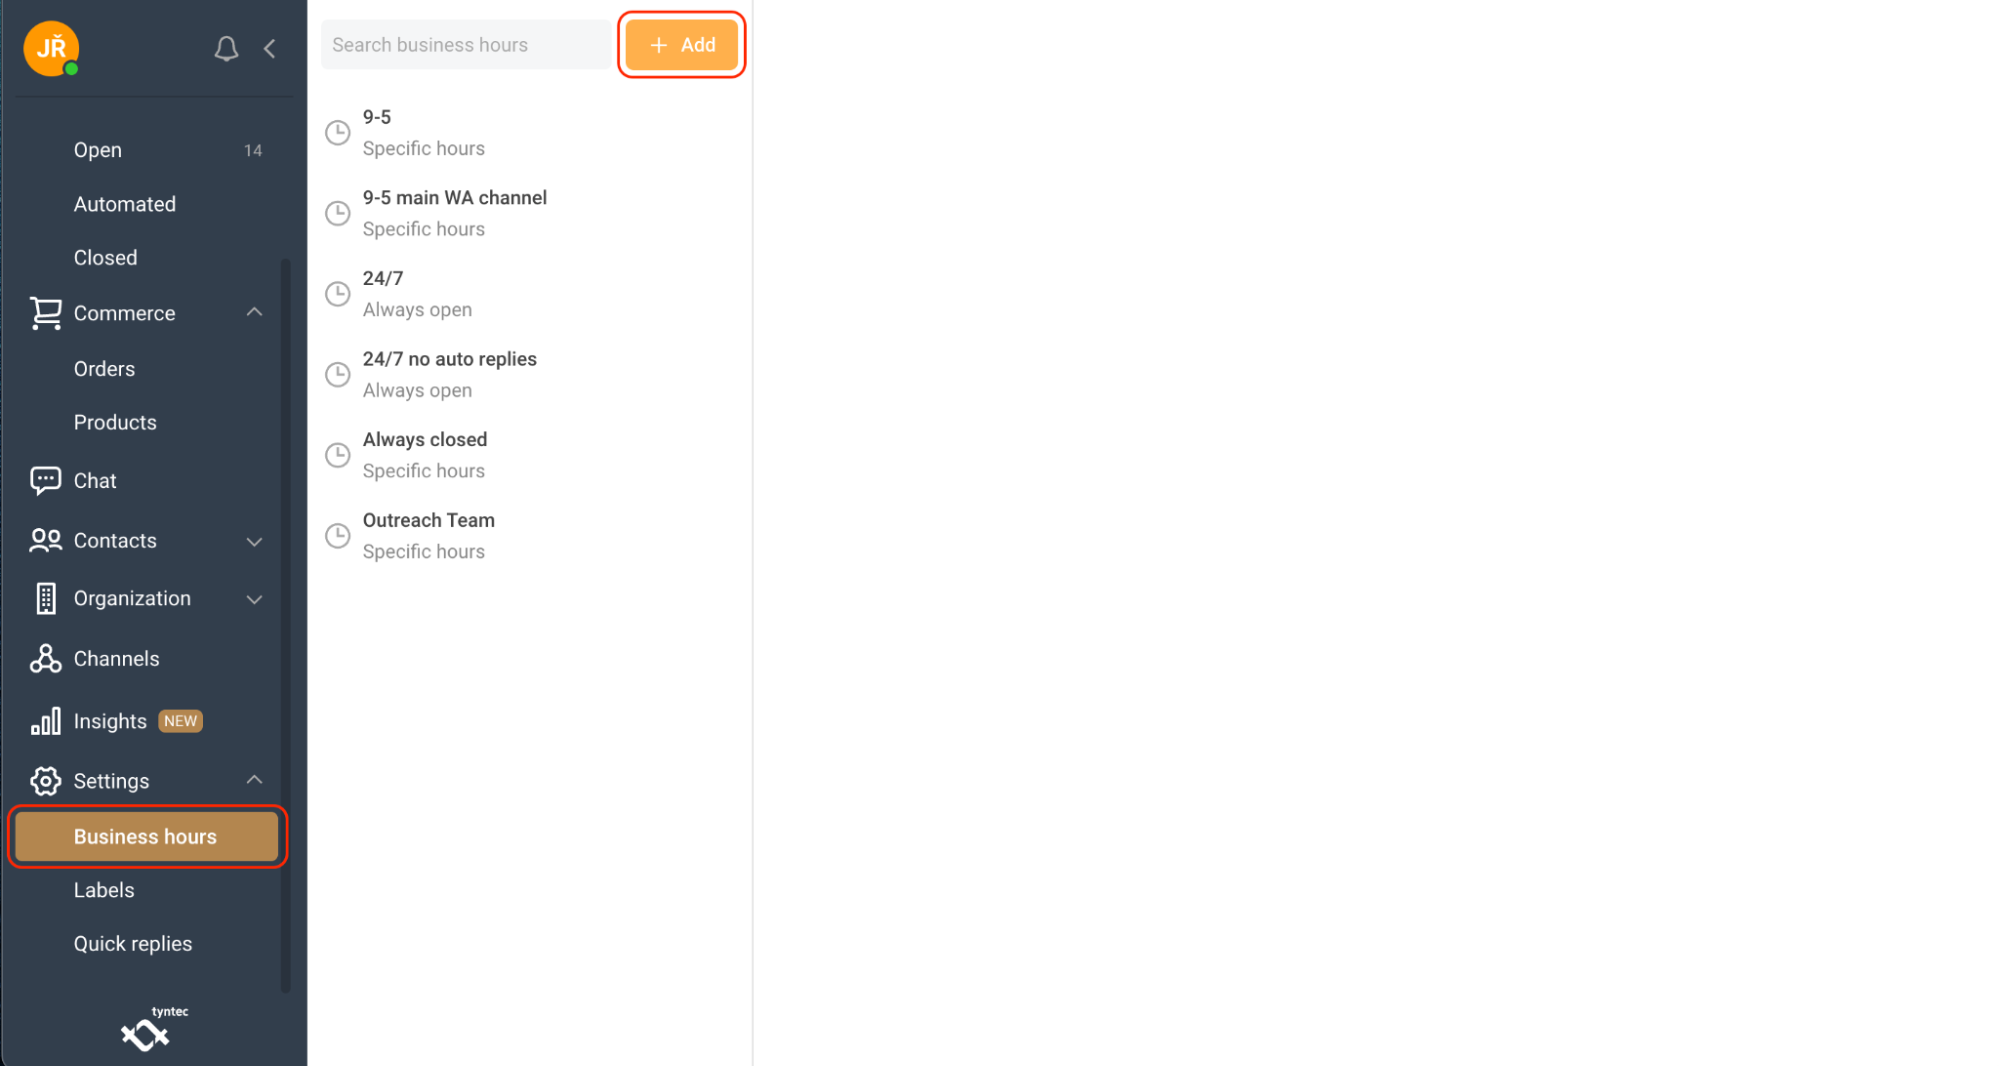
4. Enter the Name of your template.
5. Select Timezone and Availability. You can choose from Always open, Selected hours, or Permanently closed.
6. Fill in the form if you want to show your open hours. Select those days you are open, and specific hours from opening to closing.
7. Select the appropriate time-zone.
8. Click Save.
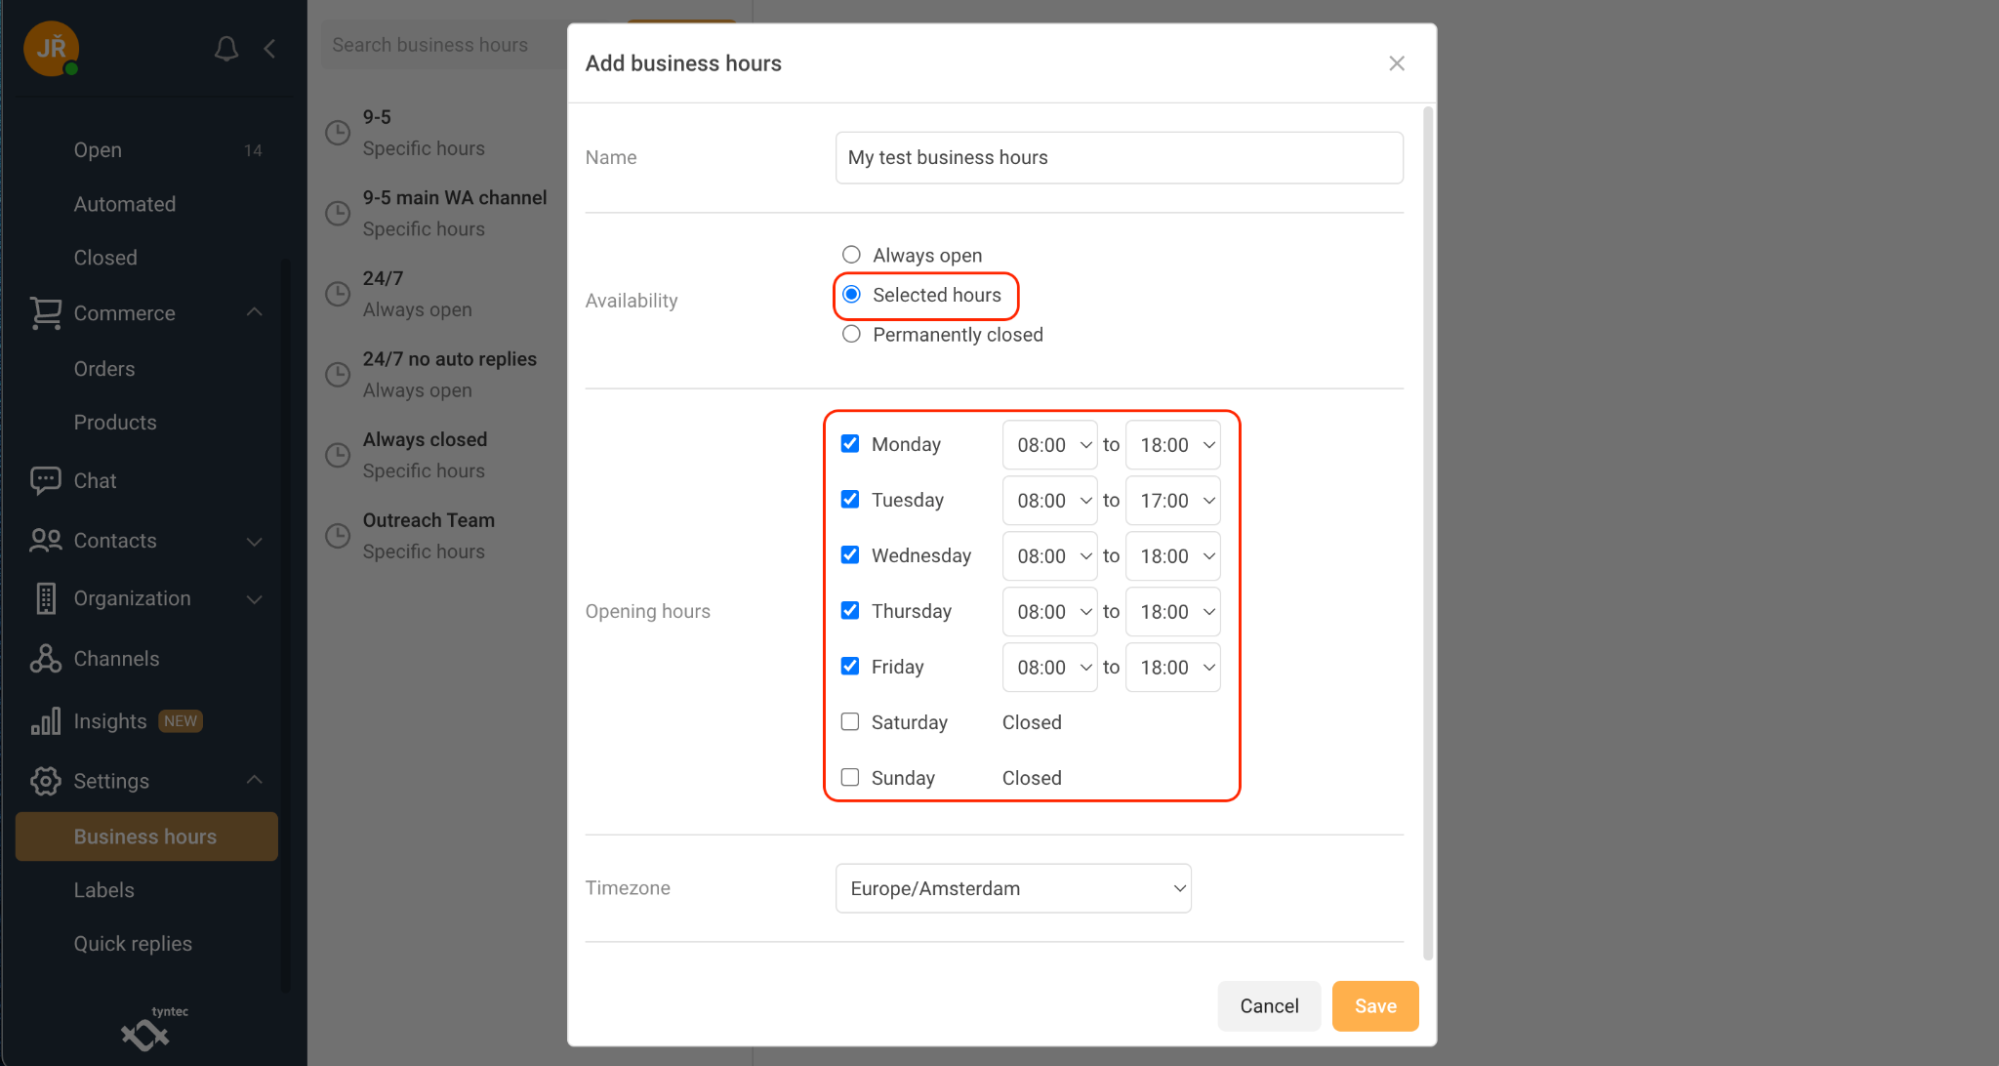
Assign Channels to your business hours
1. Select Settings then Business hours.
2. Select the Business hours template from the left-side menu.
3. Select the Channels from the right-side menu.
4. Click the Channels you want to assign selected Business hours.
You can also Edit or Delete your business hours templates by clicking on the applicable button on the top right corner.
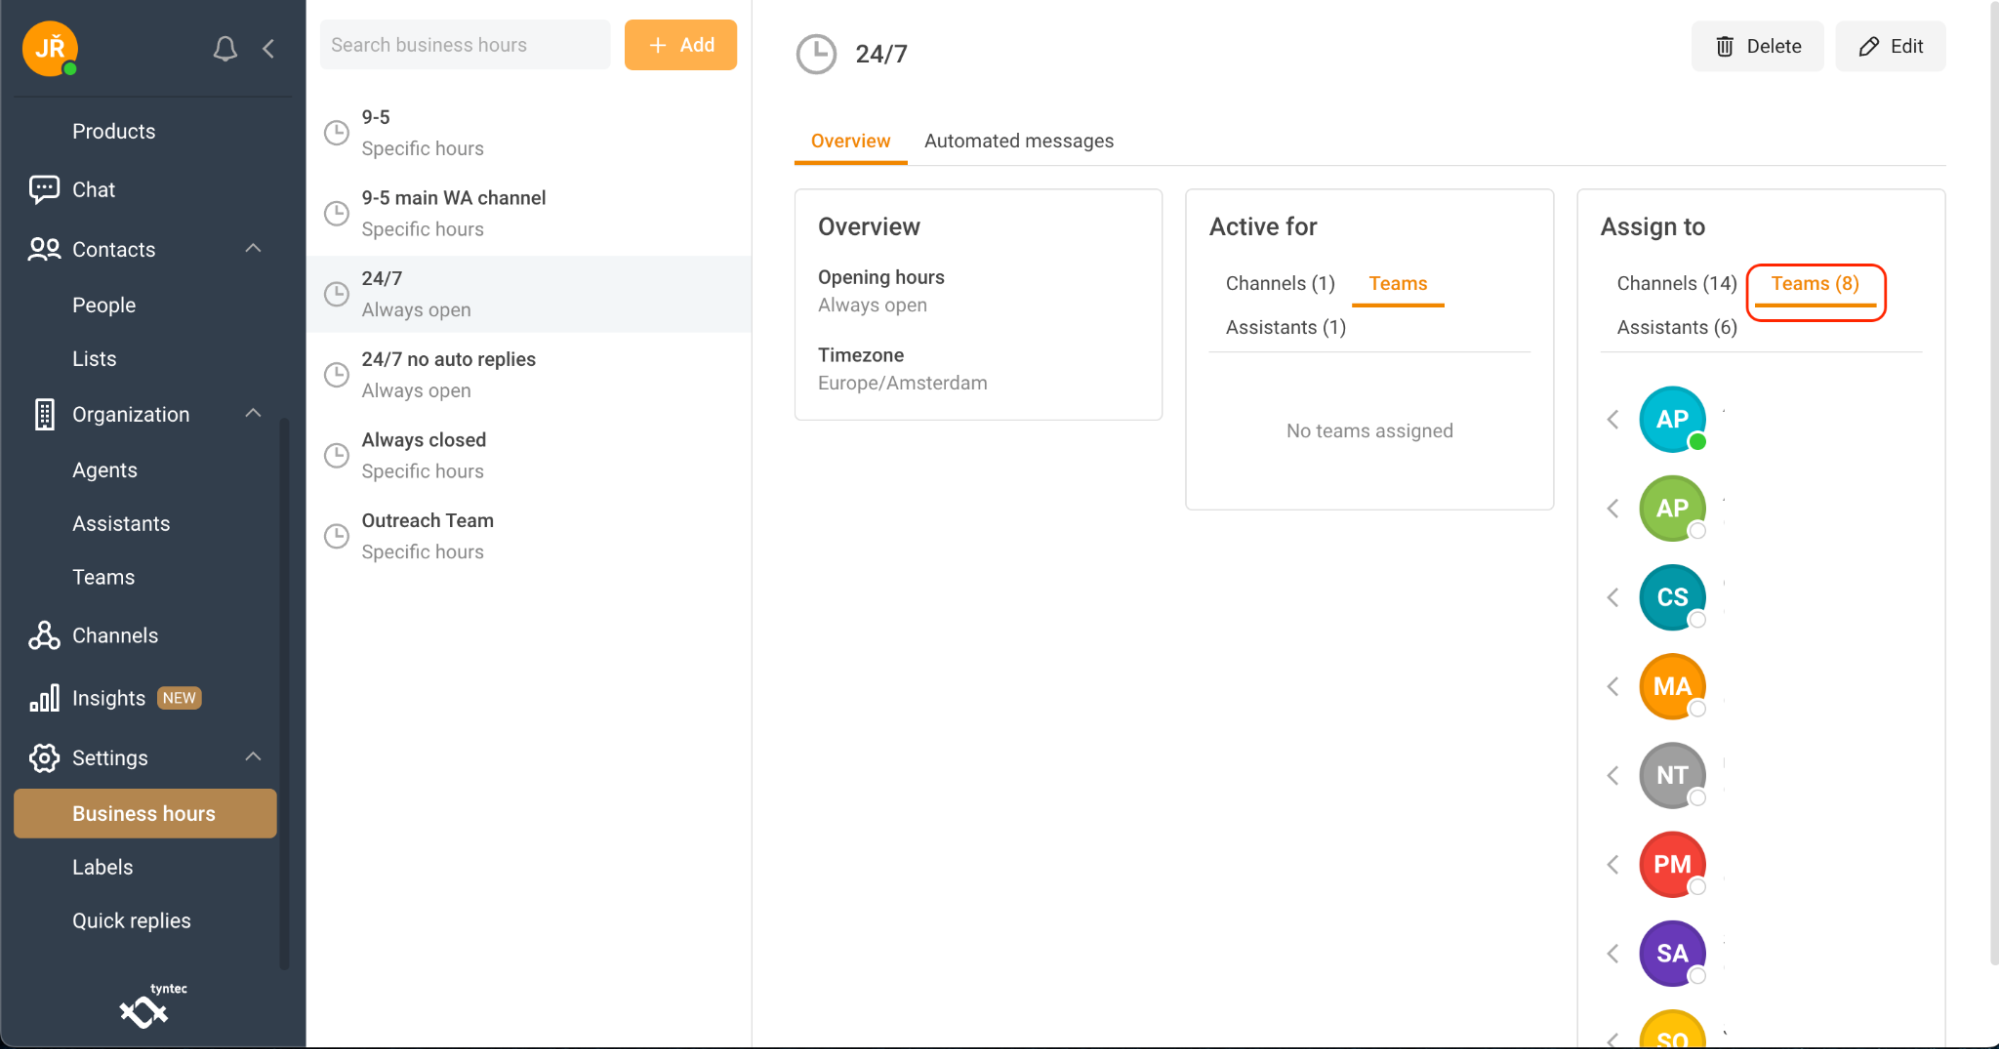
Assign Teams to your Business Hours
1. Select Settings then Business hours.
2. Select the Business hours template from the left panel.
3. Select Teams from the right panel.
4. Click which Teams you want to assign selected business hours to.
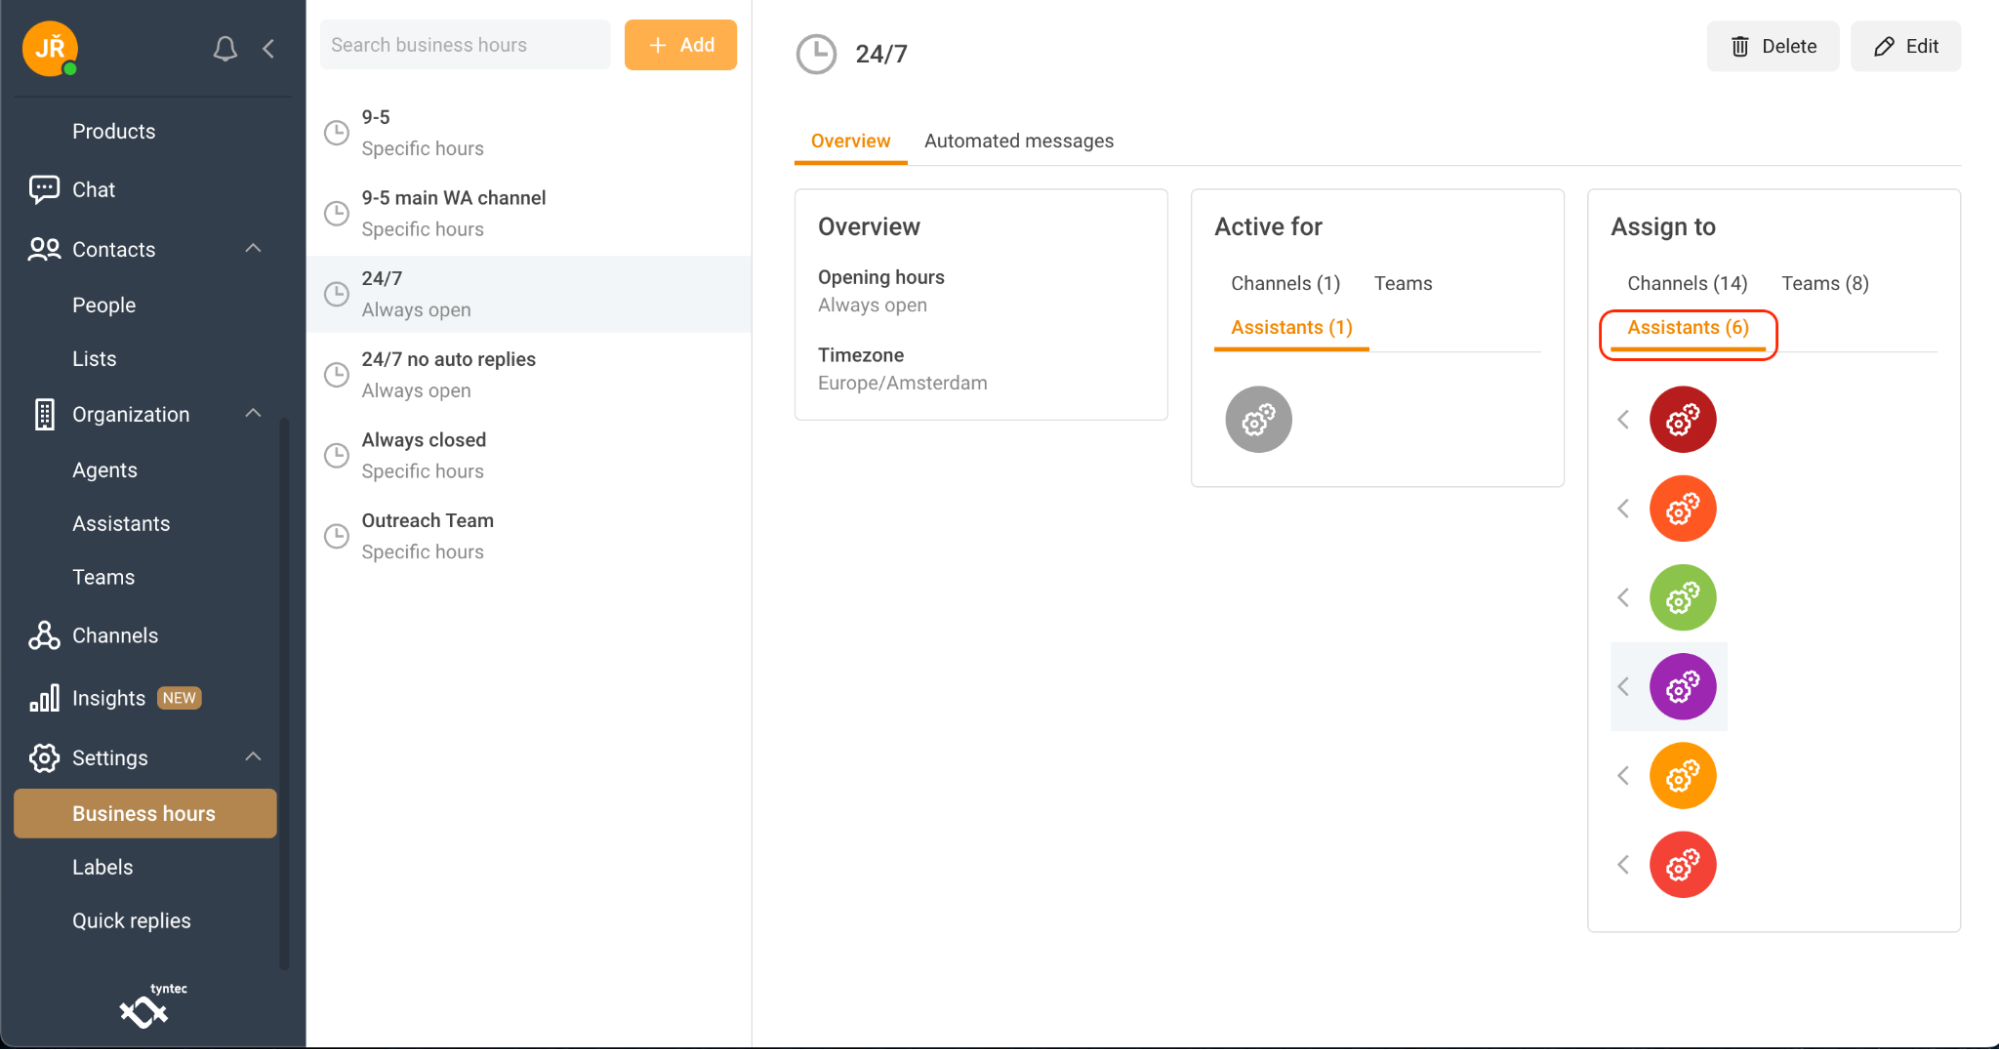
Assign Assistants to your business hours
1. Select Settings then Business hours.
2. Select the Business hours template from the left panel.
3. Select Assistants from the right panel.
4. Click Assistants.
5. Select which Assistants you want to assign.
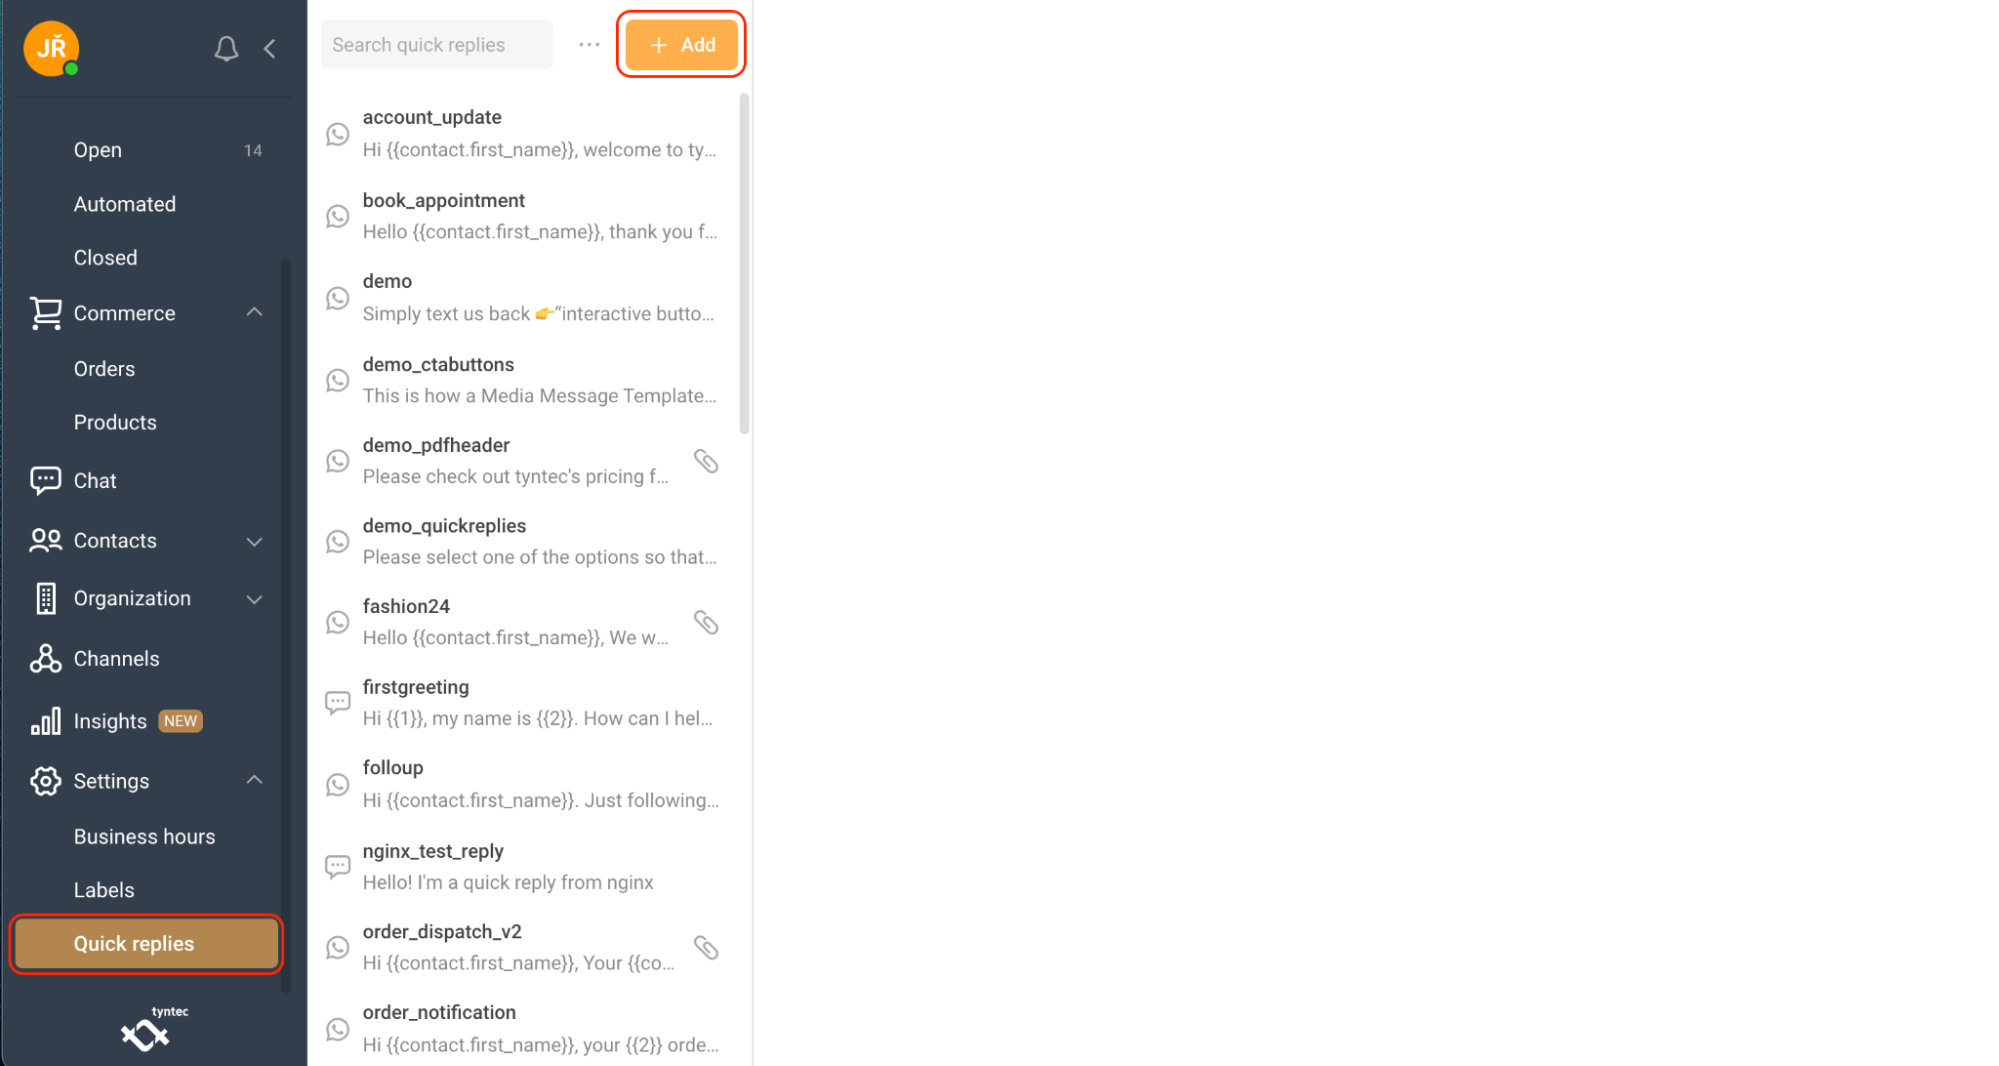
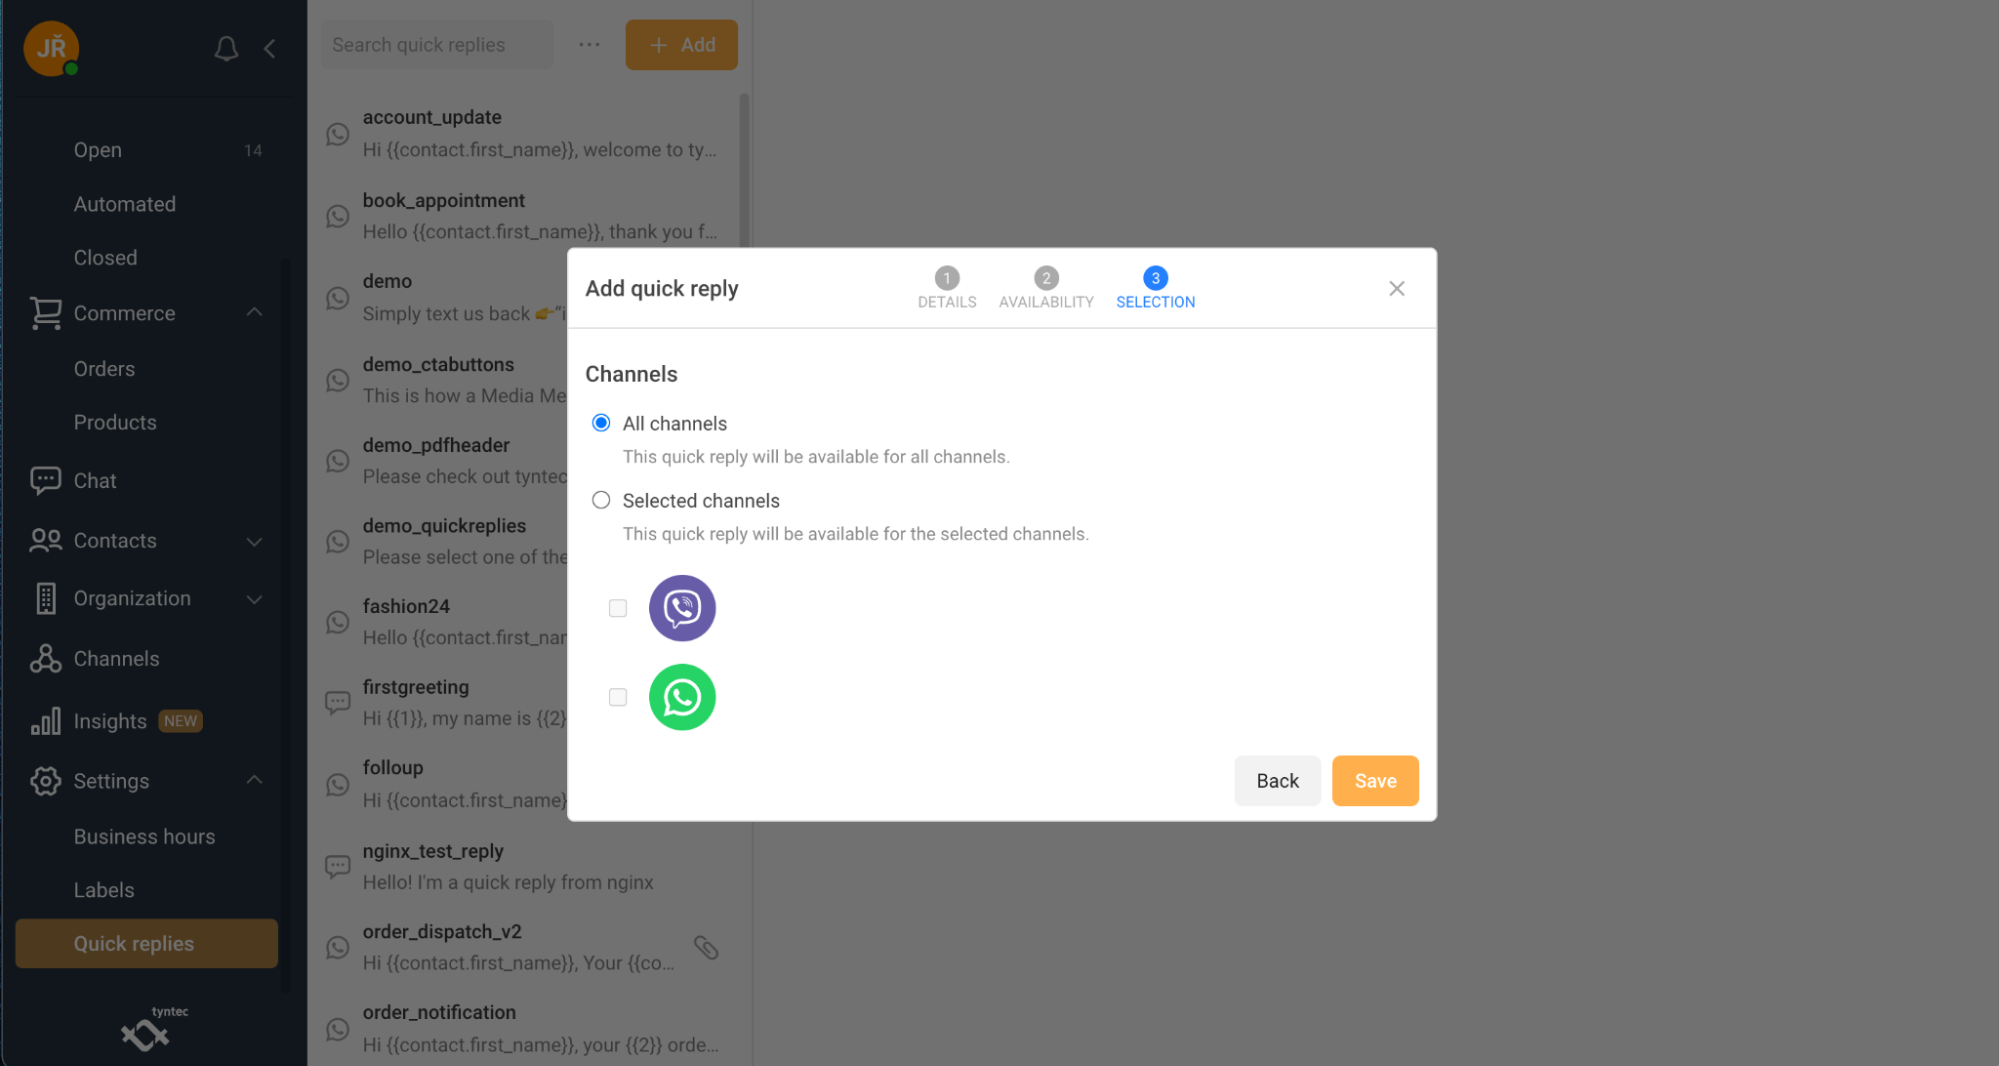
Set up Quick replies
1. Select the Settings tab.
2. Click Quick replies.
3. Click + Add.
4. Fill the Name and Message template of your quick reply.
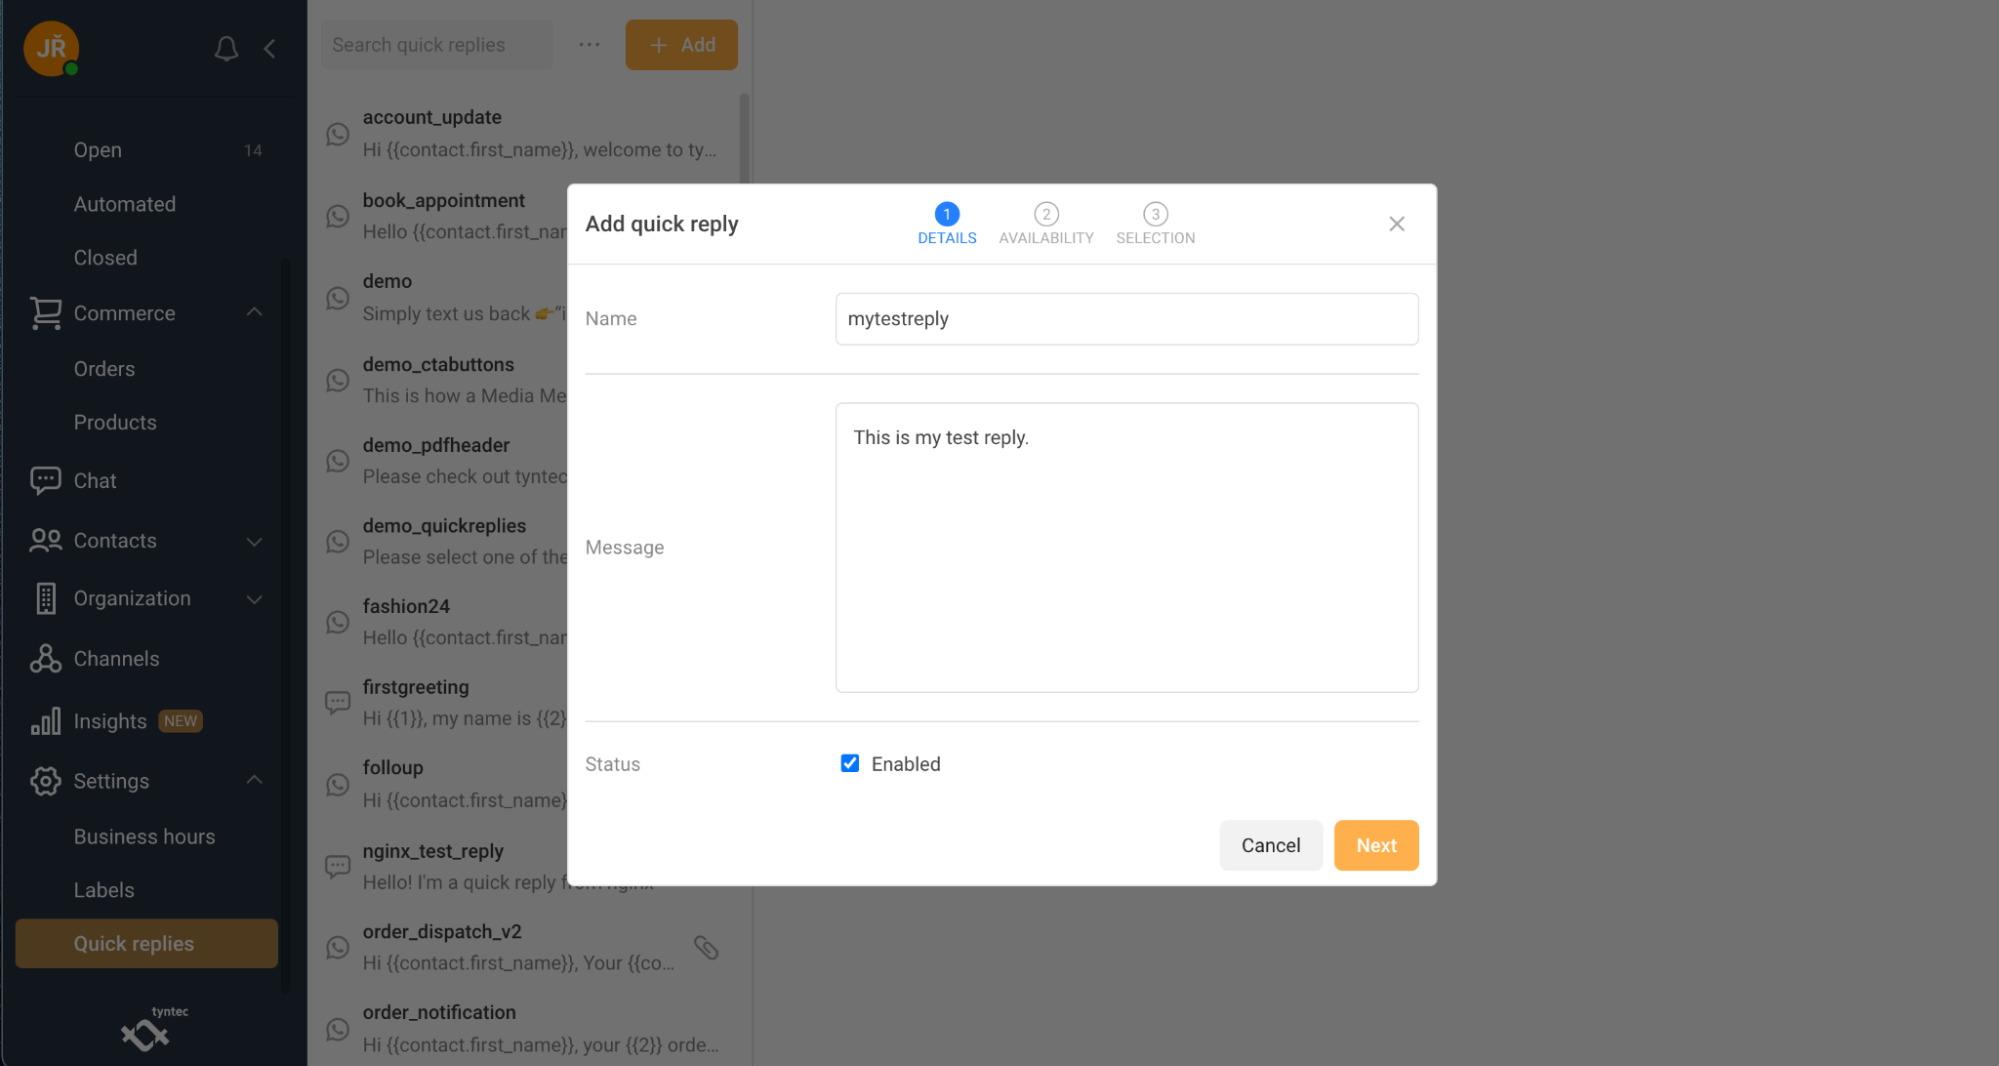
5. Select your Availability preference.

6. Select which channels you want to see your template in. You can use the template across all channels or you can select specific channels.
7. Click Save.
Let’s have a look at how to use Quick Replies here.
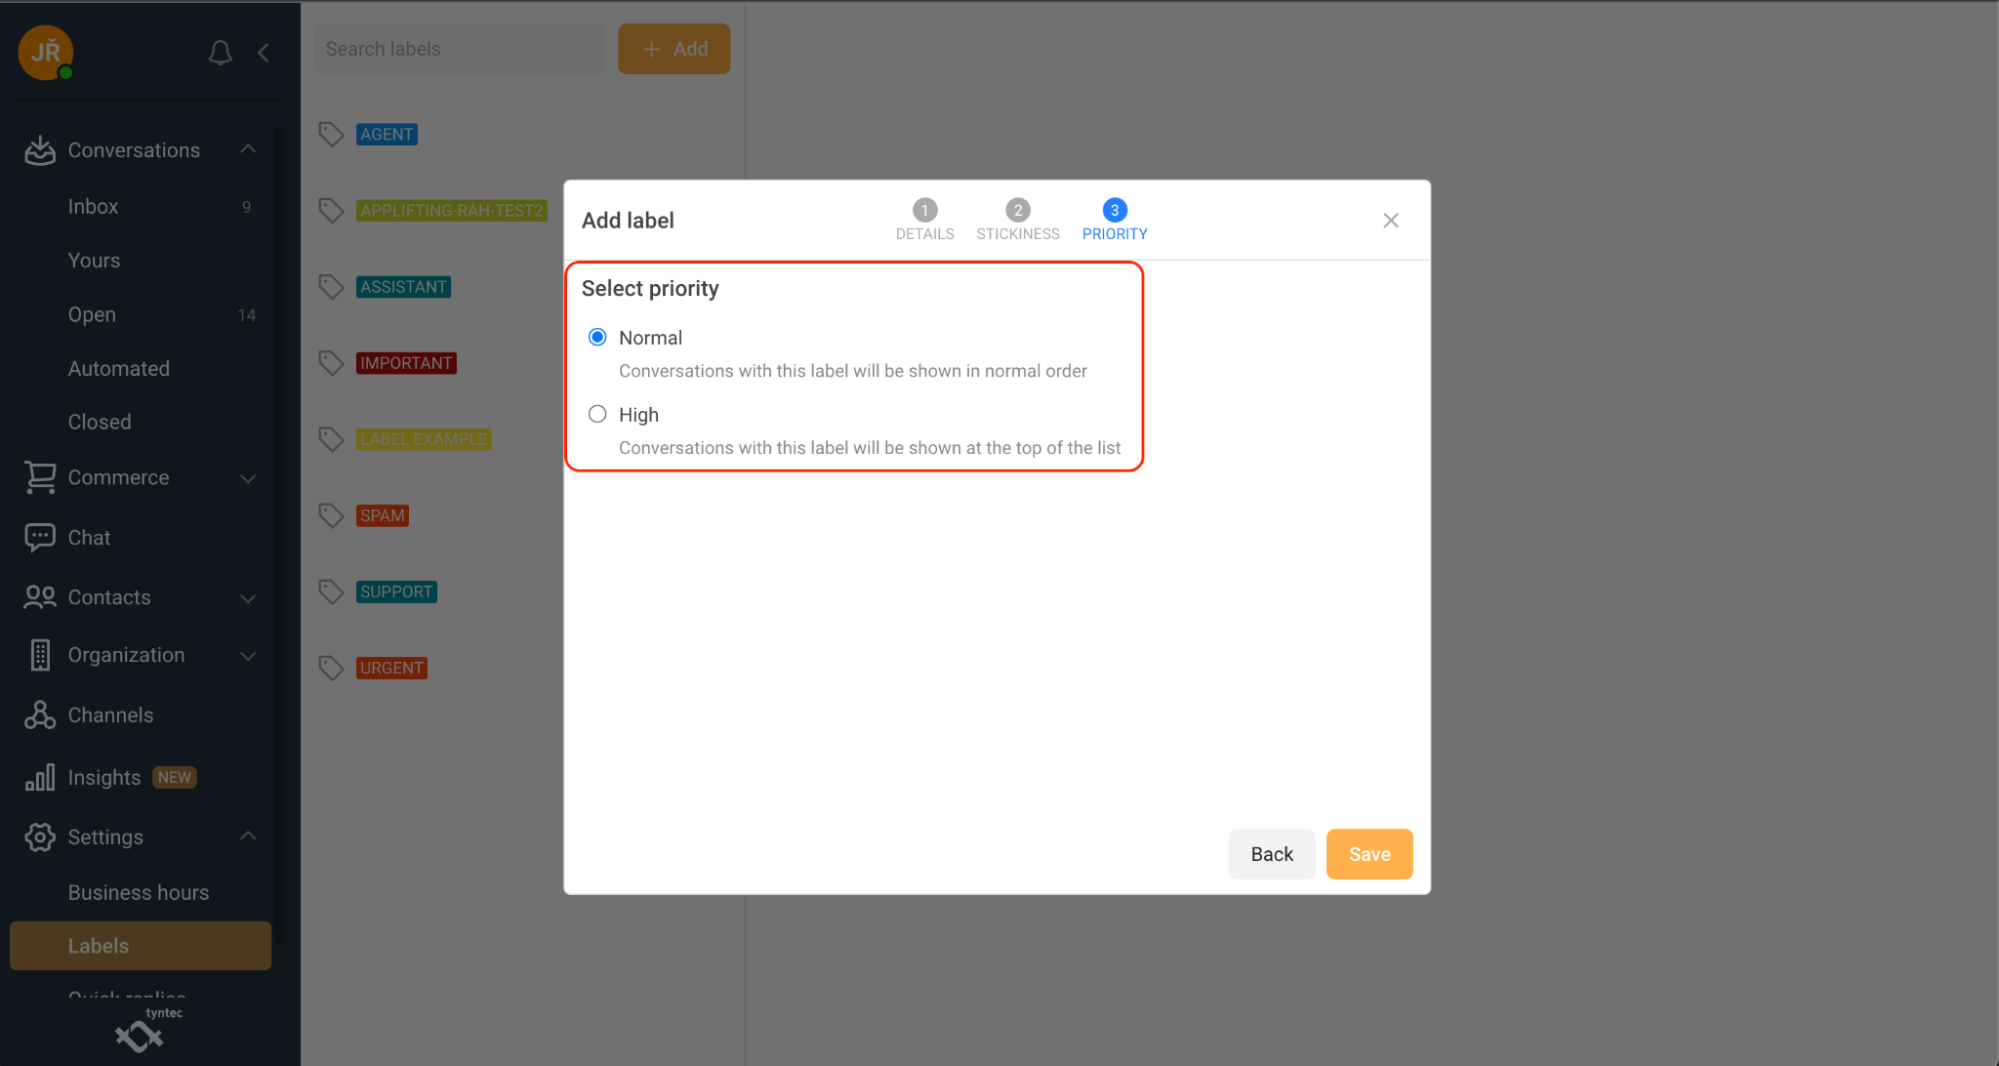
Set up labels
Labels are an easy way to classify and prioritize a conversation with a customer. Each business can create its own labels to manage and mark conversations.
Creating a new label
1. Select Settings.
2. Select Labels.
3. Click Add.

4. Fill Label Name. You can also Change color of your Label. Just click Change color.
5. Select Stickiness preference.
6. Select Priority of Label. You can choose between Normal and High.
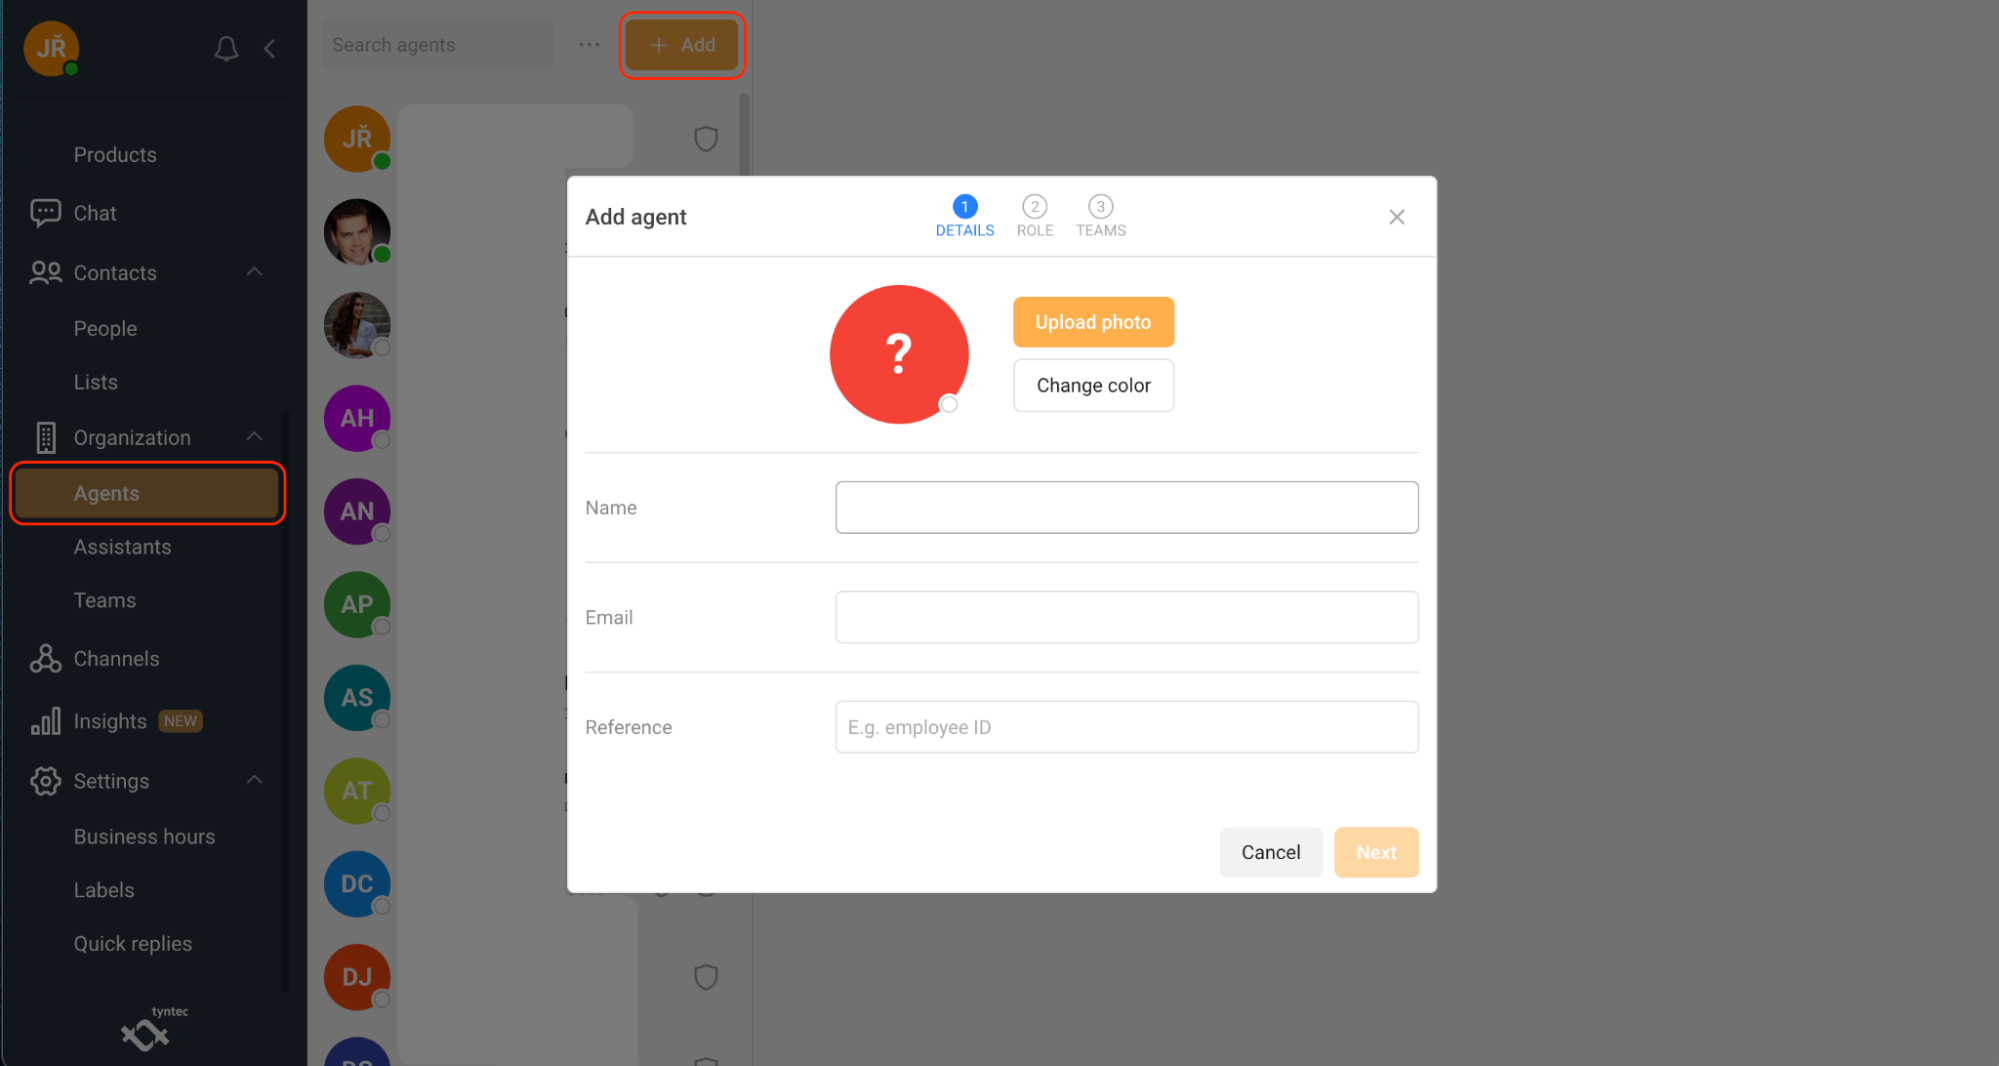
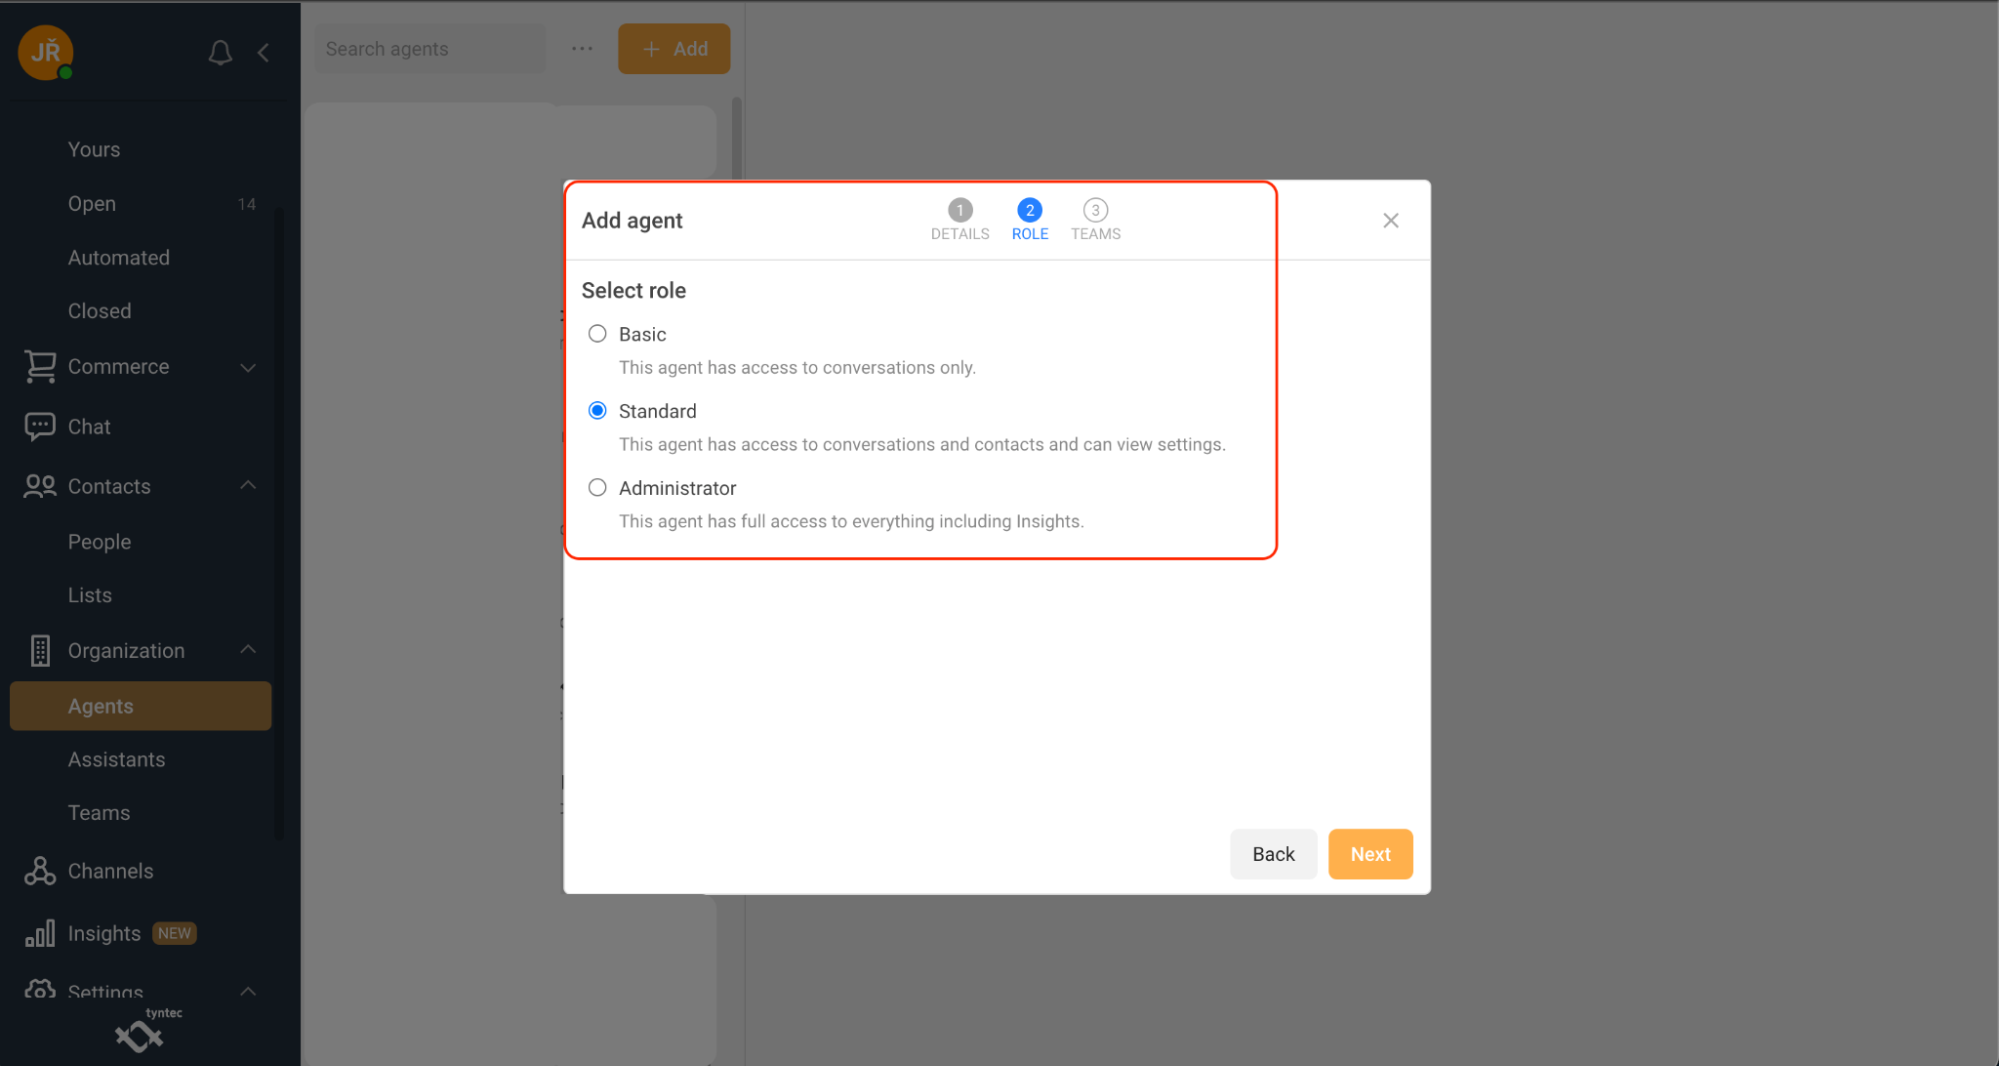
Set up company agents
Add new Agent
1. Select Agents.
2. Click + Add.
3. Fill in Name, Email and Reference. You can also update the photo or change the color of your agent icon.
4. Select the Role of your new Agent. You can select between Basic, Standard, and Administrator.
5. Select which Team(s) you want to assign your new Agent to.
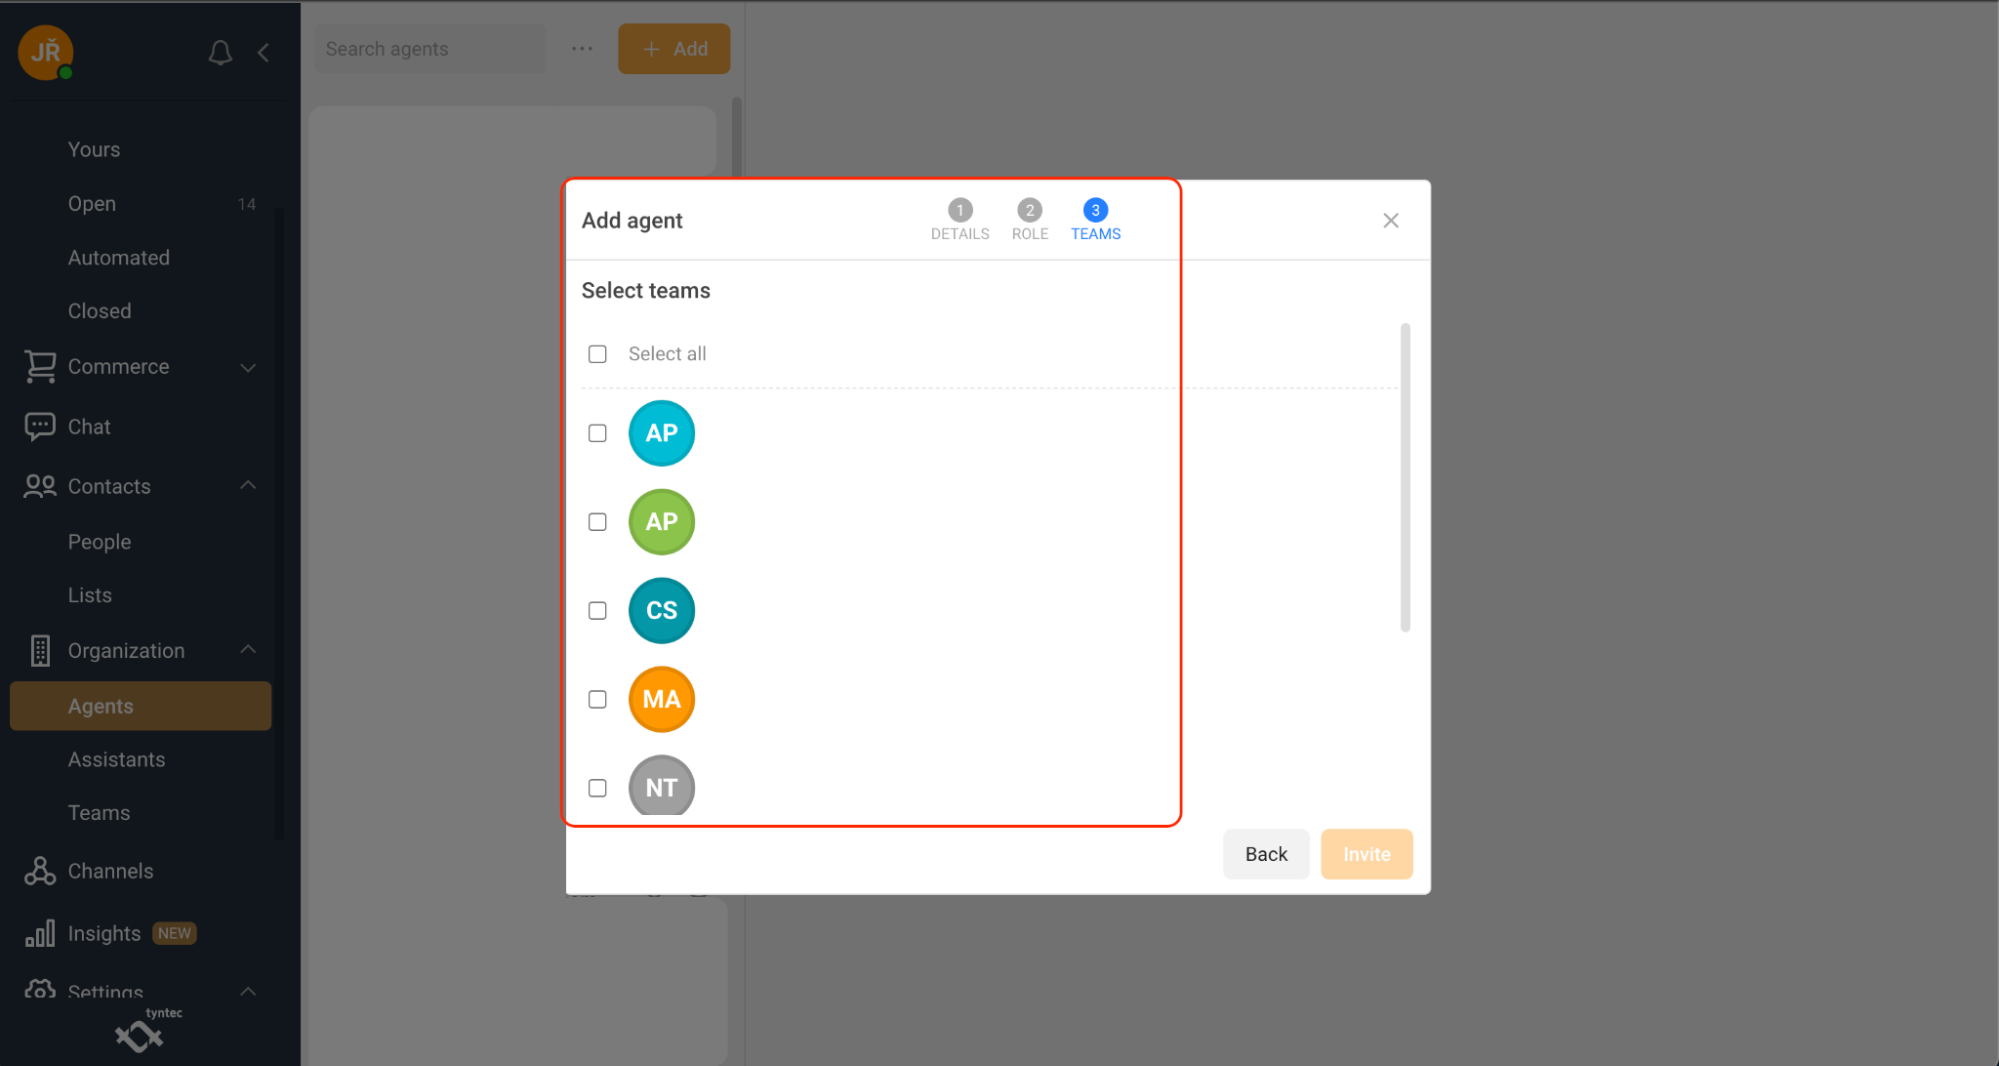
6. Click the Invite button. New Agent will receive an email with an invitation to your selected team(s).
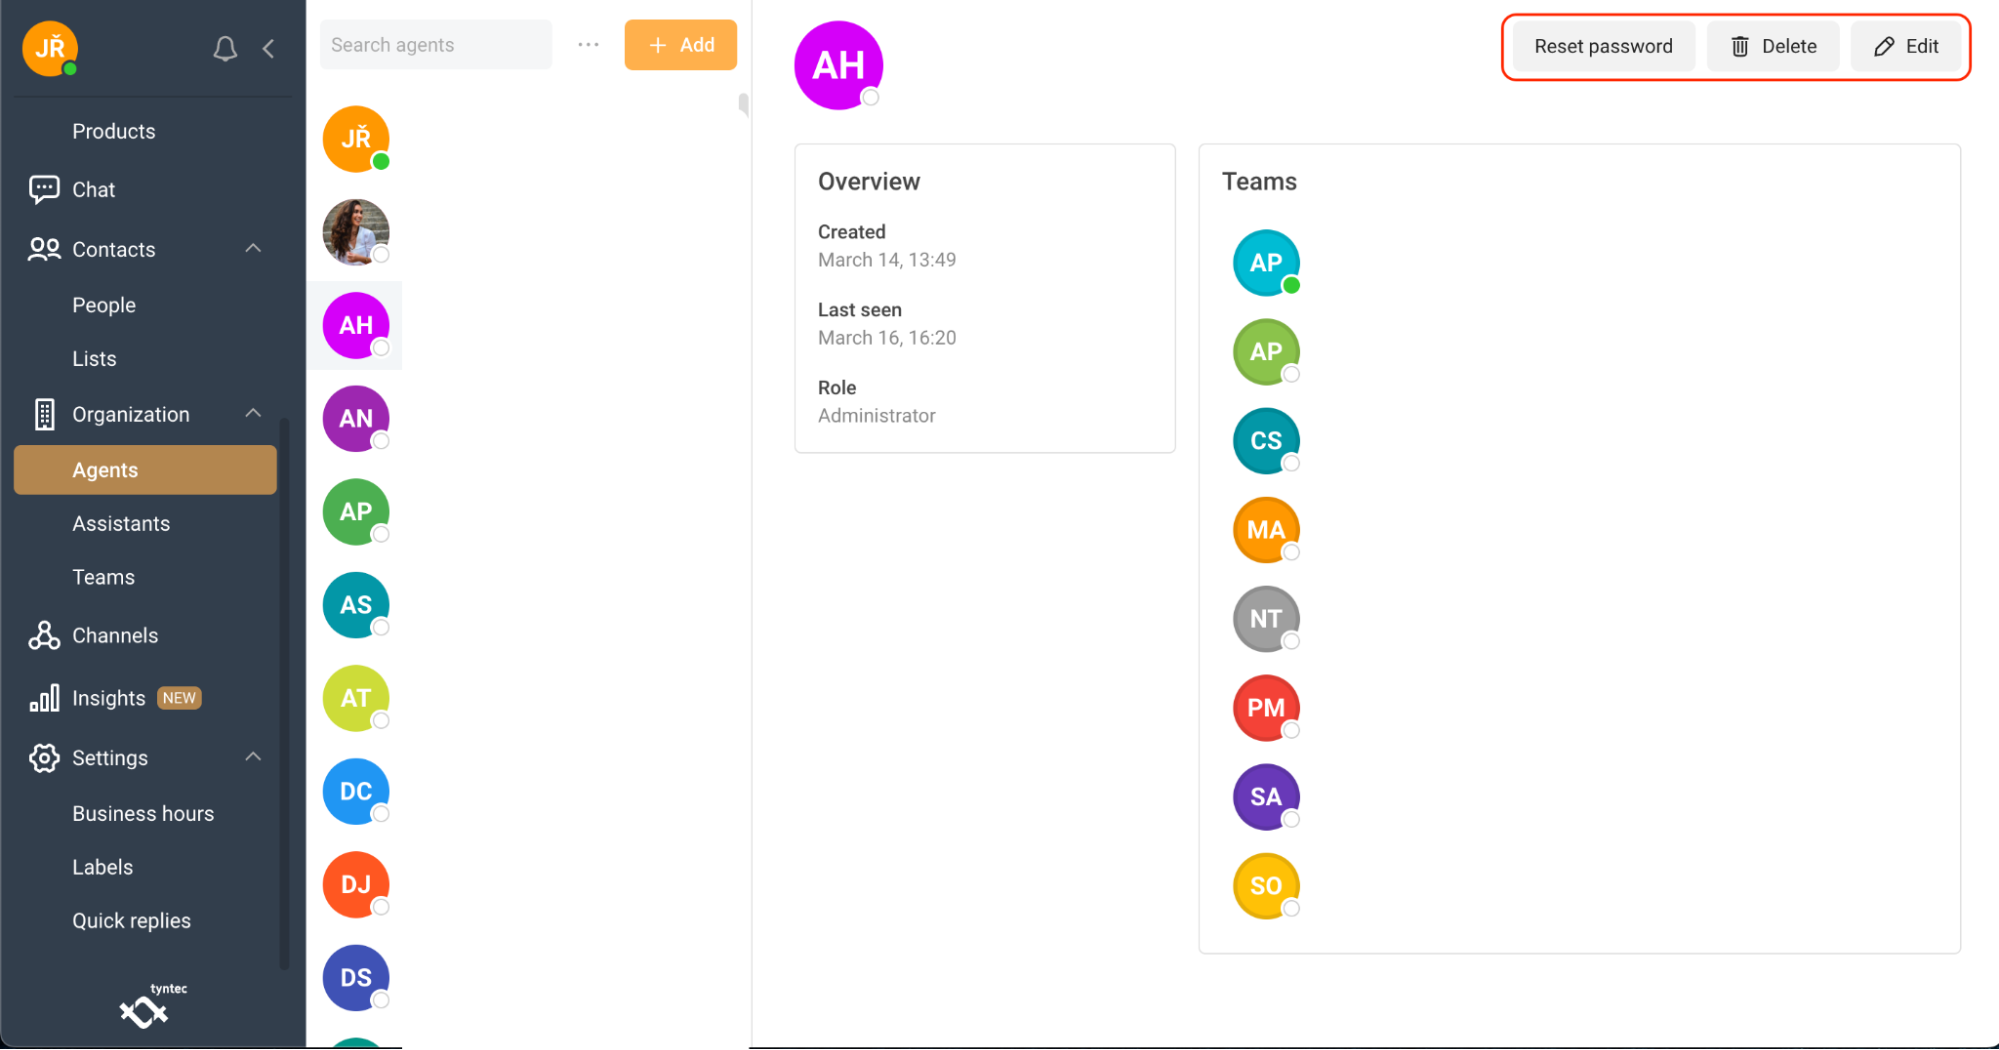
Edit Agents
1. Select the Organization tab.
2. Click Agents.
3. Select which Agent you want to edit.
4. Click Edit at the top right corner.
5. Edit agent as if you were adding a new one.
You can also reset or delete the agent’s password.
1. Use the applicable button, Reset password or Delete at top right corner.
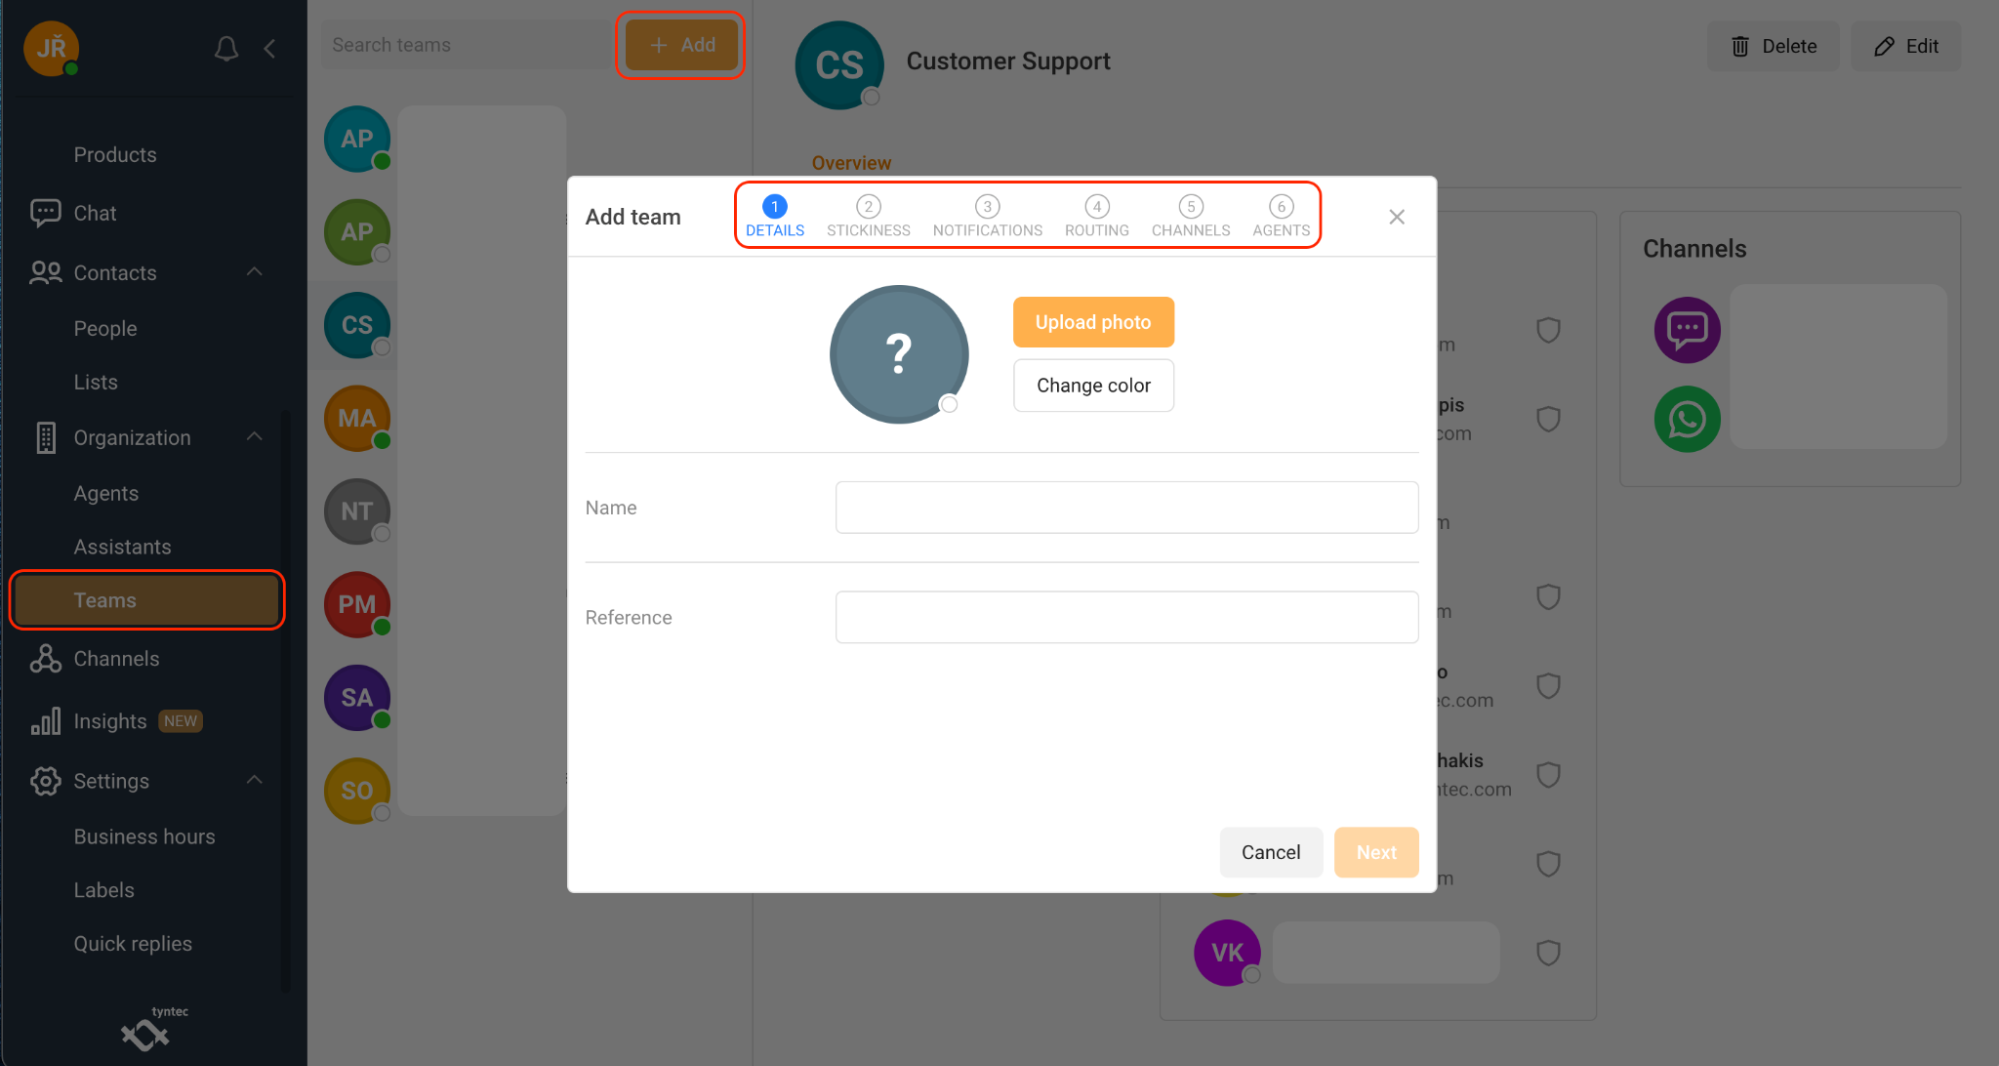
Set up teams
1. Click Teams.
2. Click Add.
3. Write the Name of the new team and add Reference. You can also upload a photo or change the color of your team icon.
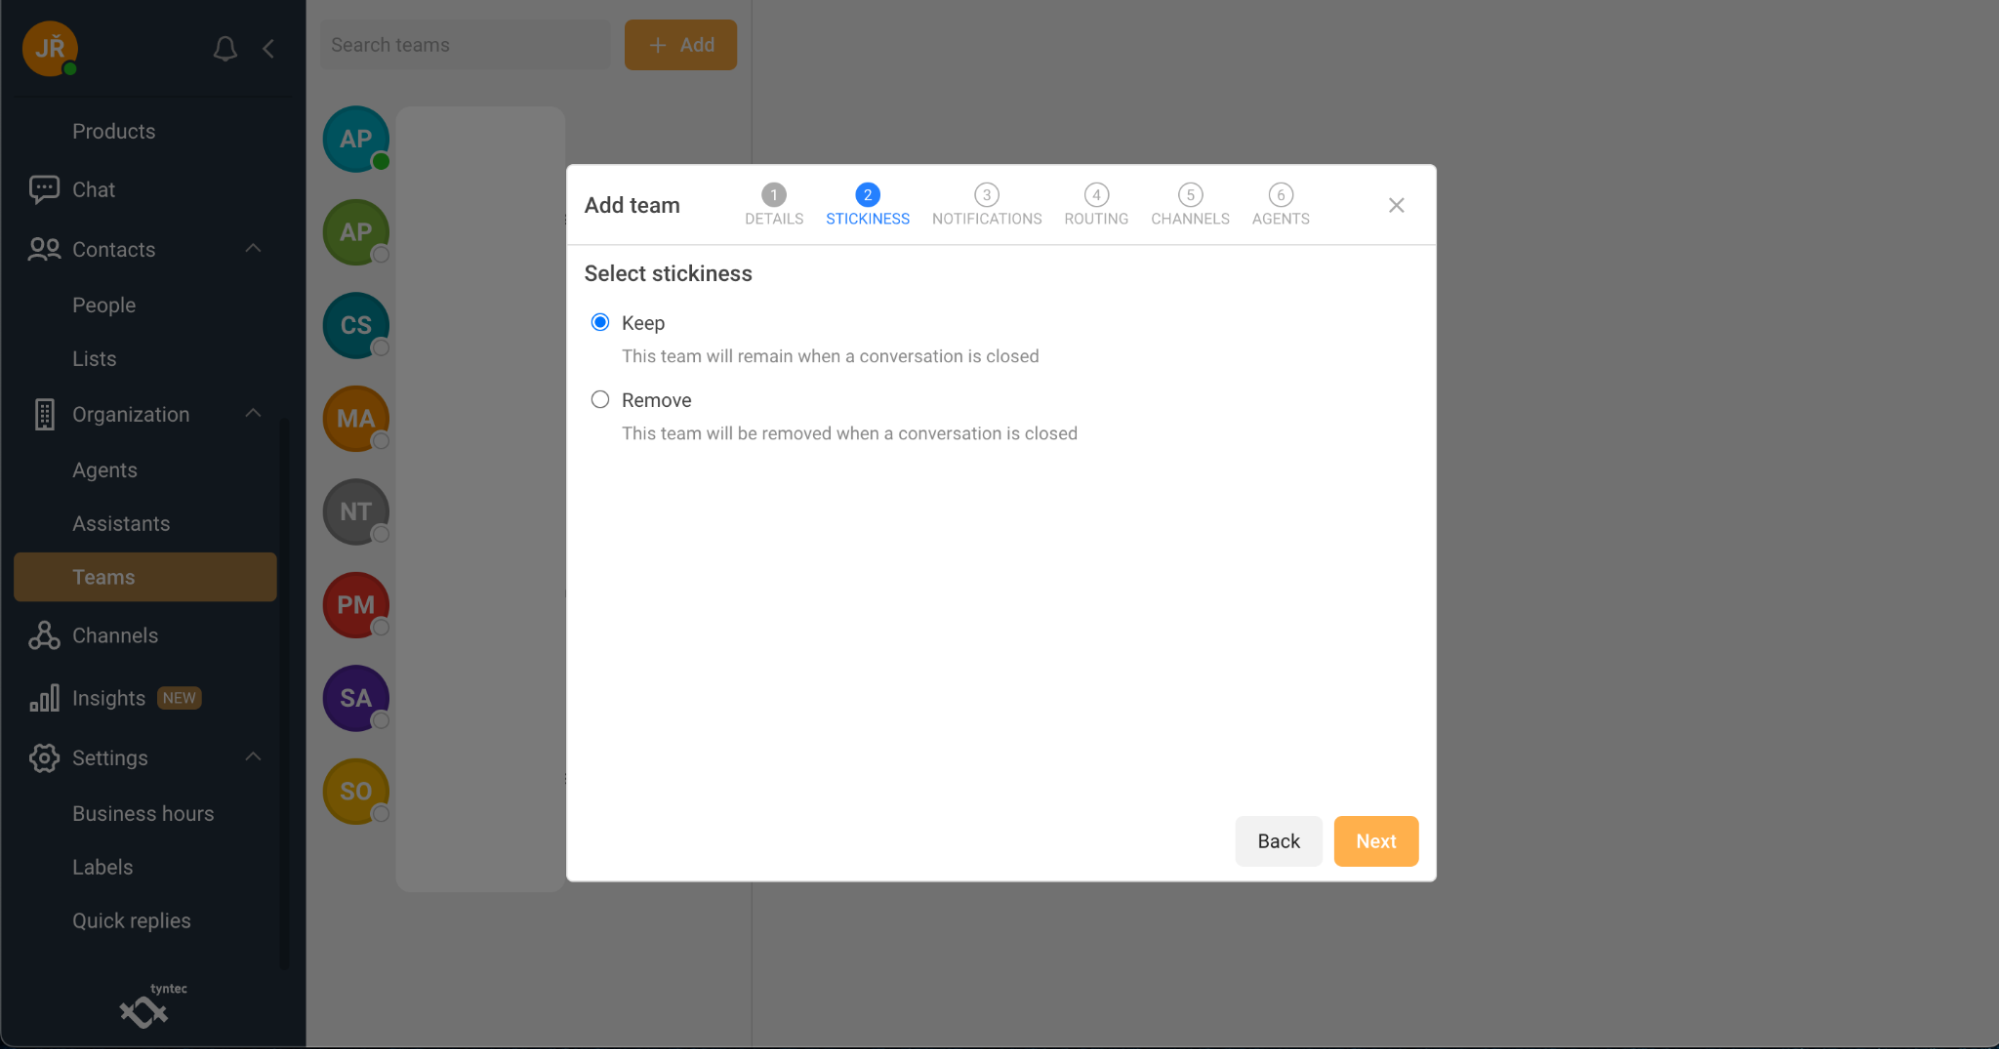
4. Select Stickiness preferences. Choose if you want to keep or remove your team when conversation is closed.
5. Select Notifications preferences.
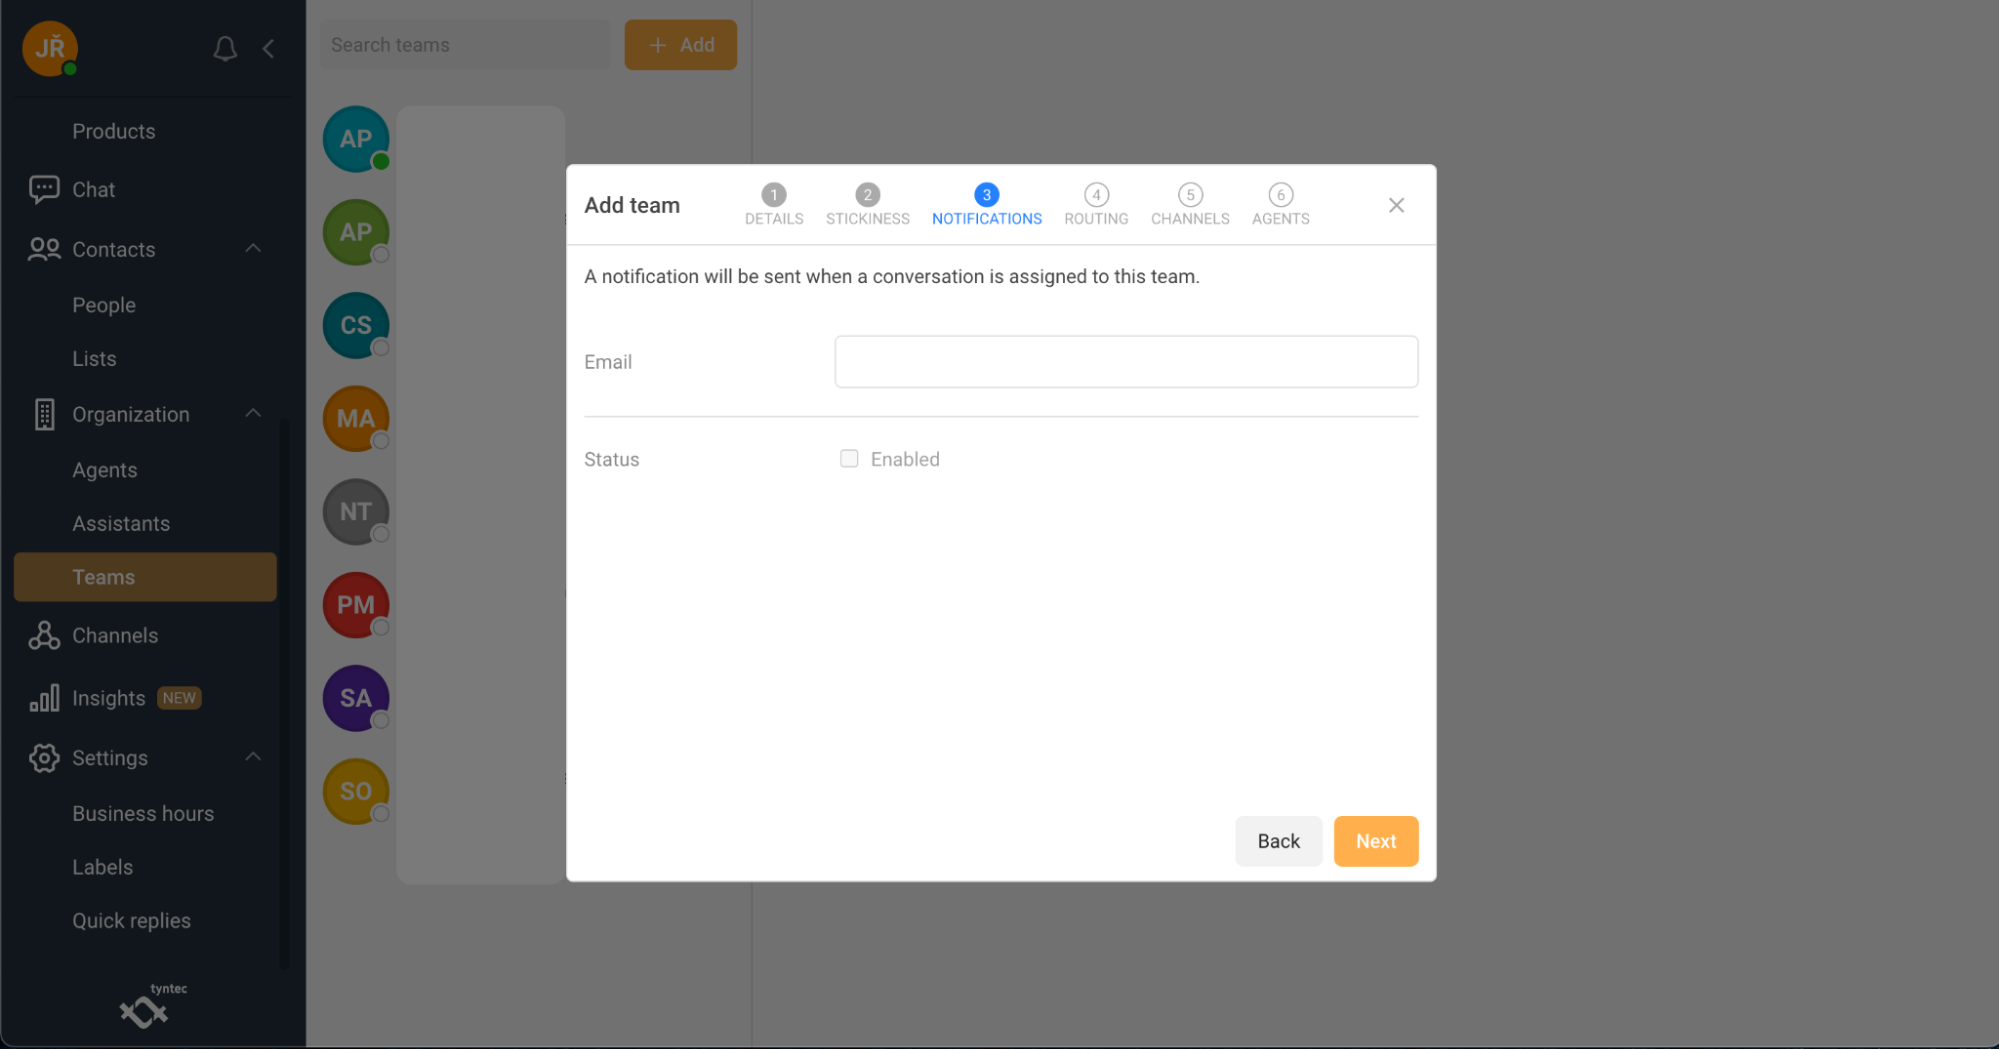
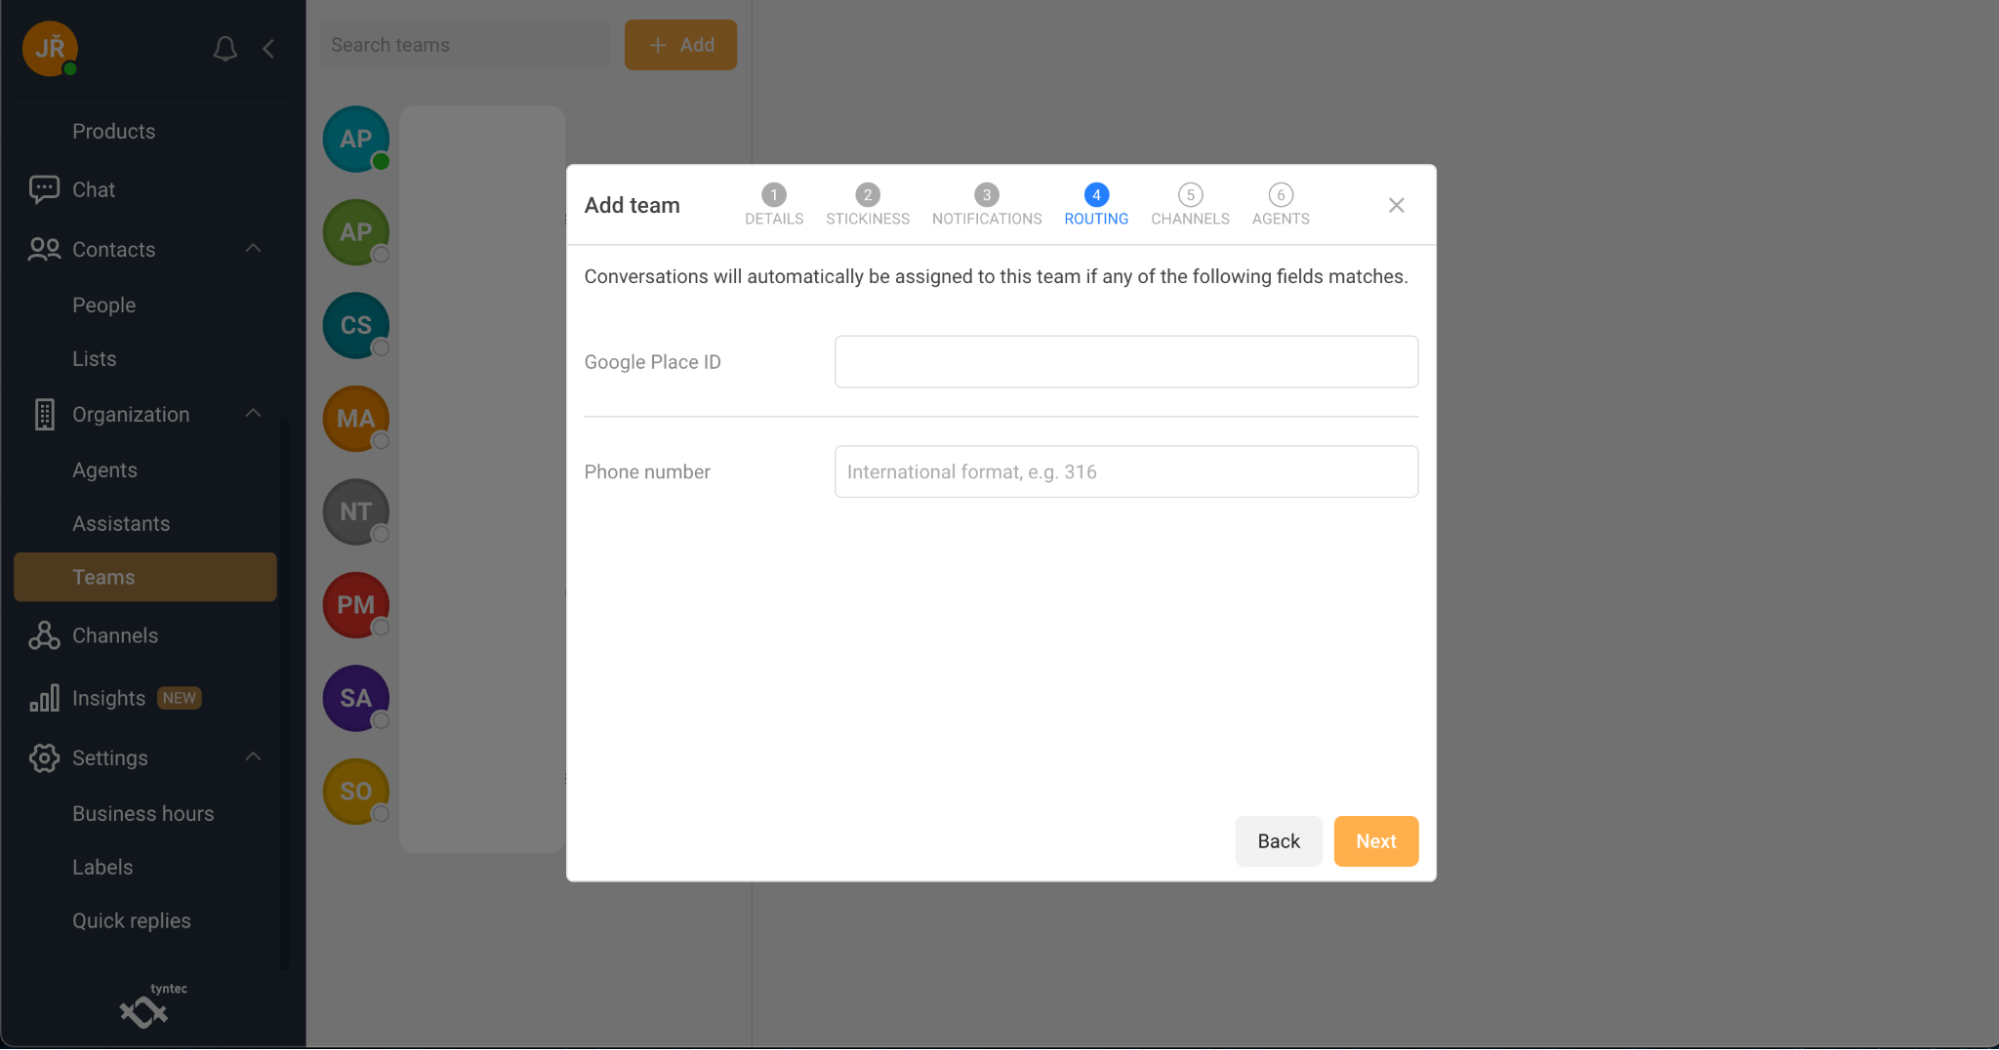
6. Select Routing preferences. This will automatically assign conversations to this team if any of the following fields matches.
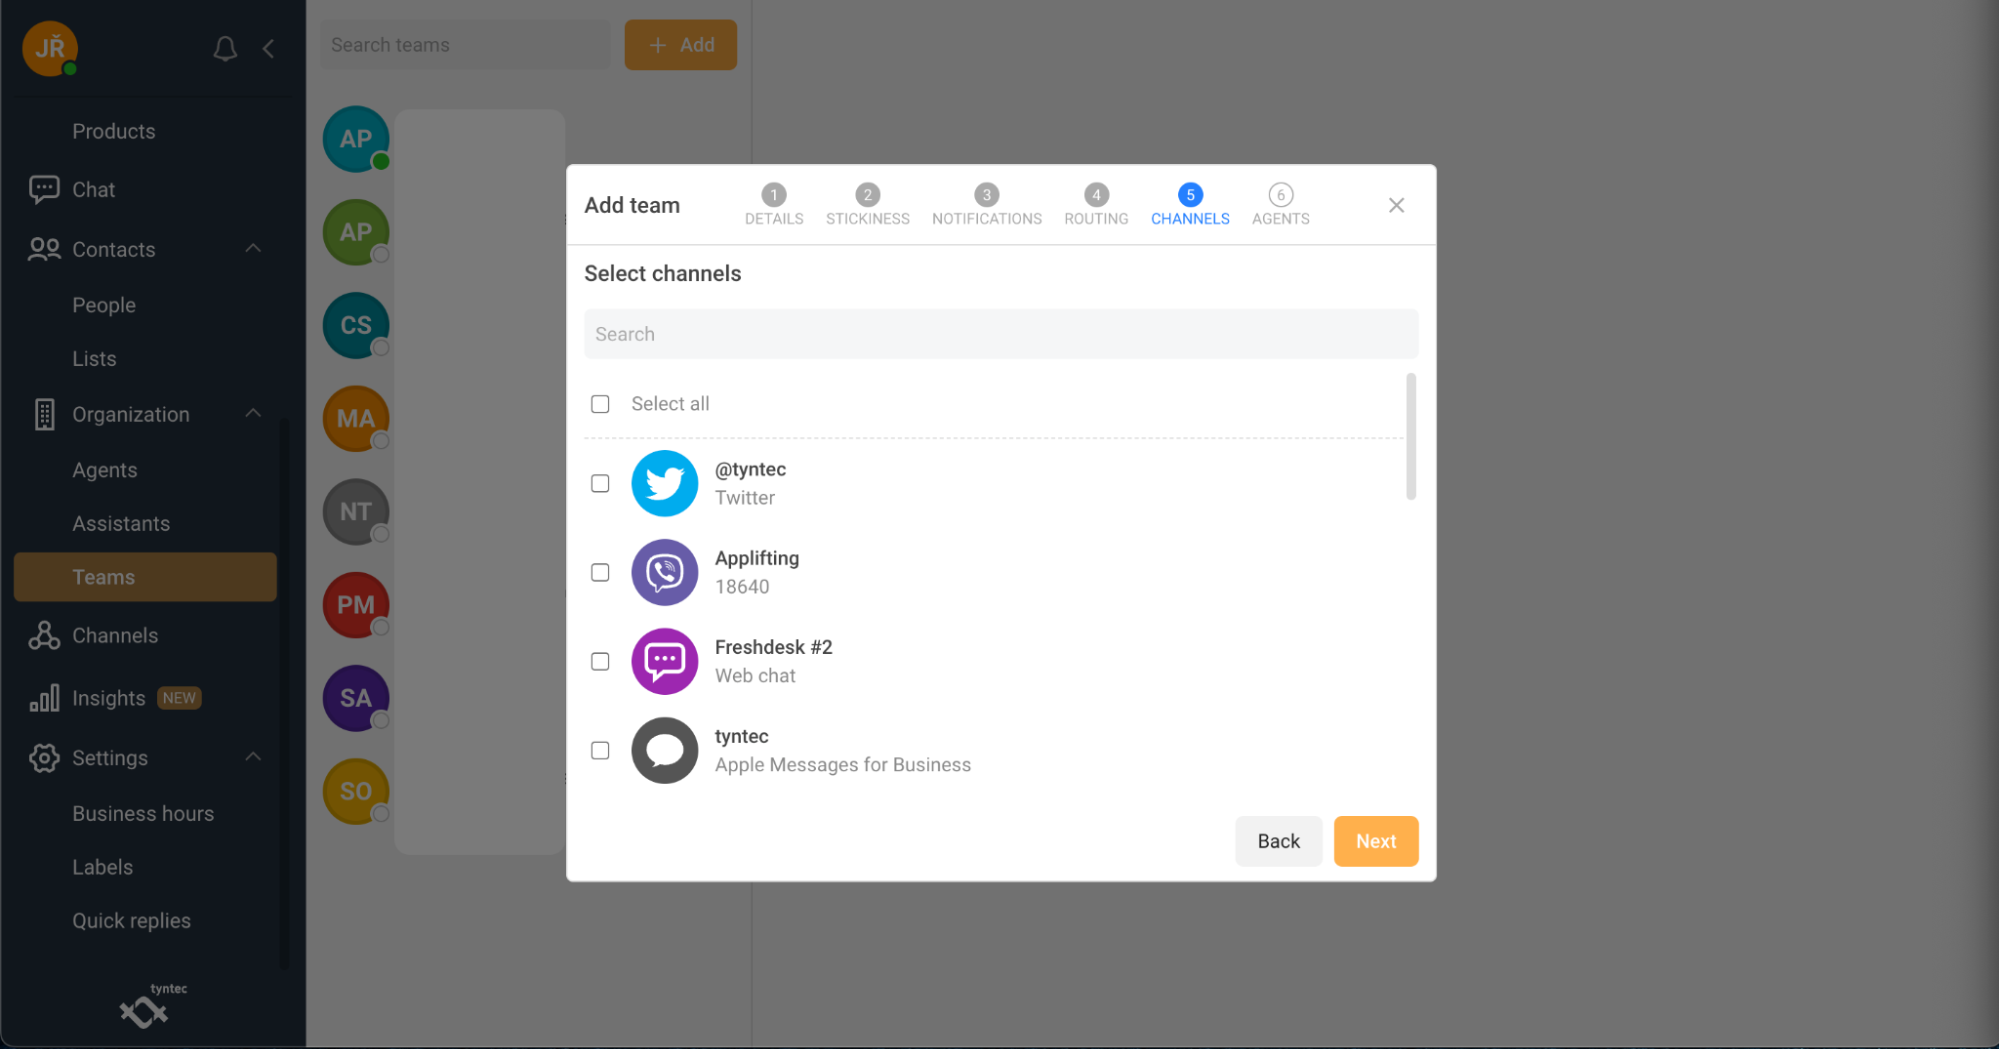
7. Select Channels you want to add to the Team.
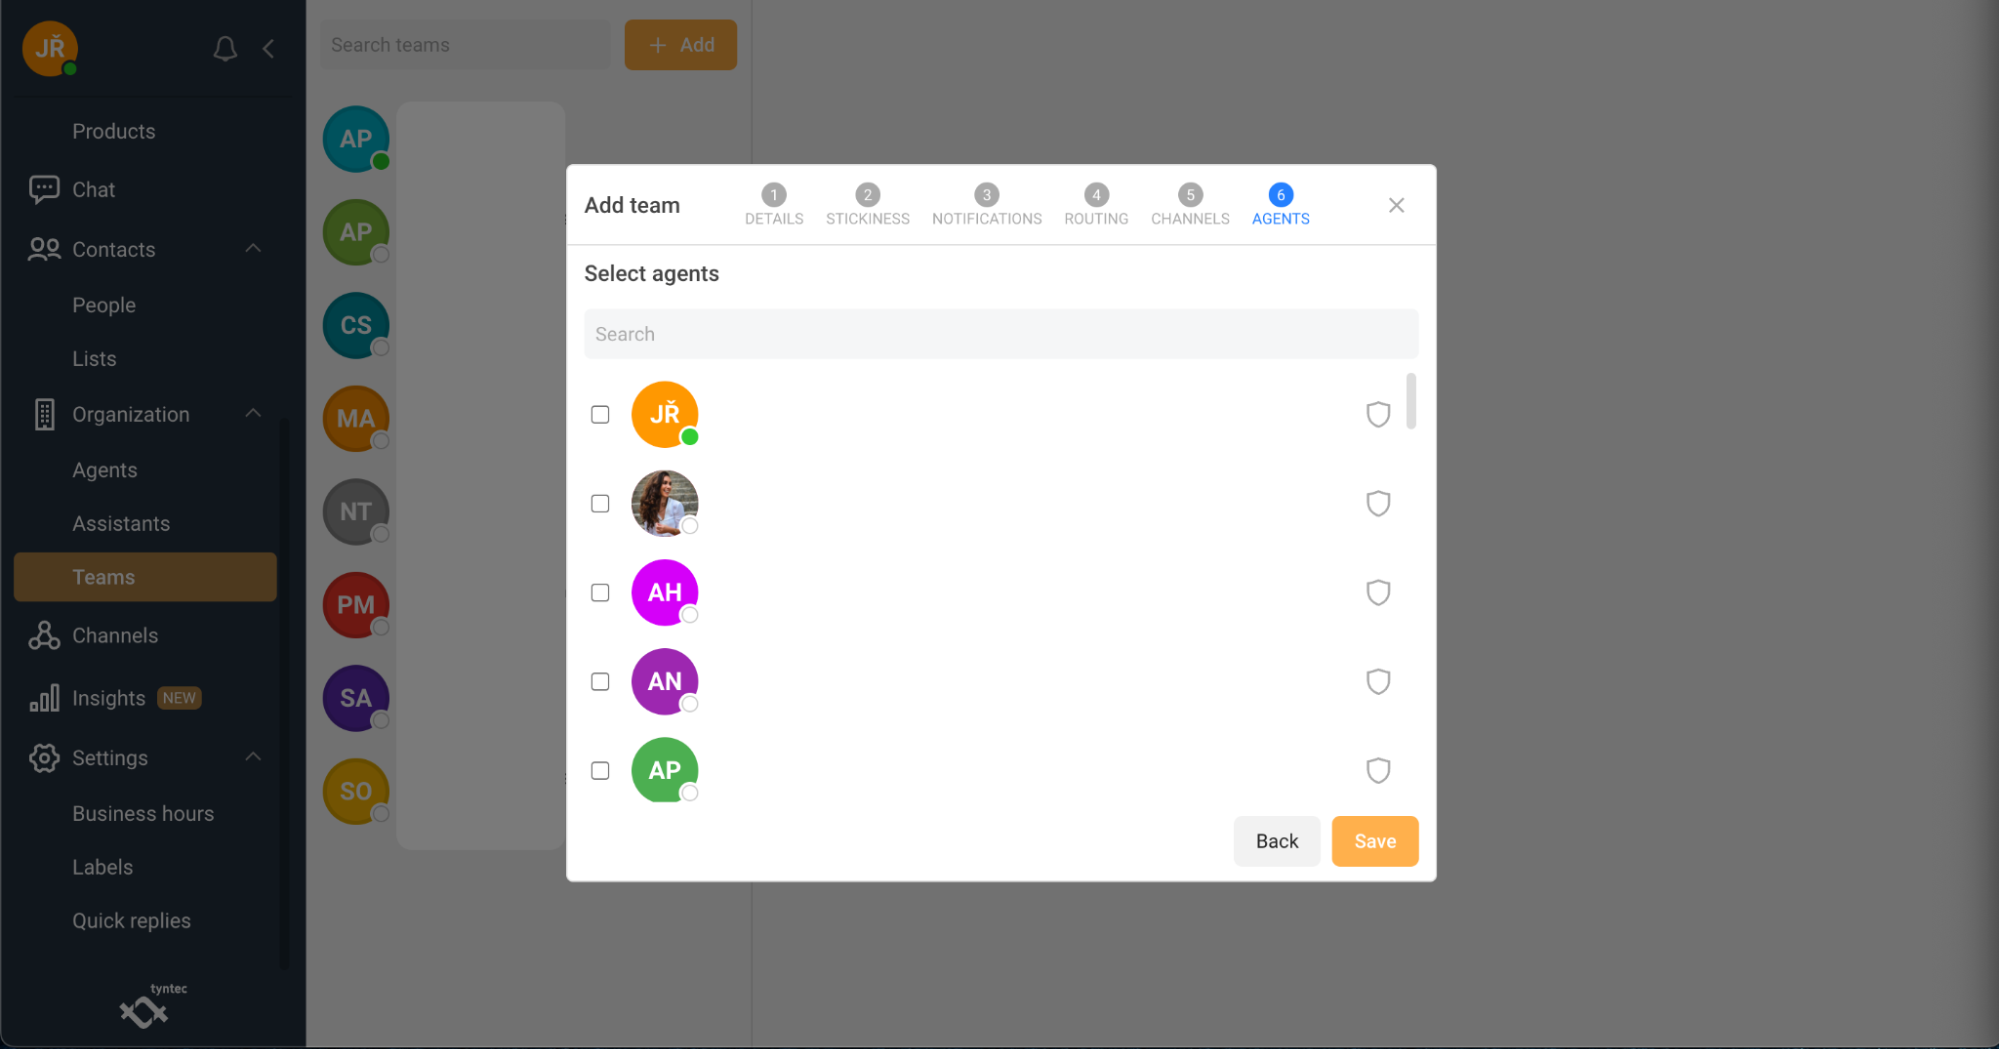
8. Select Agents you want to add to the Team.
9. Click Save.
Set up Insights
The Insights section allows you to analyze multiple metrics on each of your individual channels. Currently, you have the ability to select:
- Agents section, which provides insights into agent productivity.
- Campaigns section, which offers volumes and delivery insights.
- Durations section, which provides analytics of response and results times.
- Labels section, which provides volumes per label.
- Volumes section, which provides analytics of conversations and messages.
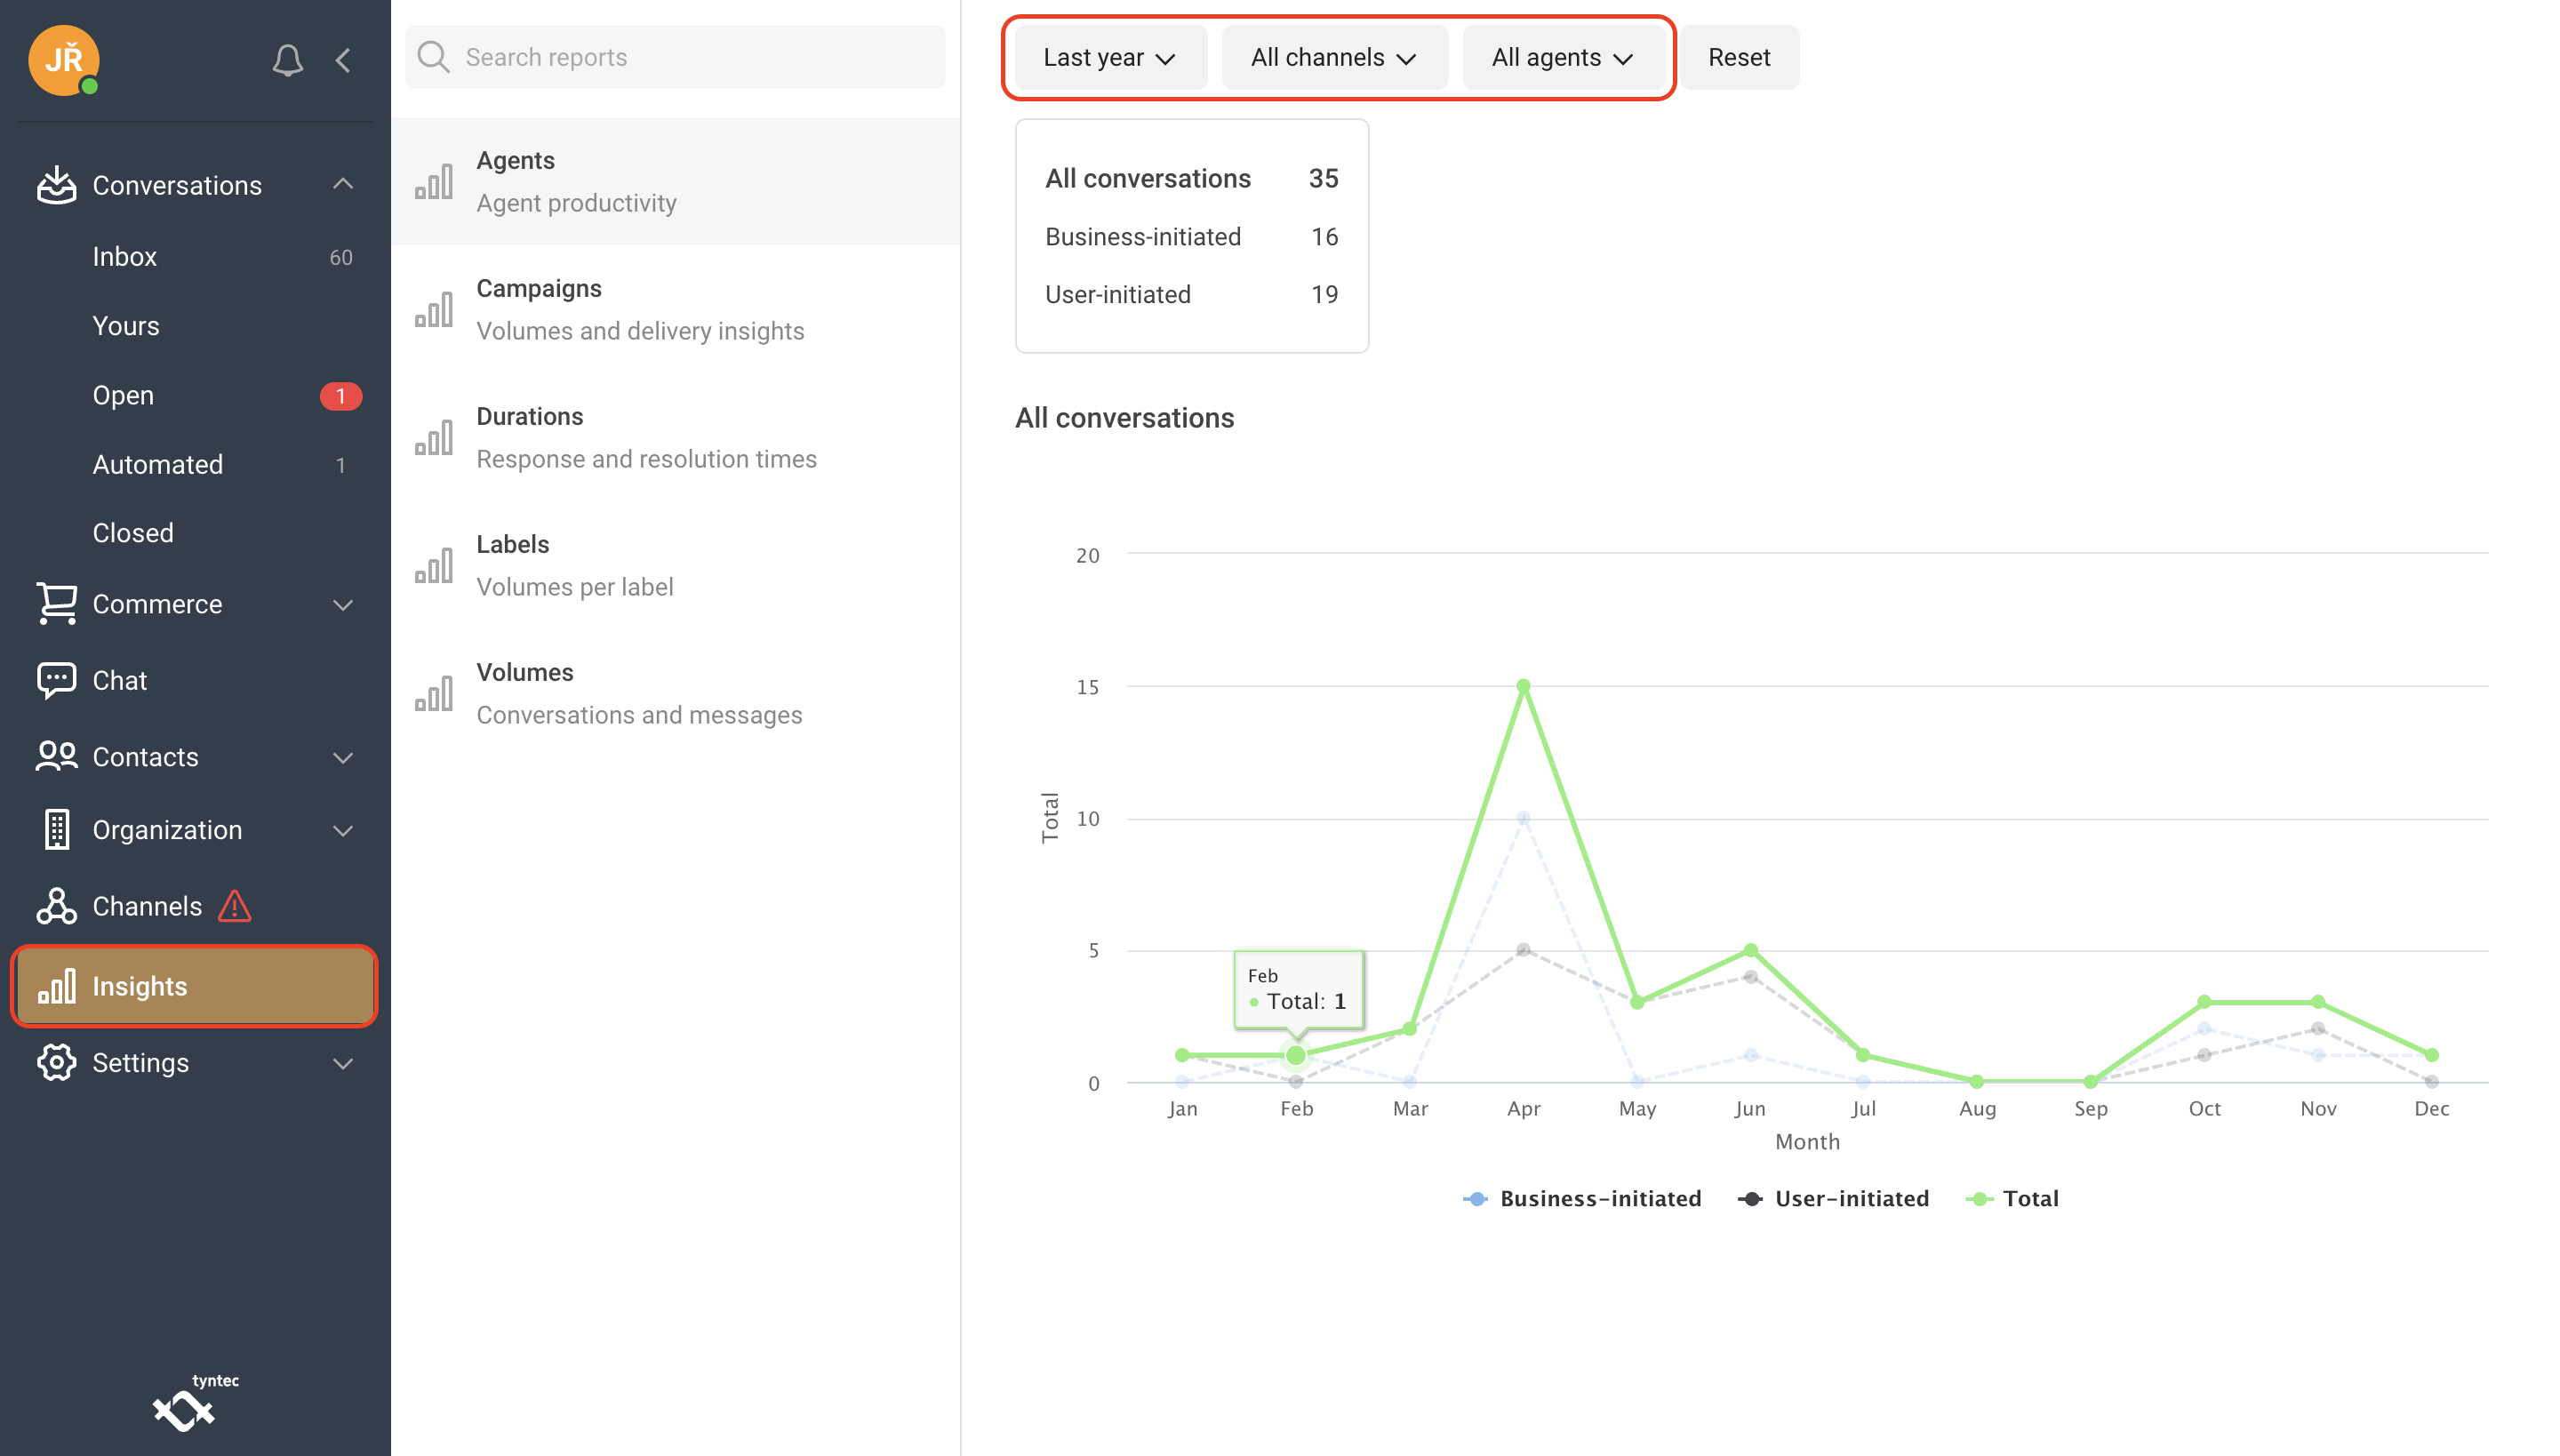
Agents
In the Agents section, you can monitor the call volume and duration for each agent and channels on your team, as well as their call resolution rates.
1. Select Agents.
2. Select the time period you want to analyze.
3. Select the channel(s) you want to analyze.
4. Select the agent(s) you want to analyze.
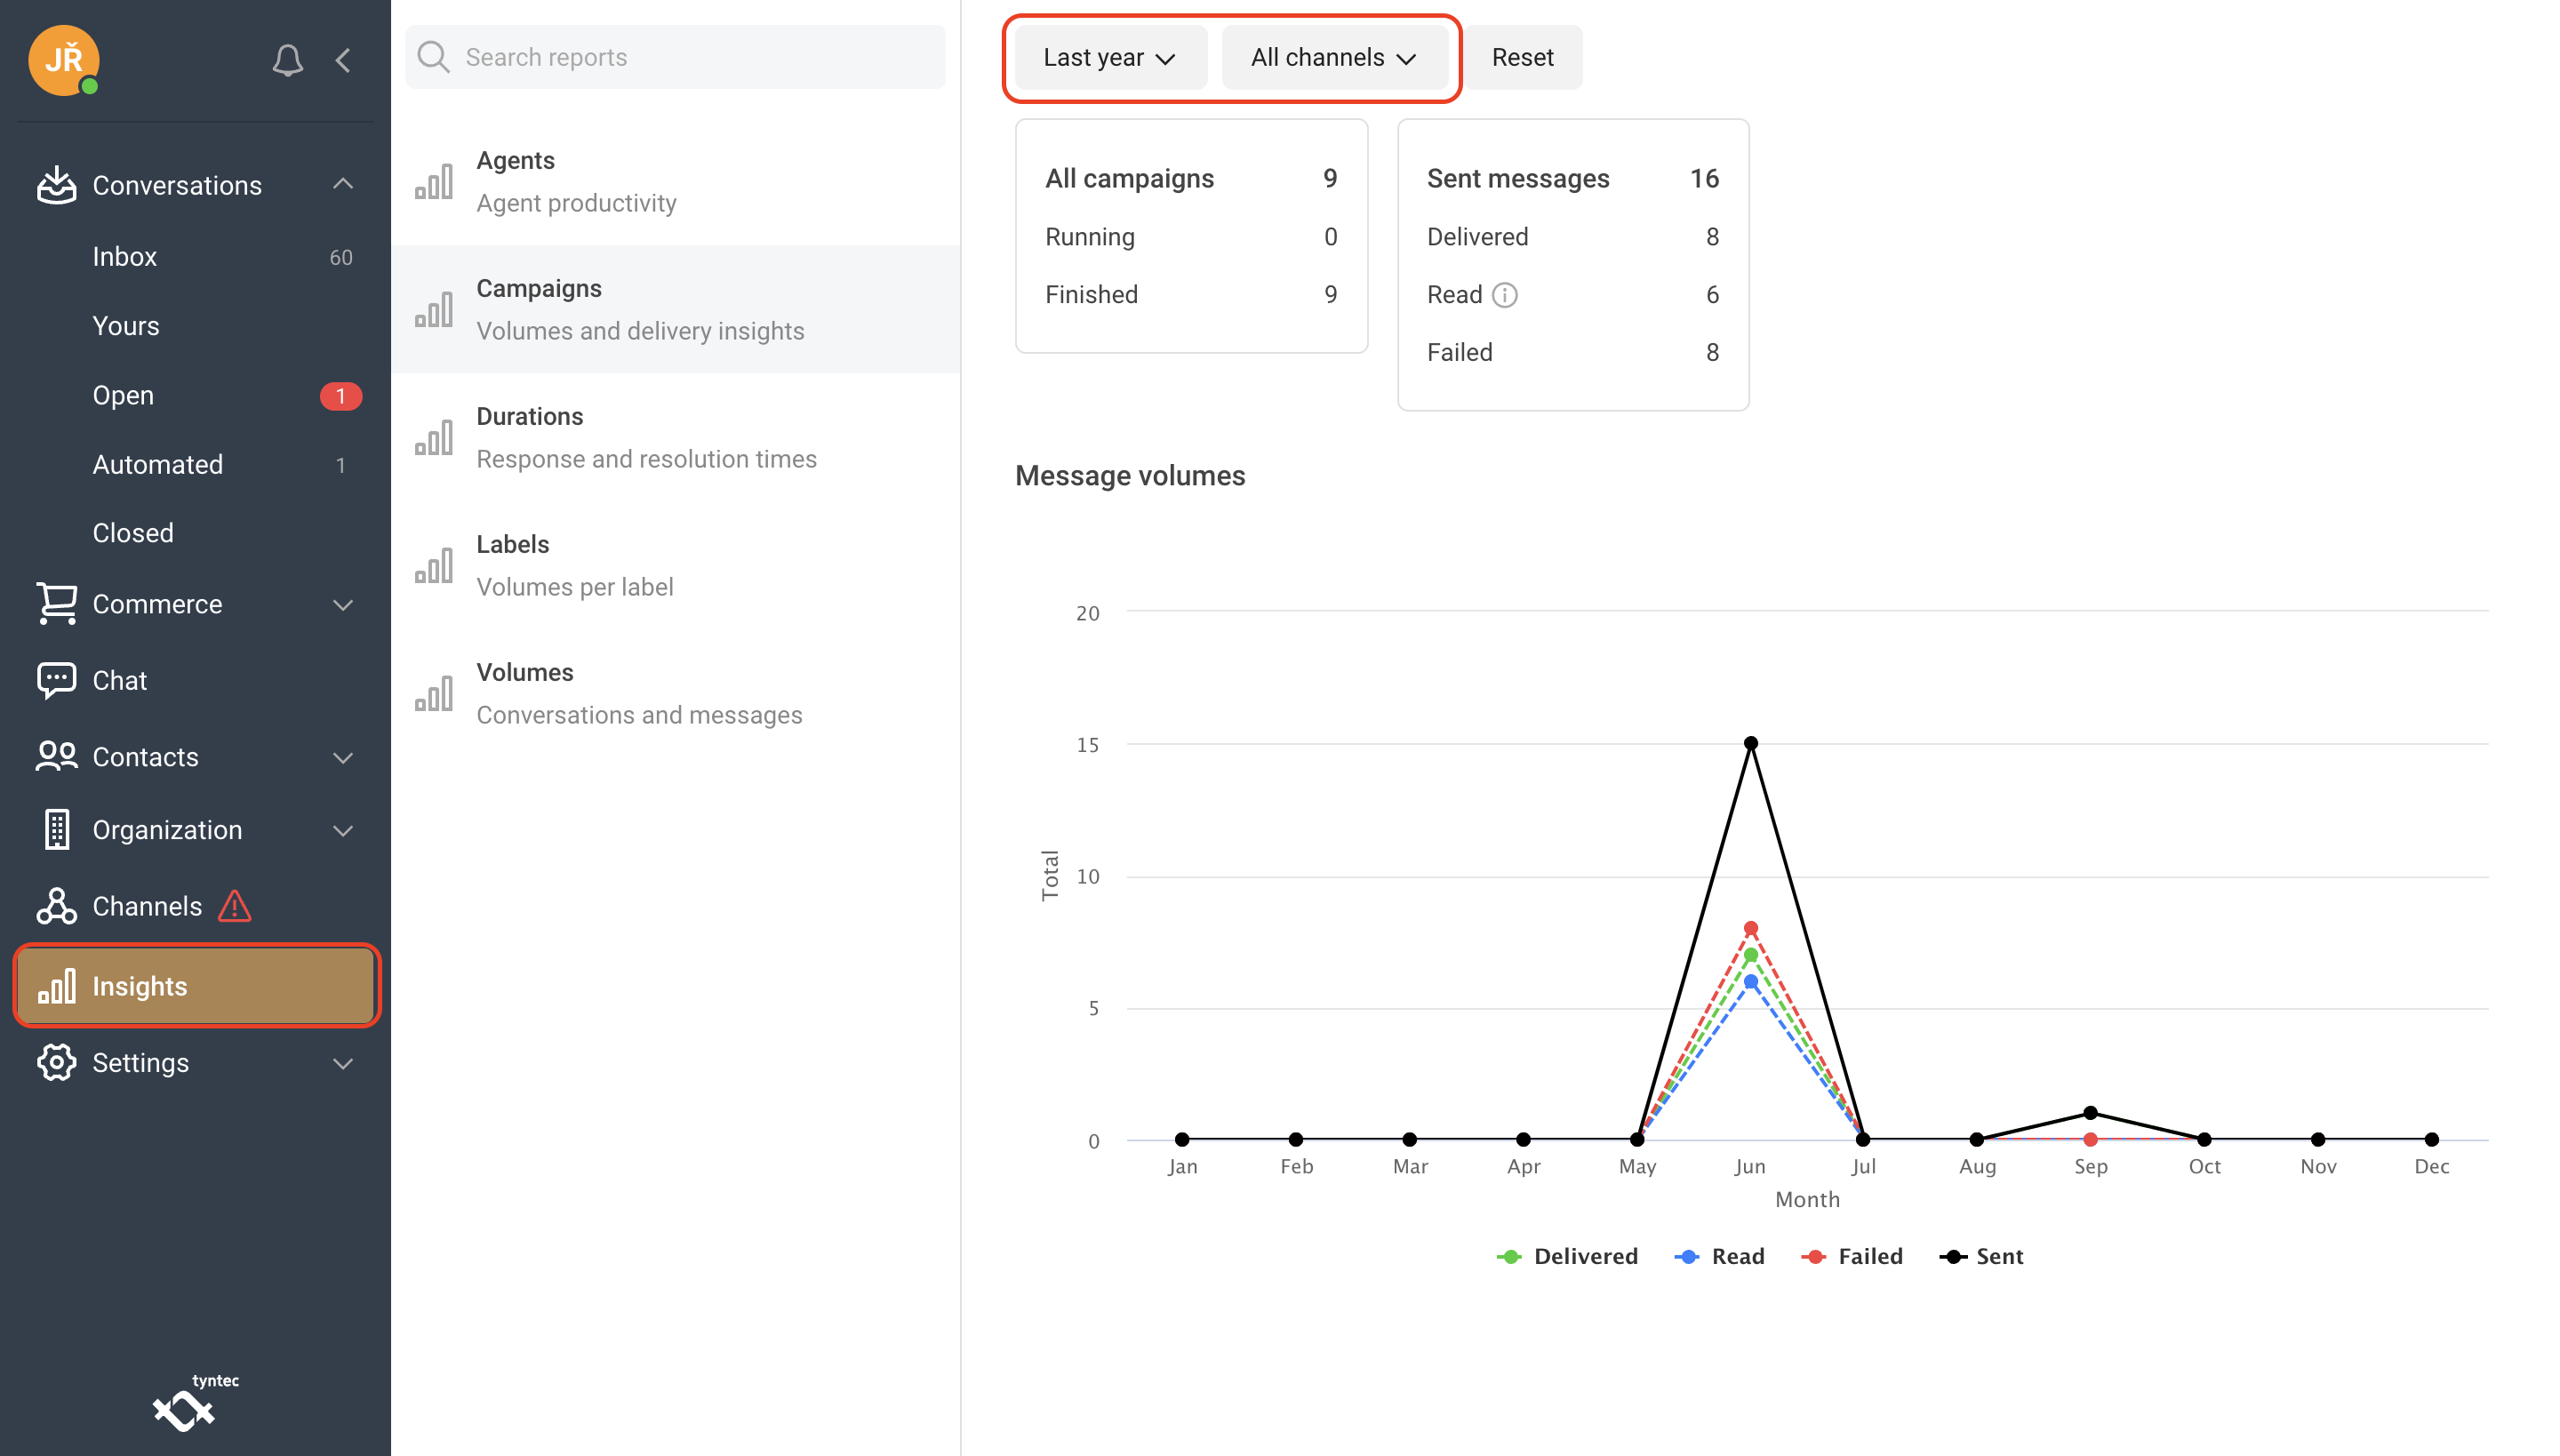
Campaigns
In the Campaigns section, you can analyze the volume of conversations and messages for your campaigns.
1. Select Campaigns.
2. Select the time period you want to analyze.
3. Select the channel(s) you want to analyze.
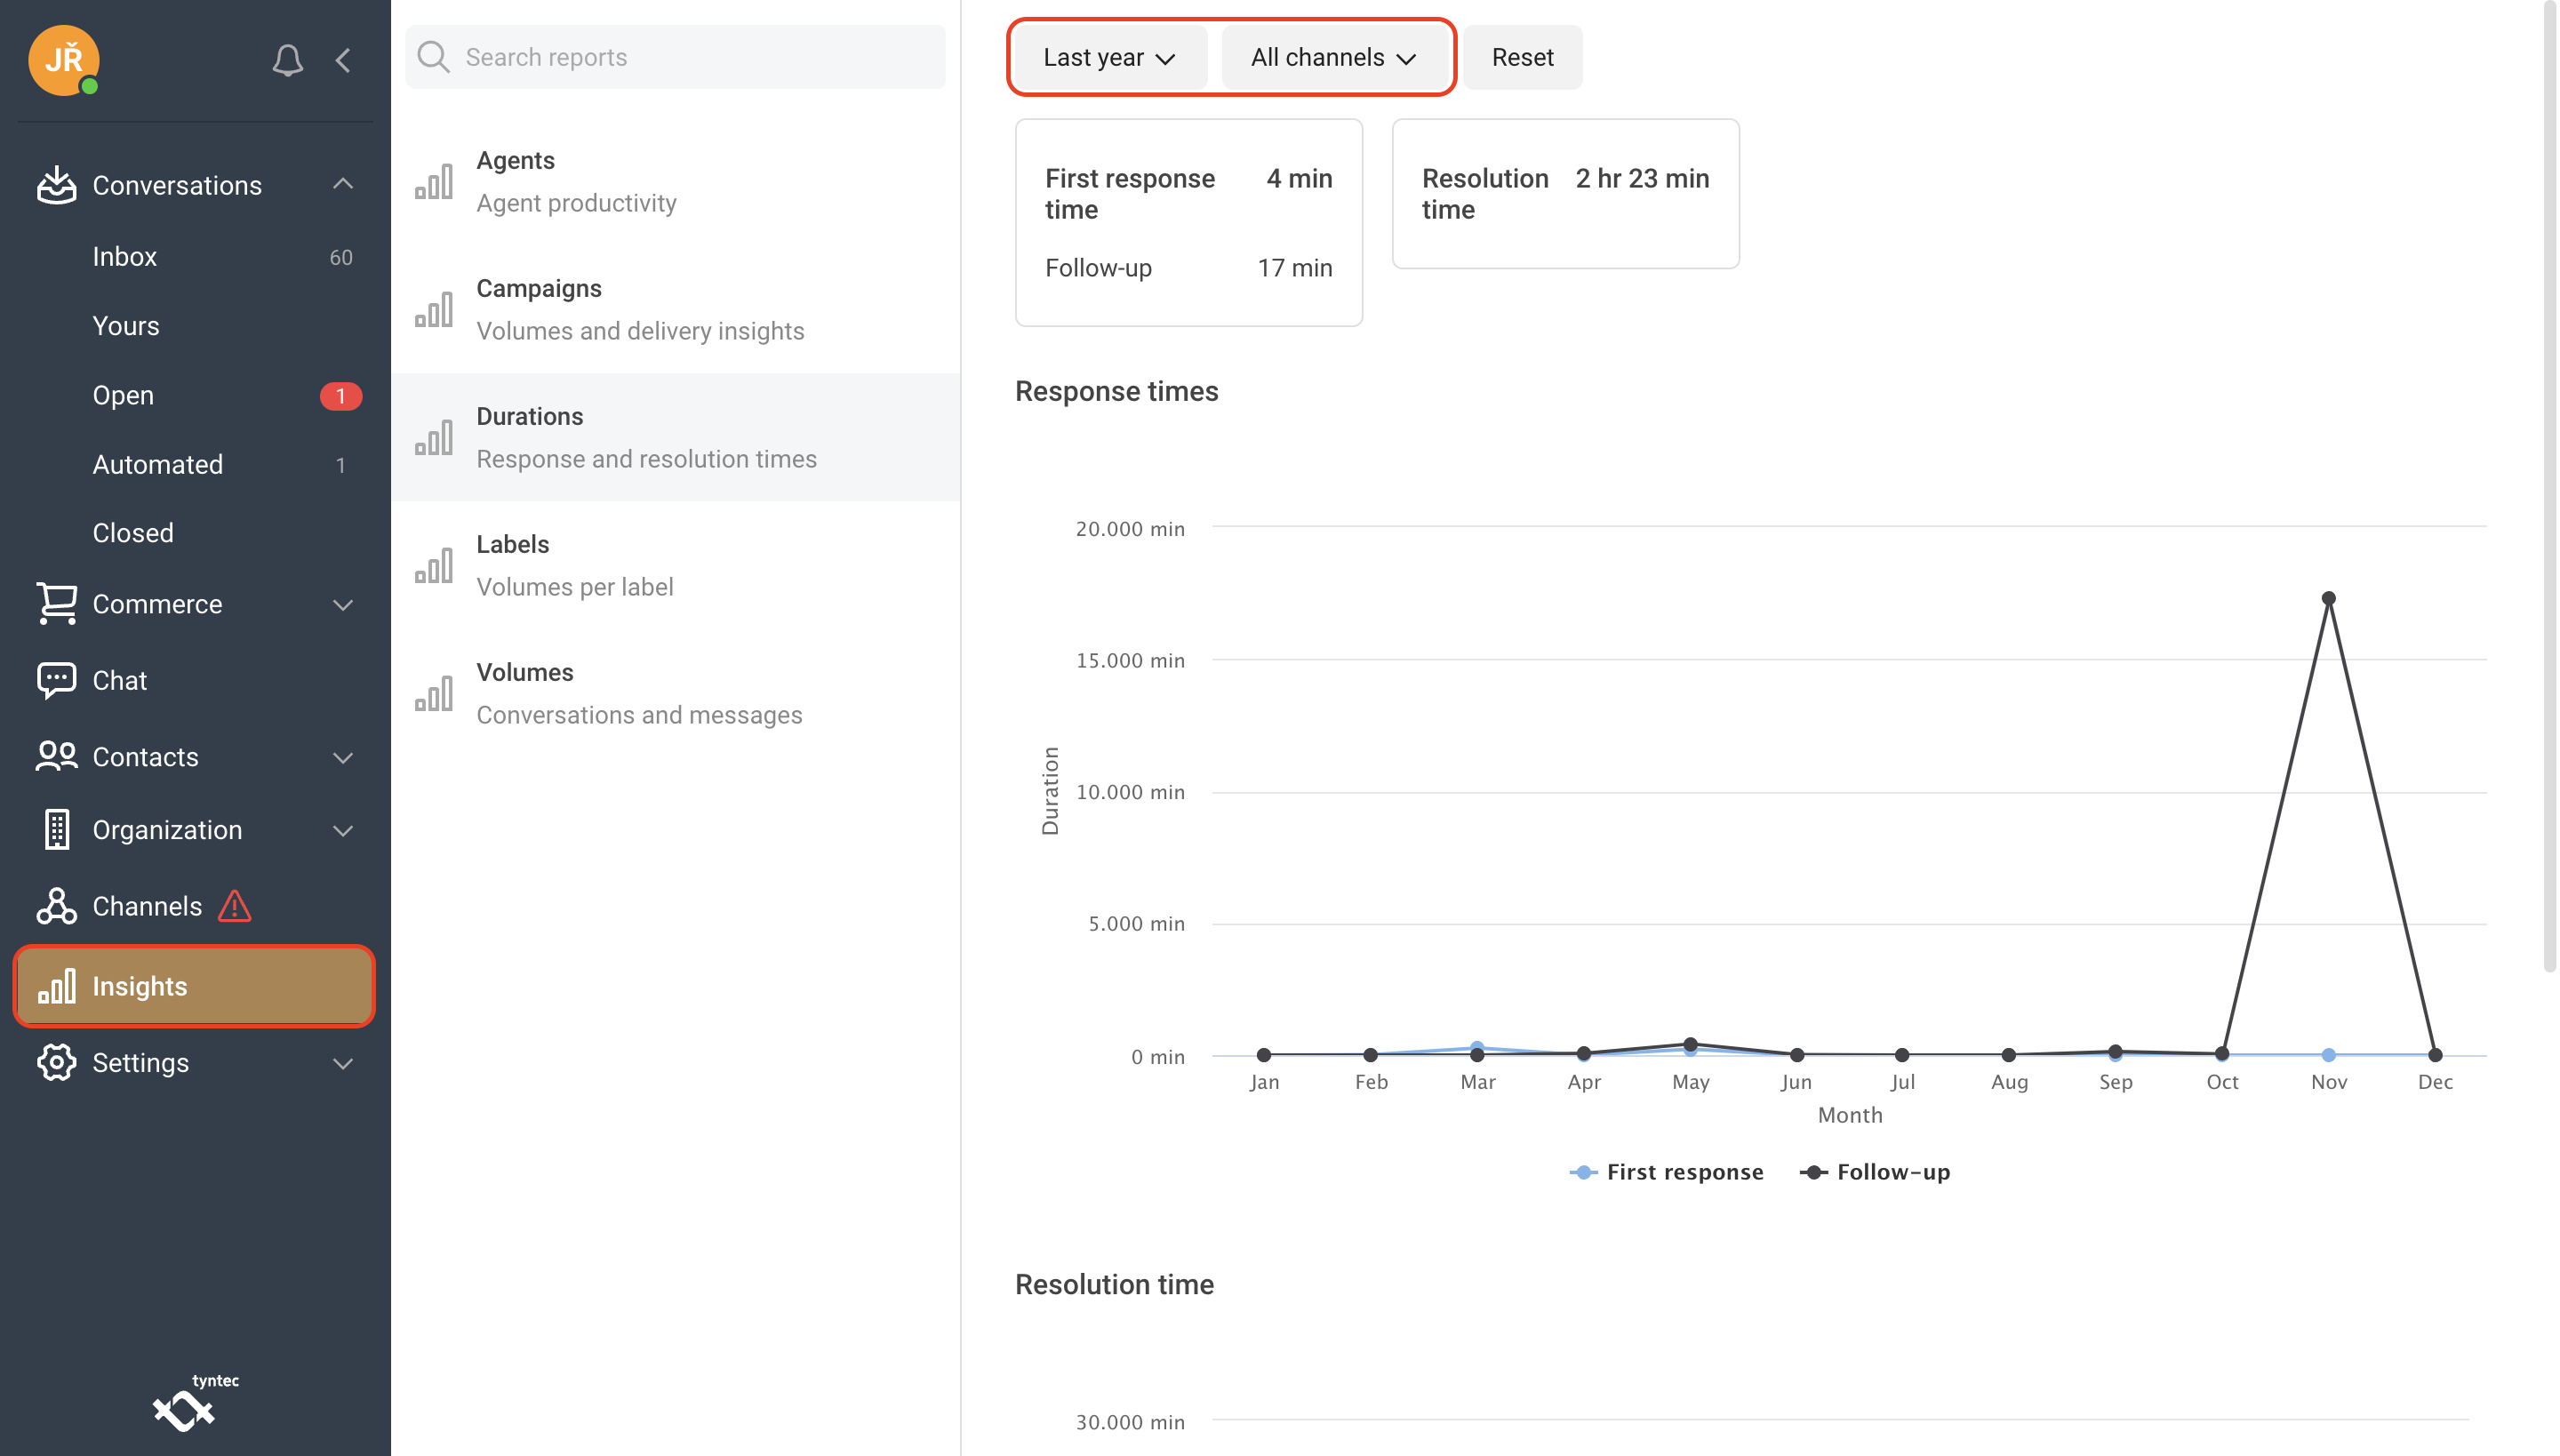
Durations
In the Durations section, you can analyze response and resolution times for conversations and messages across all channels or for specific channels of your choice.
1. Select Durations.
2. Select the time period you want to analyze.
3. Select the channel(s) you want to analyze.
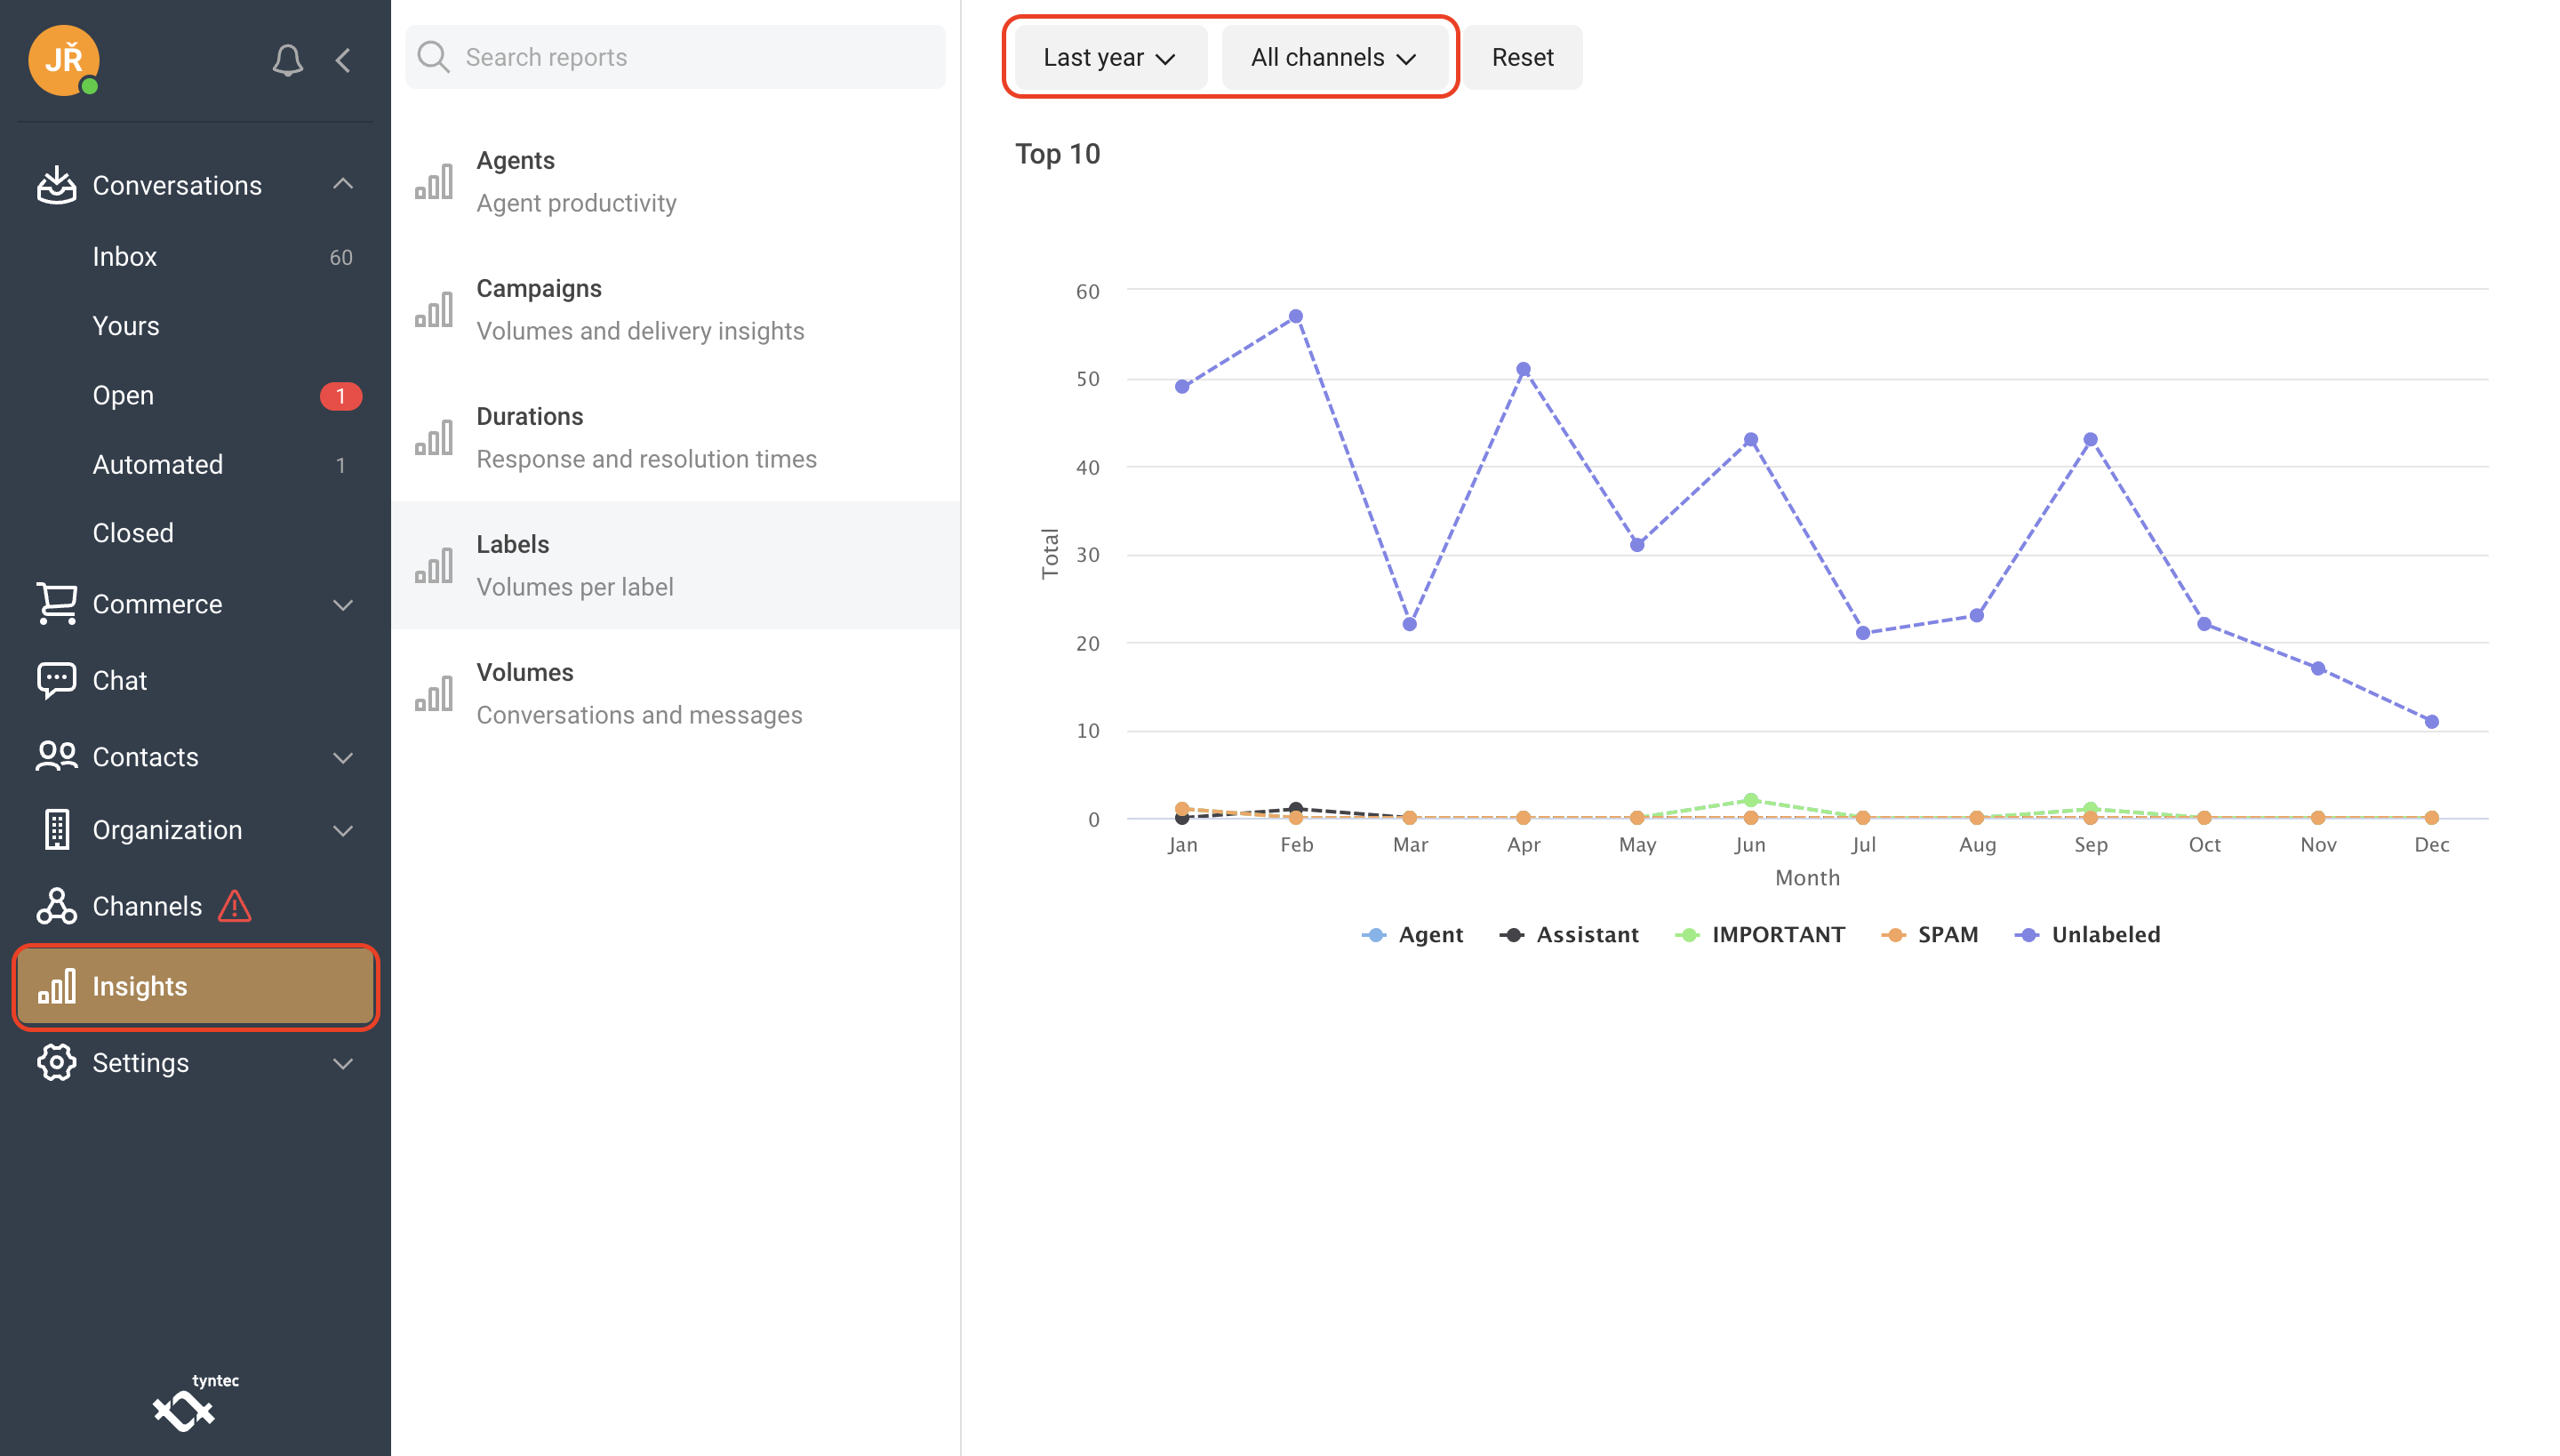
Labels
In the Labels section, you can analyze the volume of messages that have been tagged with specific labels, as well as those that are untagged.
1. Select Labels.
2. Select the time period you want to analyze.
3. Select the channel(s) you want to analyze.
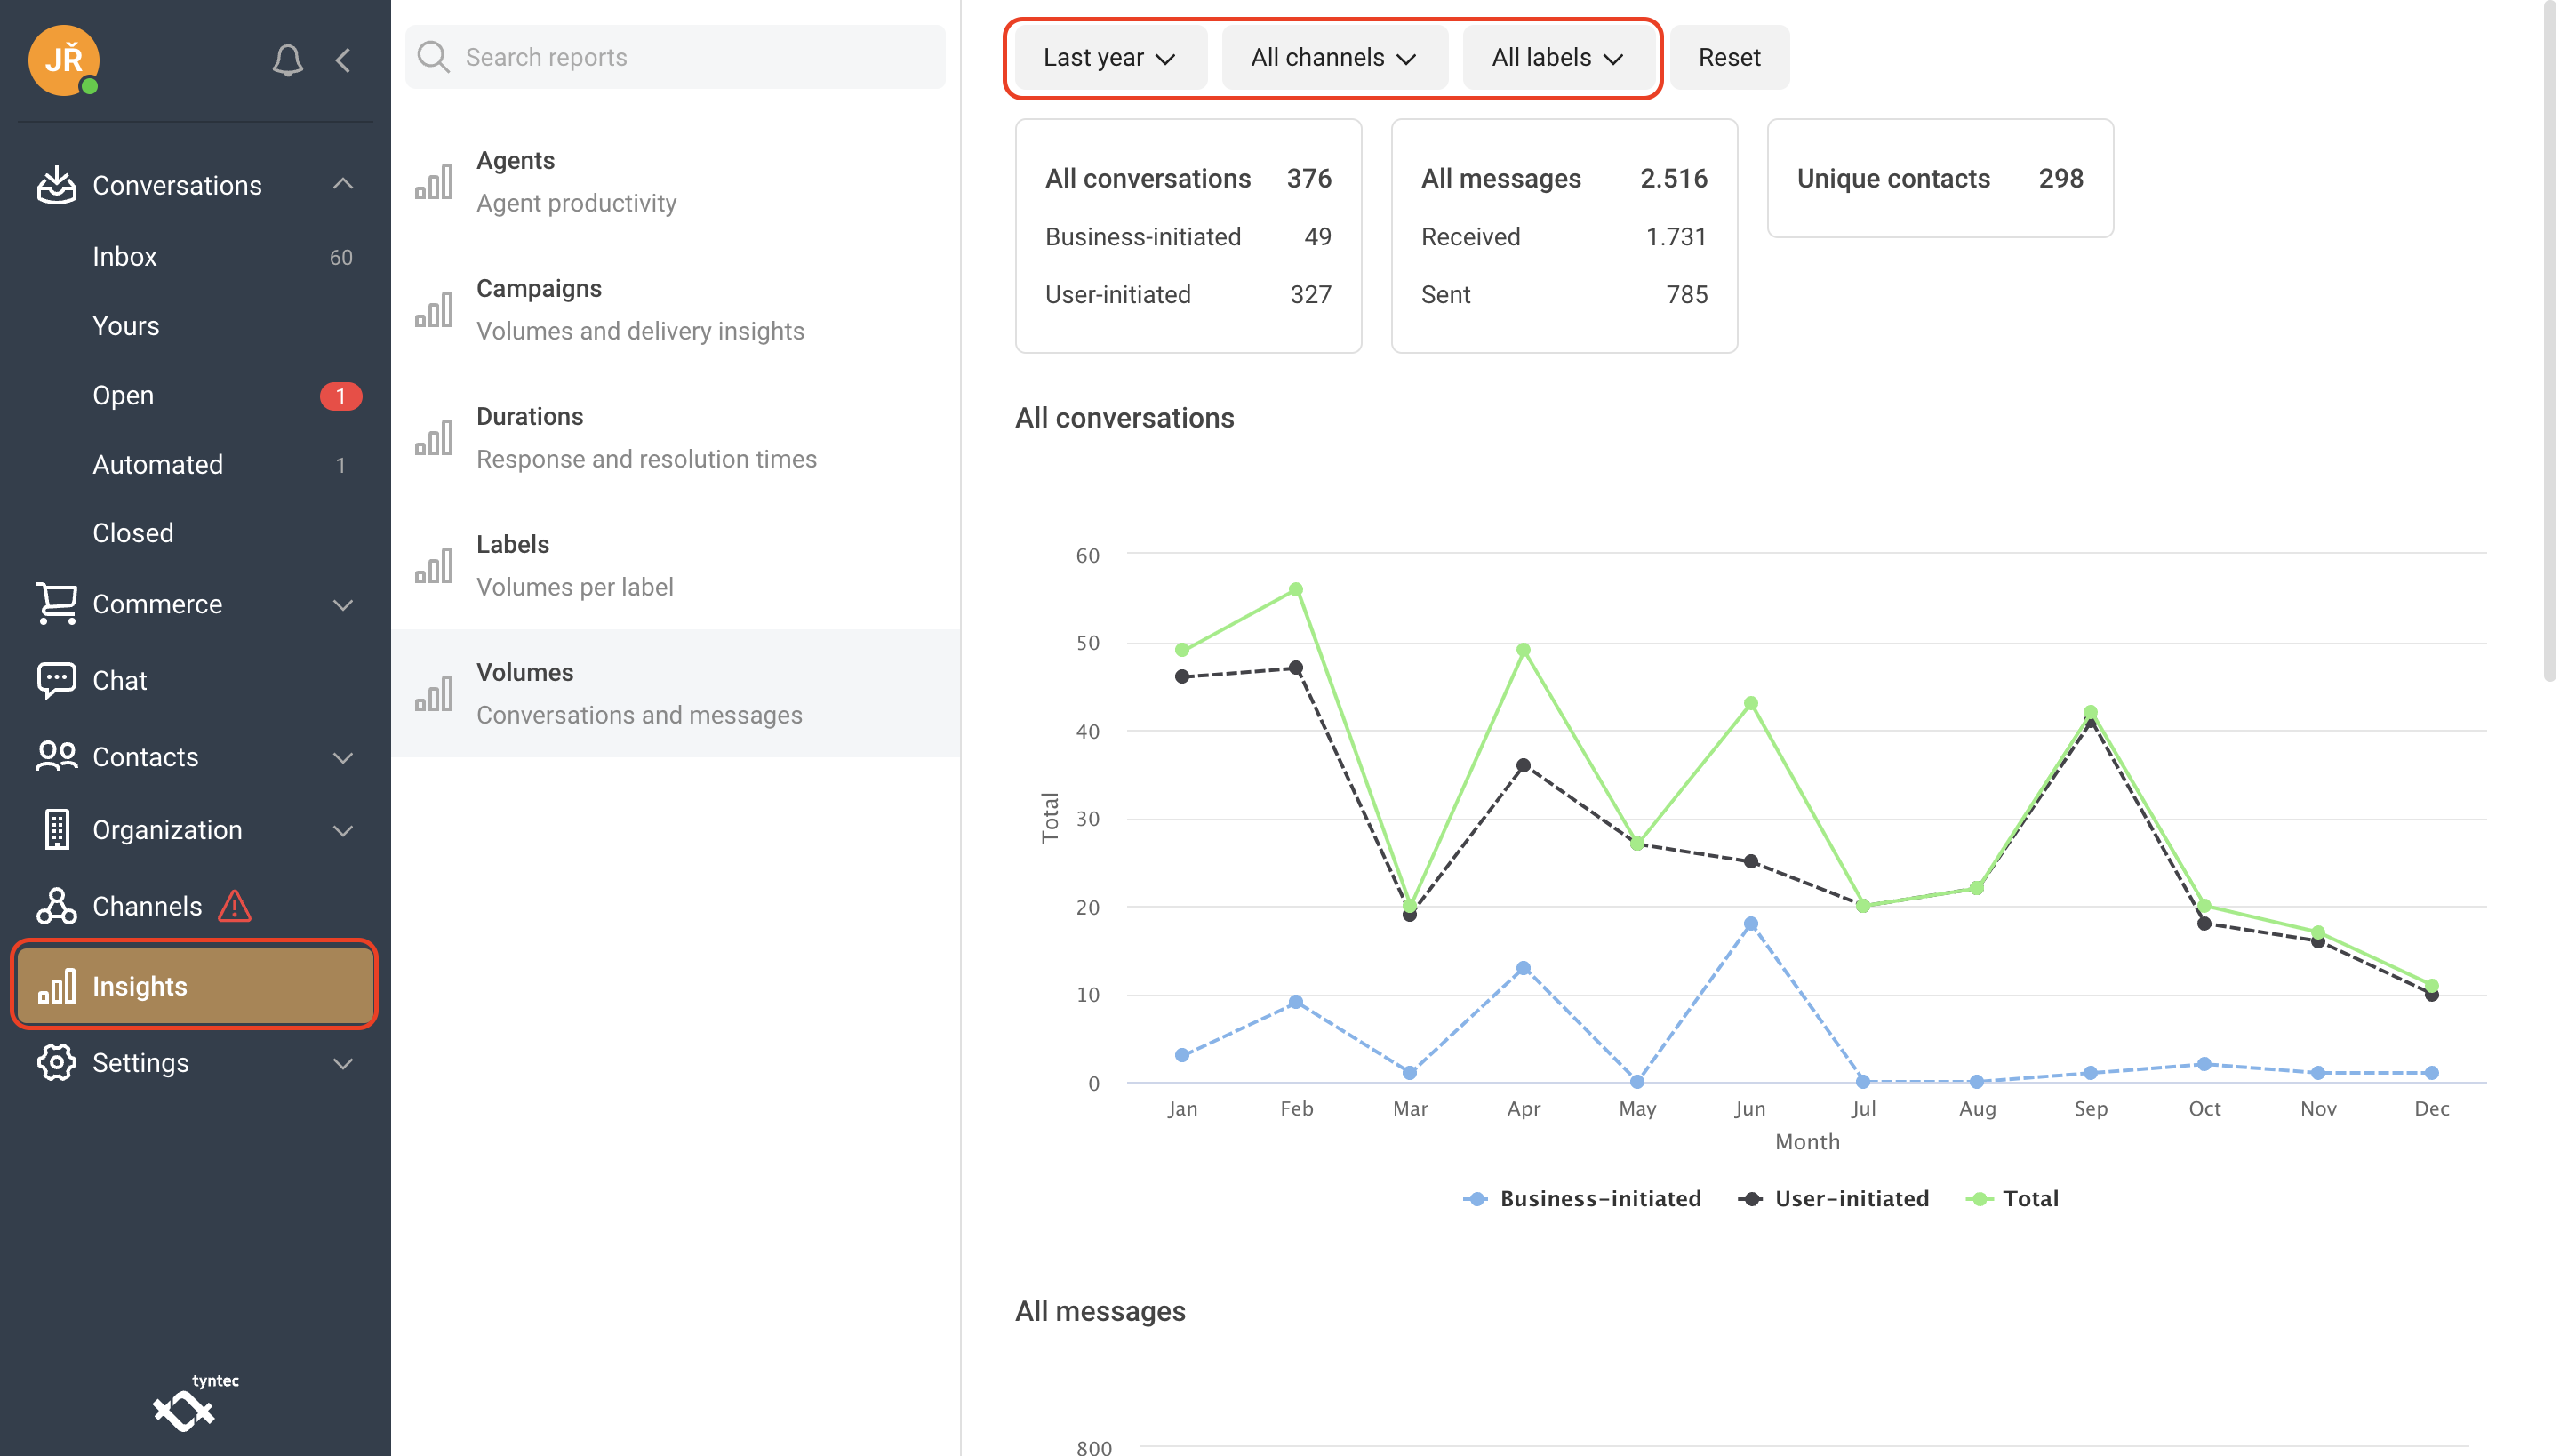
Volumes
In the Volumes tab, you have the option to monitor conversations and individual messages from all channels as well as from each of your choice within the time span of your choice.
1. Select Volumes.
2. Select the time period you want to analyze.
3. Select the channel(s) you want to analyze.
4. Select the label(s) you want to analyze.
Set up channels
In the Channels section you can see all the channels you have linked to your organization.
Add new Channel
1. Select Channels.
2. Click Add.
3. Select the Channel you want to connect to.
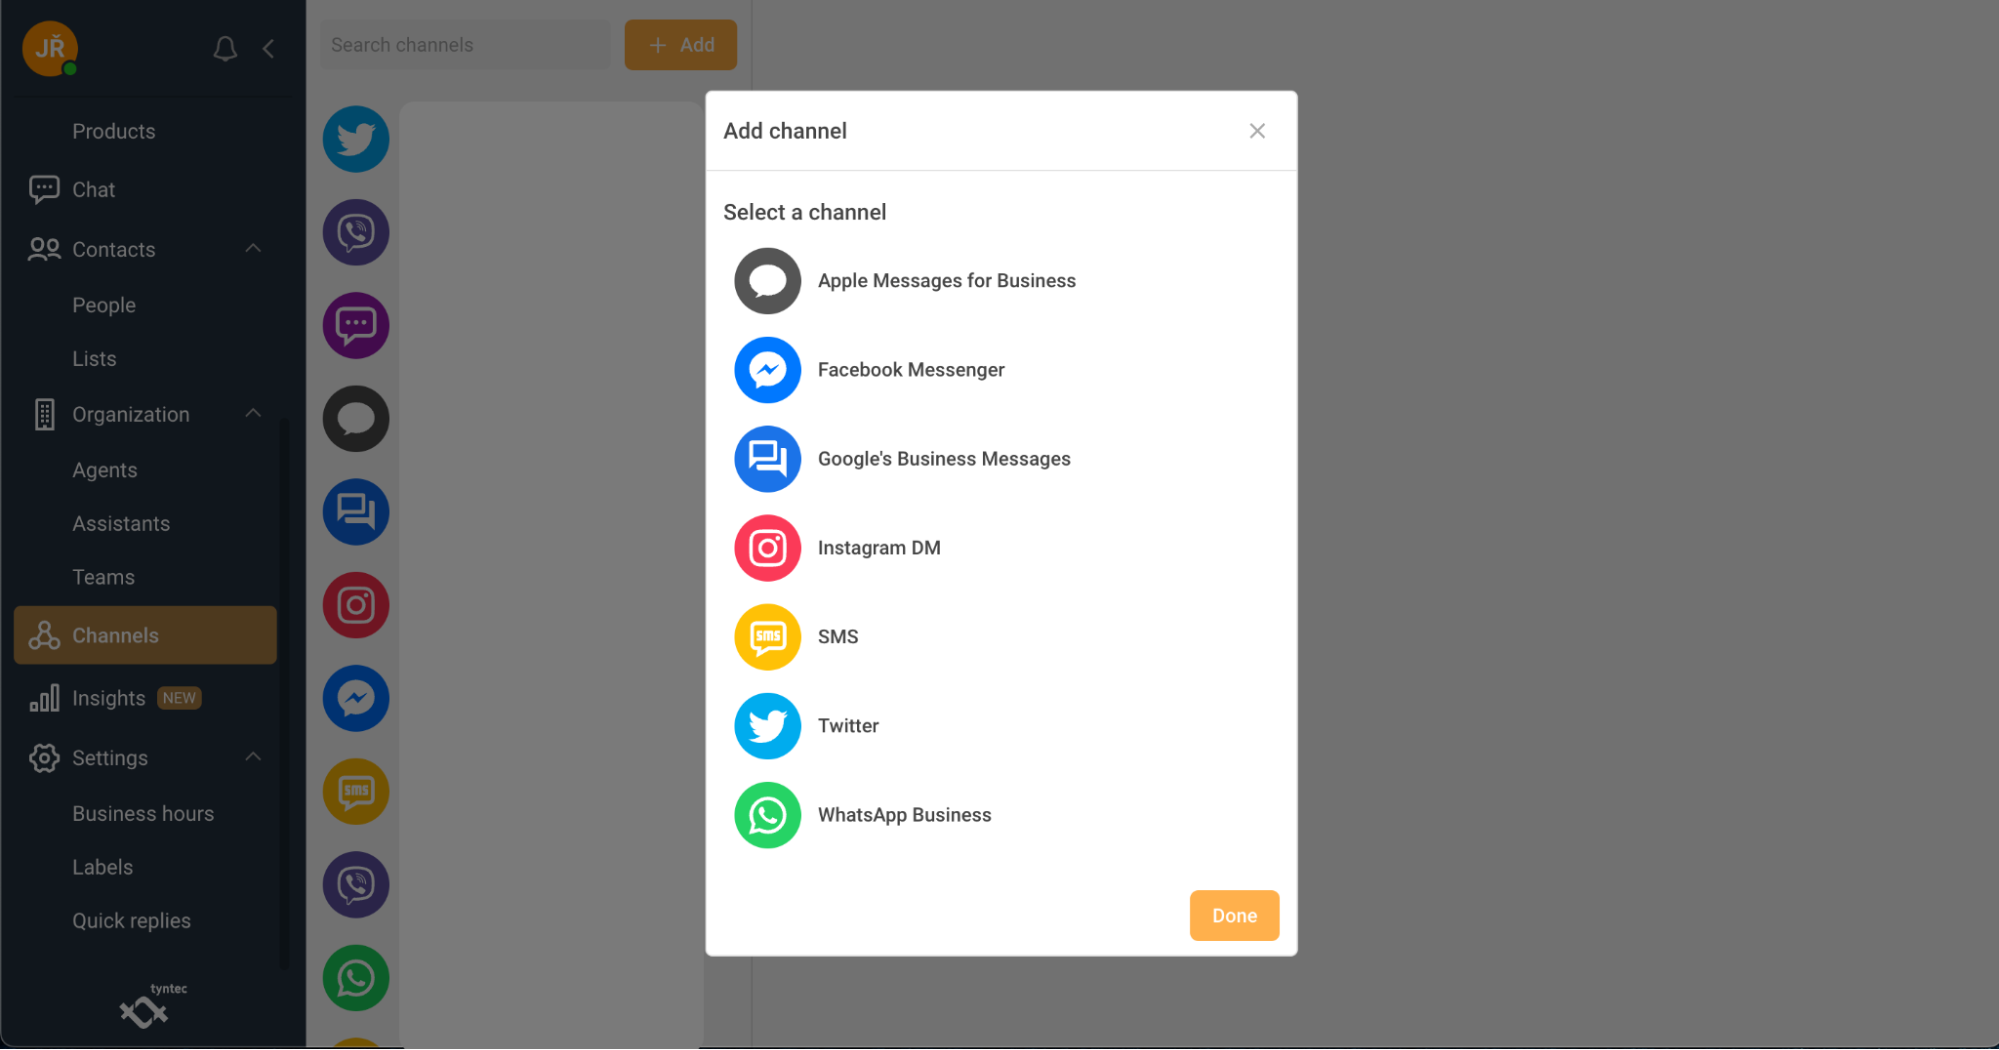
4. Depending on which channel you choose, you will be asked to fill in additional information.
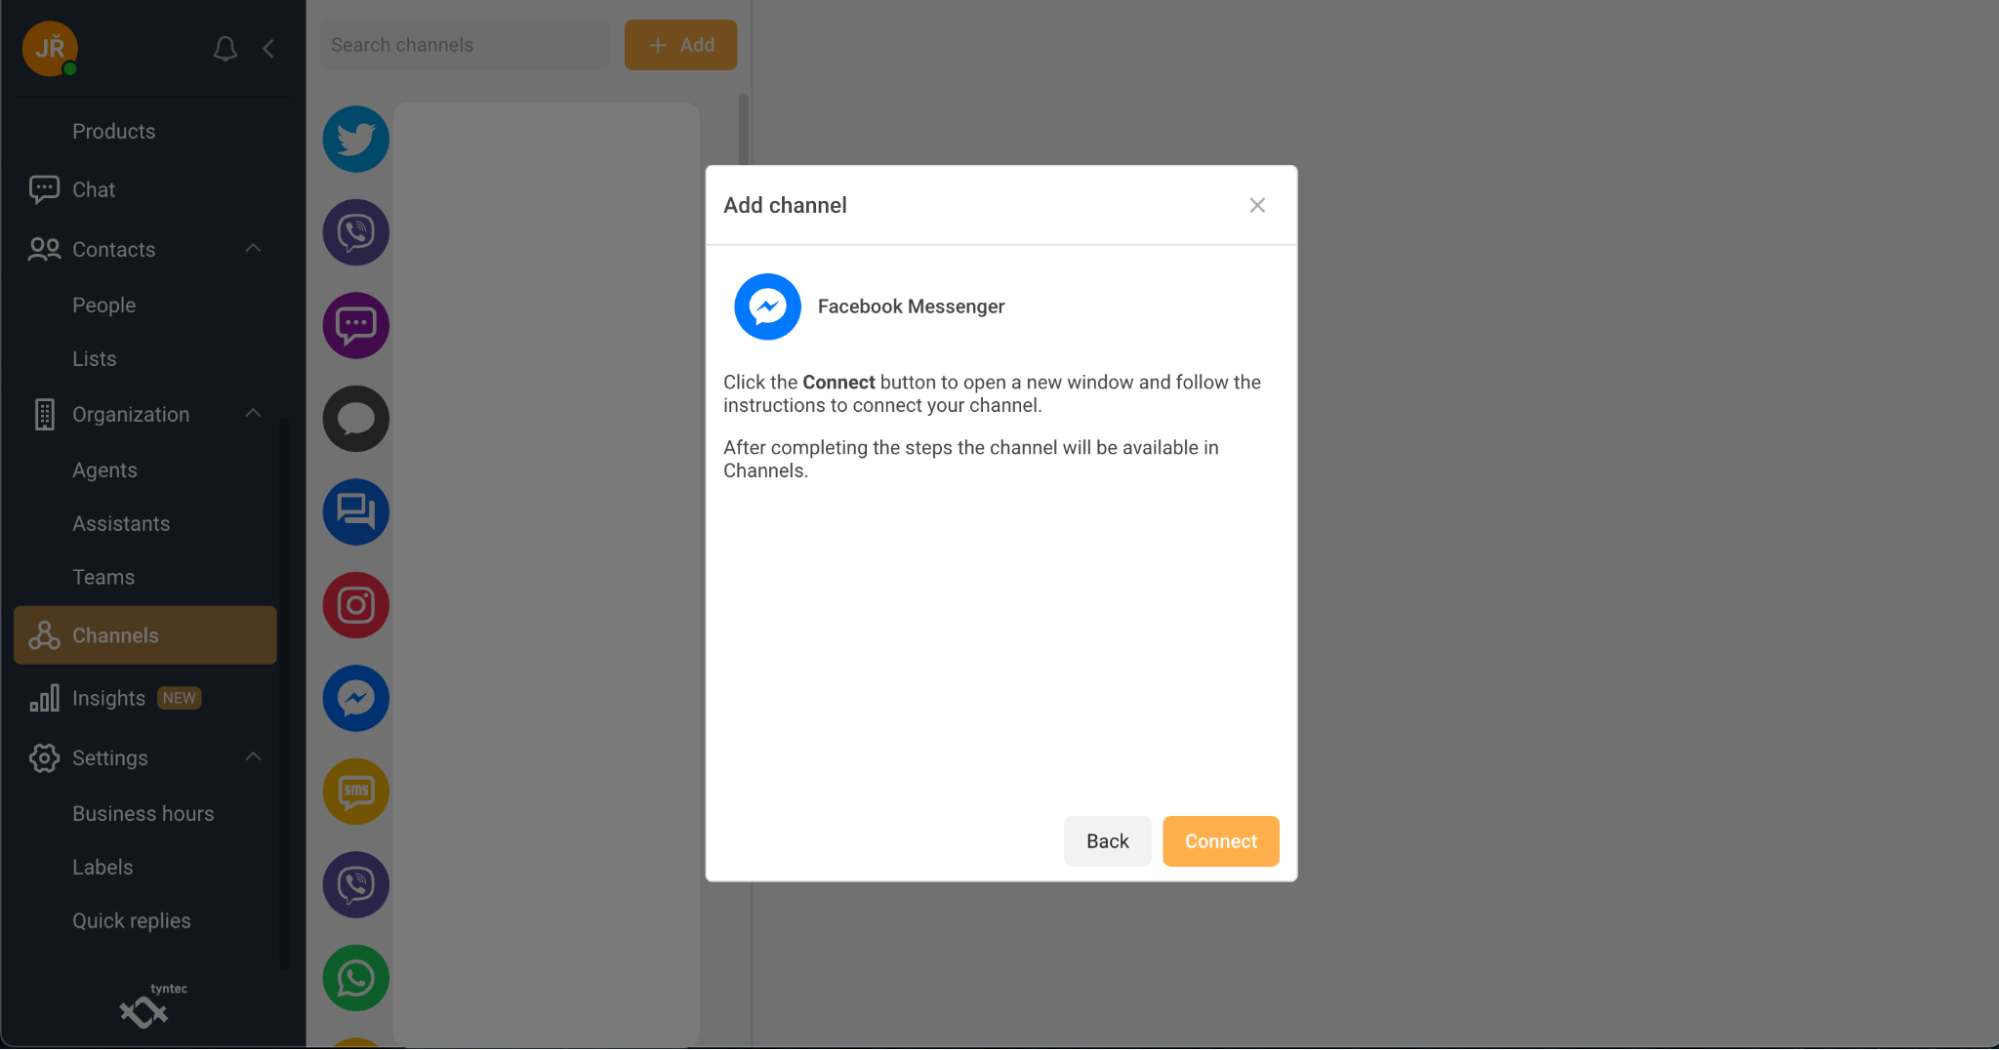
5. After filling in the information, the channel will be displayed in the menu.
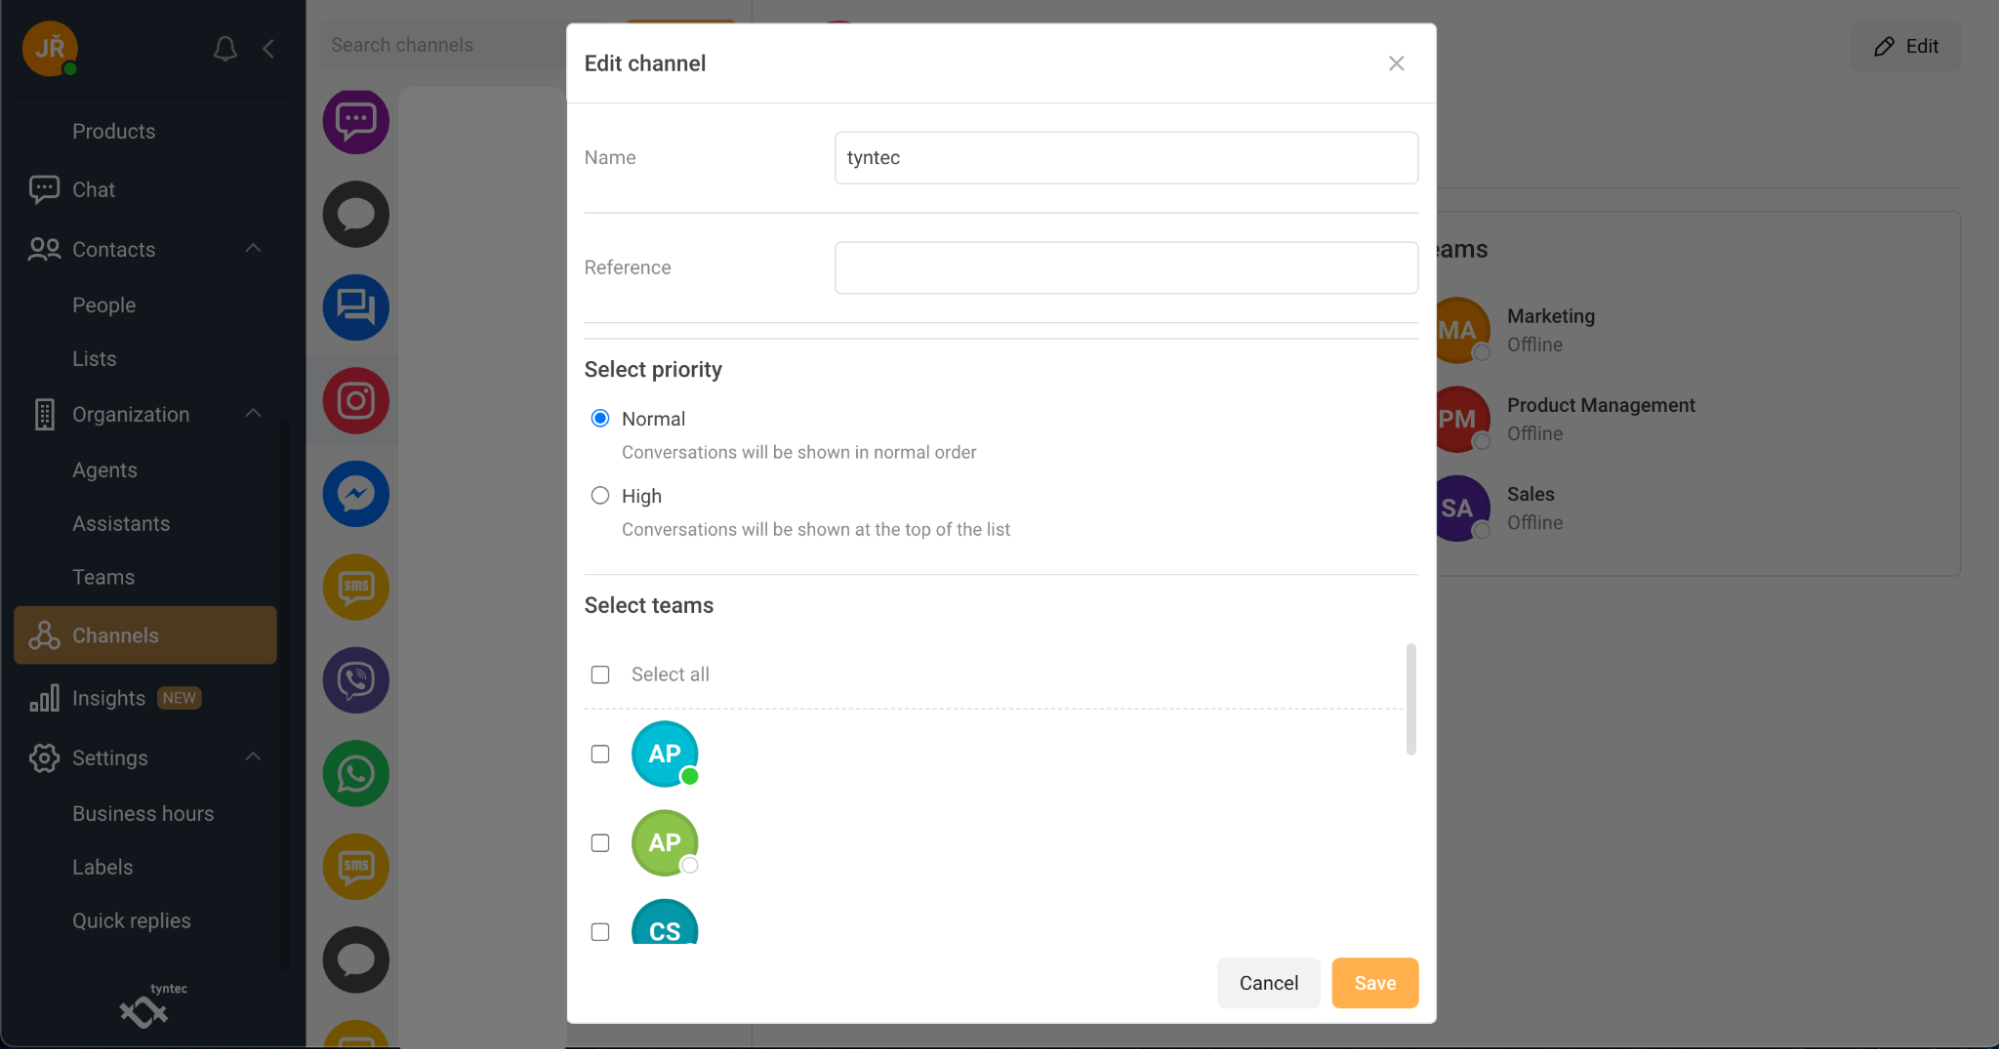
Edit Channel
1. Select Channels.
2. Select the Channel you want to edit.
3. Click Edit at the top right of the page.
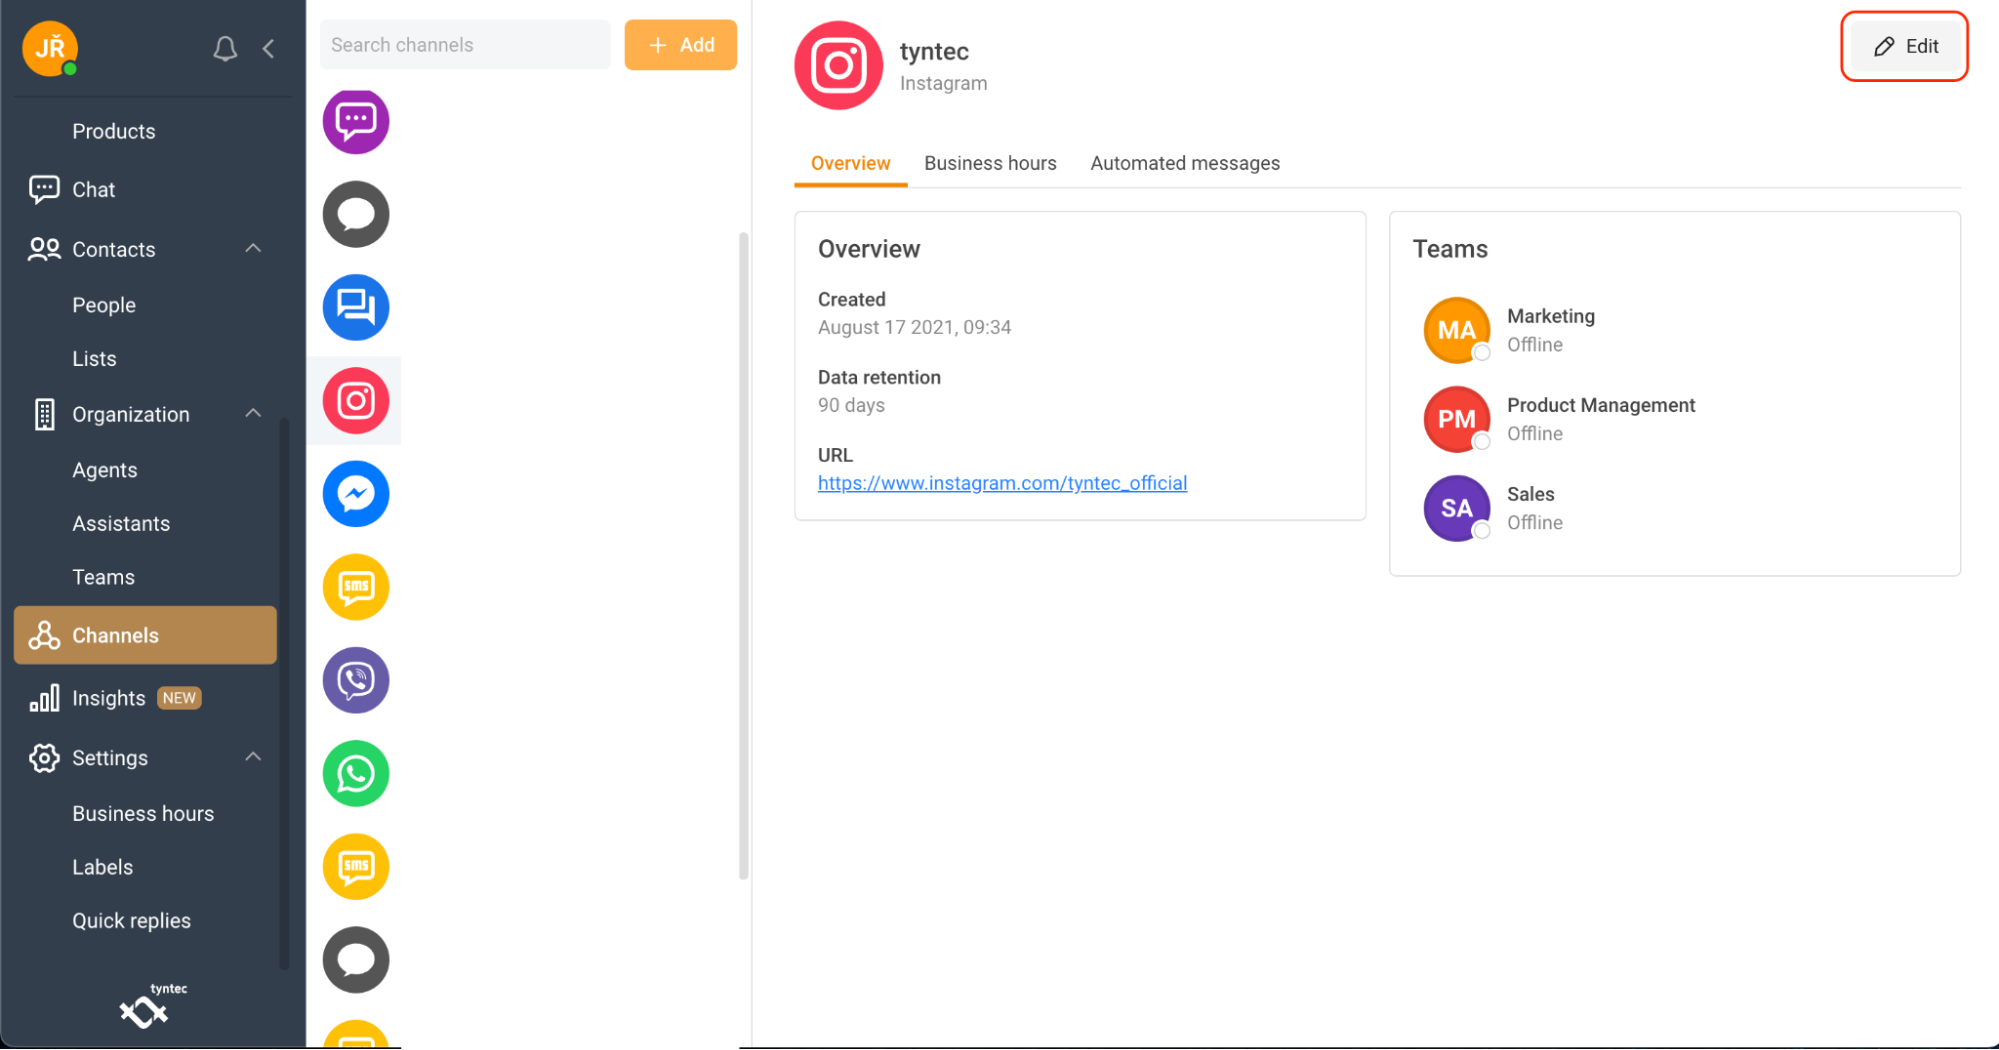
4. Edit the Channel details.
5. Click Save.
Connect your CRM
The Conversations Inbox can be integrated with your CRM system to sync contact data and conversations between the two systems, allowing you to fetch and push contact data from and to your CRM. You can also use the option to push transcripts of closed conversations to your CRM.
You can integrate your CRM systems using tyntec Conversations Inbox API. Check our API references.