Authentication (2FA) | Integration with Microsoft Dynamics 365
Hi there!
Would you like to add a user-friendly two-factor authentication (2FA) capability to the Microsoft Power Automate platform?
In this tutorial, you will learn how to automatically verify new sign-ups using the tyntec 2FA connector, and how to save new contact into your Microsoft Dynamics 365 instance.
You will need
- Your tyntec API key from your tyntec account
- A testing Microsoft Dynamics account
- A Microsoft Power Automate Free license in your Dynamics Environment
- A testing HTML form
- A testing phone number to receive OTP
- Your favorite Text editor
Step One: Create a submission form
For your quick start with the tyntec 2FA connector, we’ve prepared a sample HTML code.
It contains two similar forms (the signup form and the verification code form) that send user input to given URL addresses and javascript code to handle sending JSON data.
1. In your Text editor, create a new HTML file and paste the following code.
Disclaimer: This code is for testing purposes only.
<div class="geshifilter"><pre class="php geshifilter-php"><span class="sy0"><</span>html<span class="sy0">></span>
<span class="sy0"><</span>head<span class="sy0">></span>
 <span class="sy0"><</span>script<span class="sy0">></span>
   <span class="kw2">function</span> signUp<span class="br0">(</span><span class="br0">)</span> <span class="br0">{</span>
   document<span class="sy0">.</span>getElementById<span class="br0">(</span><span class="st_h">'verify'</span><span class="br0">)</span><span class="sy0">.</span>style<span class="sy0">.</span>visibility <span class="sy0">=</span> <span class="st0">"visible"</span><span class="sy0">;</span>
   document<span class="sy0">.</span>getElementById<span class="br0">(</span><span class="st_h">'sign up'</span><span class="br0">)</span><span class="sy0">.</span>style<span class="sy0">.</span>visibility <span class="sy0">=</span> <span class="st0">"hidden"</span><span class="sy0">;</span>
<span class="br0">}</span>
<span class="kw2">function</span> handleAuth<span class="br0">(</span>e<span class="sy0">,</span> action<span class="br0">)</span> <span class="br0">{</span>
   e<span class="sy0">.</span>preventDefault<span class="br0">(</span><span class="br0">)</span><span class="sy0">;</span>
   <span class="kw2">const</span> data <span class="sy0">=</span> <span class="kw2">new</span> FormData<span class="br0">(</span>e<span class="sy0">.</span>target<span class="br0">)</span><span class="sy0">;</span>
   <span class="kw2">const</span> signUpUrl <span class="sy0">=</span> action <span class="sy0">==</span> <span class="st0">"signUp"</span> ? “Sign Up URL” <span class="sy0">:</span> <span class="st0">"Verify URL"</span>
   <span class="kw2">const</span> body <span class="sy0">=</span> <span class="br0">(</span>JSON<span class="sy0">.</span>stringify<span class="br0">(</span>Object<span class="sy0">.</span>fromEntries<span class="br0">(</span>data<span class="sy0">.</span>entries<span class="br0">(</span><span class="br0">)</span><span class="br0">)</span><span class="br0">)</span><span class="br0">)</span><span class="sy0">;</span>
   <span class="kw2">var</span> xhr <span class="sy0">=</span> <span class="kw2">new</span> XMLHttpRequest<span class="br0">(</span><span class="br0">)</span><span class="sy0">;</span>
   xhr<span class="sy0">.</span>open<span class="br0">(</span><span class="st0">"POST"</span><span class="sy0">,</span> signUpUrl <span class="sy0">,</span> <span class="kw4">true</span><span class="br0">)</span><span class="sy0">;</span>
   xhr<span class="sy0">.</span>setRequestHeader<span class="br0">(</span><span class="st_h">'Content-Type'</span><span class="sy0">,</span> <span class="st_h">'application/json'</span><span class="br0">)</span><span class="sy0">;</span>
   xhr<span class="sy0">.</span>send<span class="br0">(</span>body<span class="br0">)</span><span class="sy0">;</span>
 <span class="br0">}</span>
 window<span class="sy0">.</span>onload<span class="sy0">=</span><span class="kw2">function</span><span class="br0">(</span><span class="br0">)</span><span class="br0">{</span>
   <span class="kw2">const</span> signUp <span class="sy0">=</span> document<span class="sy0">.</span>getElementById<span class="br0">(</span><span class="st_h">'sign up'</span><span class="br0">)</span><span class="sy0">;</span>
   signUp<span class="sy0">.</span>addEventListener<span class="br0">(</span><span class="st_h">'submit'</span><span class="sy0">,</span> handleSubmit<span class="br0">)</span><span class="sy0">;</span>
<span class="br0">}</span>
 window<span class="sy0">.</span>onload<span class="sy0">=</span><span class="kw2">function</span><span class="br0">(</span><span class="br0">)</span><span class="br0">{</span>
   <span class="kw2">const</span> signUp <span class="sy0">=</span> document<span class="sy0">.</span>getElementById<span class="br0">(</span><span class="st_h">'sign up'</span><span class="br0">)</span><span class="sy0">;</span>
   signUp<span class="sy0">.</span>addEventListener<span class="br0">(</span><span class="st_h">'submit'</span><span class="sy0">,</span> <span class="br0">(</span>e<span class="br0">)</span> <span class="sy0">=></span> handleAuth<span class="br0">(</span>e<span class="sy0">,</span> <span class="st_h">'signUp'</span><span class="br0">)</span><span class="br0">)</span><span class="sy0">;</span>
   <span class="kw2">const</span> verify <span class="sy0">=</span> document<span class="sy0">.</span>getElementById<span class="br0">(</span><span class="st_h">'verify'</span><span class="br0">)</span><span class="sy0">;</span>
   verify<span class="sy0">.</span>addEventListener<span class="br0">(</span><span class="st_h">'submit'</span><span class="sy0">,</span> <span class="br0">(</span>e<span class="br0">)</span> <span class="sy0">=></span> handleAuth<span class="br0">(</span>e<span class="sy0">,</span> <span class="st_h">'verify'</span><span class="br0">)</span><span class="br0">)</span><span class="sy0">;</span>
<span class="br0">}</span>
<span class="kw2"></script></span>
<span class="sy0"><</span>title<span class="sy0">></span>Sign up Form<span class="sy0"></</span>title<span class="sy0">></span>
<span class="sy0"></</span>head<span class="sy0">></span>
<span class="sy0"><</span>body<span class="sy0">></span>
<span class="sy0"><</span>form target<span class="sy0">=</span><span class="st0">"_blank"</span> id<span class="sy0">=</span><span class="st0">"sign up"</span><span class="sy0">></span>
 <span class="sy0"><</span>div<span class="sy0">></span>
   <span class="sy0"><</span>label <span class="kw1">for</span><span class="sy0">=</span><span class="st0">"firstName"</span><span class="sy0">></span>Your First Name<span class="sy0"></</span>label<span class="sy0">></span>
   <span class="sy0"><</span>input name<span class="sy0">=</span><span class="st0">"firstName"</span> id<span class="sy0">=</span><span class="st0">"firstName"</span> value<span class="sy0">=</span><span class="st0">"David"</span><span class="sy0">></span>
 <span class="sy0"></</span>div<span class="sy0">></span>
 <span class="sy0"><</span>div<span class="sy0">></span>
   <span class="sy0"><</span>label <span class="kw1">for</span><span class="sy0">=</span><span class="st0">"lastName"</span><span class="sy0">></span>Your Last Name<span class="sy0"></</span>label<span class="sy0">></span>
   <span class="sy0"><</span>input name<span class="sy0">=</span><span class="st0">"lastName"</span> id<span class="sy0">=</span><span class="st0">"lastName"</span> value<span class="sy0">=</span><span class="st0">"Brown"</span><span class="sy0">></span>
 <span class="sy0"></</span>div<span class="sy0">></span>
 <span class="sy0"><</span>div<span class="sy0">></span>
   <span class="sy0"><</span>label <span class="kw1">for</span><span class="sy0">=</span><span class="st0">"phone number"</span><span class="sy0">></span>Your Phone Number<span class="sy0"></</span>label<span class="sy0">></span>
   <span class="sy0"><</span>input name<span class="sy0">=</span><span class="st0">"phone number"</span> id<span class="sy0">=</span><span class="st0">"phone number"</span> value<span class="sy0">=</span><span class="st0">"4989202451100"</span><span class="sy0">></span>
 <span class="sy0"></</span>div<span class="sy0">></span>
 <span class="sy0"><</span>div<span class="sy0">></span>
   <span class="sy0"><</span>label <span class="kw1">for</span><span class="sy0">=</span><span class="st0">"emal"</span><span class="sy0">></span>Your Email<span class="sy0"></</span>label<span class="sy0">></span>
   <span class="sy0"><</span>input name<span class="sy0">=</span><span class="st0">"email"</span> id<span class="sy0">=</span><span class="st0">"email"</span> value<span class="sy0">=</span><span class="st0">"support@tyntec.com"</span><span class="sy0">></span>
 <span class="sy0"></</span>div<span class="sy0">></span>
 <span class="sy0"><</span>div<span class="sy0">></span>
  <span class="sy0"><</span>button onclick<span class="sy0">=</span><span class="st0">"signUp()"</span><span class="sy0">></span>Submit
  <span class="sy0"></</span>button<span class="sy0">></span>
 <span class="sy0"></</span>div<span class="sy0">></span>
<span class="sy0"></</span>form<span class="sy0">></span>
<span class="sy0"><</span>form target<span class="sy0">=</span><span class="st0">"_blank"</span> id<span class="sy0">=</span><span class="st0">"verify"</span> style<span class="sy0">=</span><span class="st0">"visibility: hidden;"</span><span class="sy0">></span>
 <span class="sy0"><</span>div<span class="sy0">></span>
   <span class="sy0"><</span>label <span class="kw1">for</span><span class="sy0">=</span><span class="st0">"code"</span><span class="sy0">></span>Your One<span class="sy0">-</span><a href="http://www.php.net/time"><span class="kw3">Time</span></a> Password<span class="sy0"></</span>label<span class="sy0">></span>
   <span class="sy0"><</span>input name<span class="sy0">=</span><span class="st0">"code"</span> id<span class="sy0">=</span><span class="st0">"Code"</span> value<span class="sy0">=</span><span class="st0">""</span><span class="sy0">></span>
 <span class="sy0"></</span>div<span class="sy0">></span>
 <span class="sy0"><</span>div<span class="sy0">></span>
   <span class="sy0"><</span>label <span class="kw1">for</span><span class="sy0">=</span><span class="st0">"phone number"</span><span class="sy0">></span>Your Phone Number<span class="sy0"></</span>label<span class="sy0">></span>
   <span class="sy0"><</span>input name<span class="sy0">=</span><span class="st0">"phone number"</span> id<span class="sy0">=</span><span class="st0">"phone number"</span> value<span class="sy0">=</span><span class="st0">"4989202451100"</span><span class="sy0">></span>
 <span class="sy0"></</span>div<span class="sy0">></span>
 <span class="sy0"><</span>div<span class="sy0">></span>
   <span class="sy0"><</span>button<span class="sy0">></span>Submit<span class="sy0"></</span>button<span class="sy0">></span>
 <span class="sy0"></</span>div<span class="sy0">></span>
<span class="sy0"></</span>form<span class="sy0">></span>
<span class="sy0"></</span>body<span class="sy0">></span></pre></div>
2. Save your HTML file.
The signUp() function switches from the first form to the second one on submission, so the end-user doesn’t see both forms at once.
The handleAuth handles creating JSON from x-www-form-urlencoded data and sending it to MS Power Automate Instances.
Note: If you are using custom forms, make sure to adjust the Flows accordingly.
Step Two: Create a Flow for sending OTP and creating contact
Let’s start with creating a Flow that receives information from your HTML form, sends OTP, and creates a contact.
1. Open to your Power Automate
2. In the left dropdown menu, click the Create button
3. From all possible Flow types, select Automated—from blank.
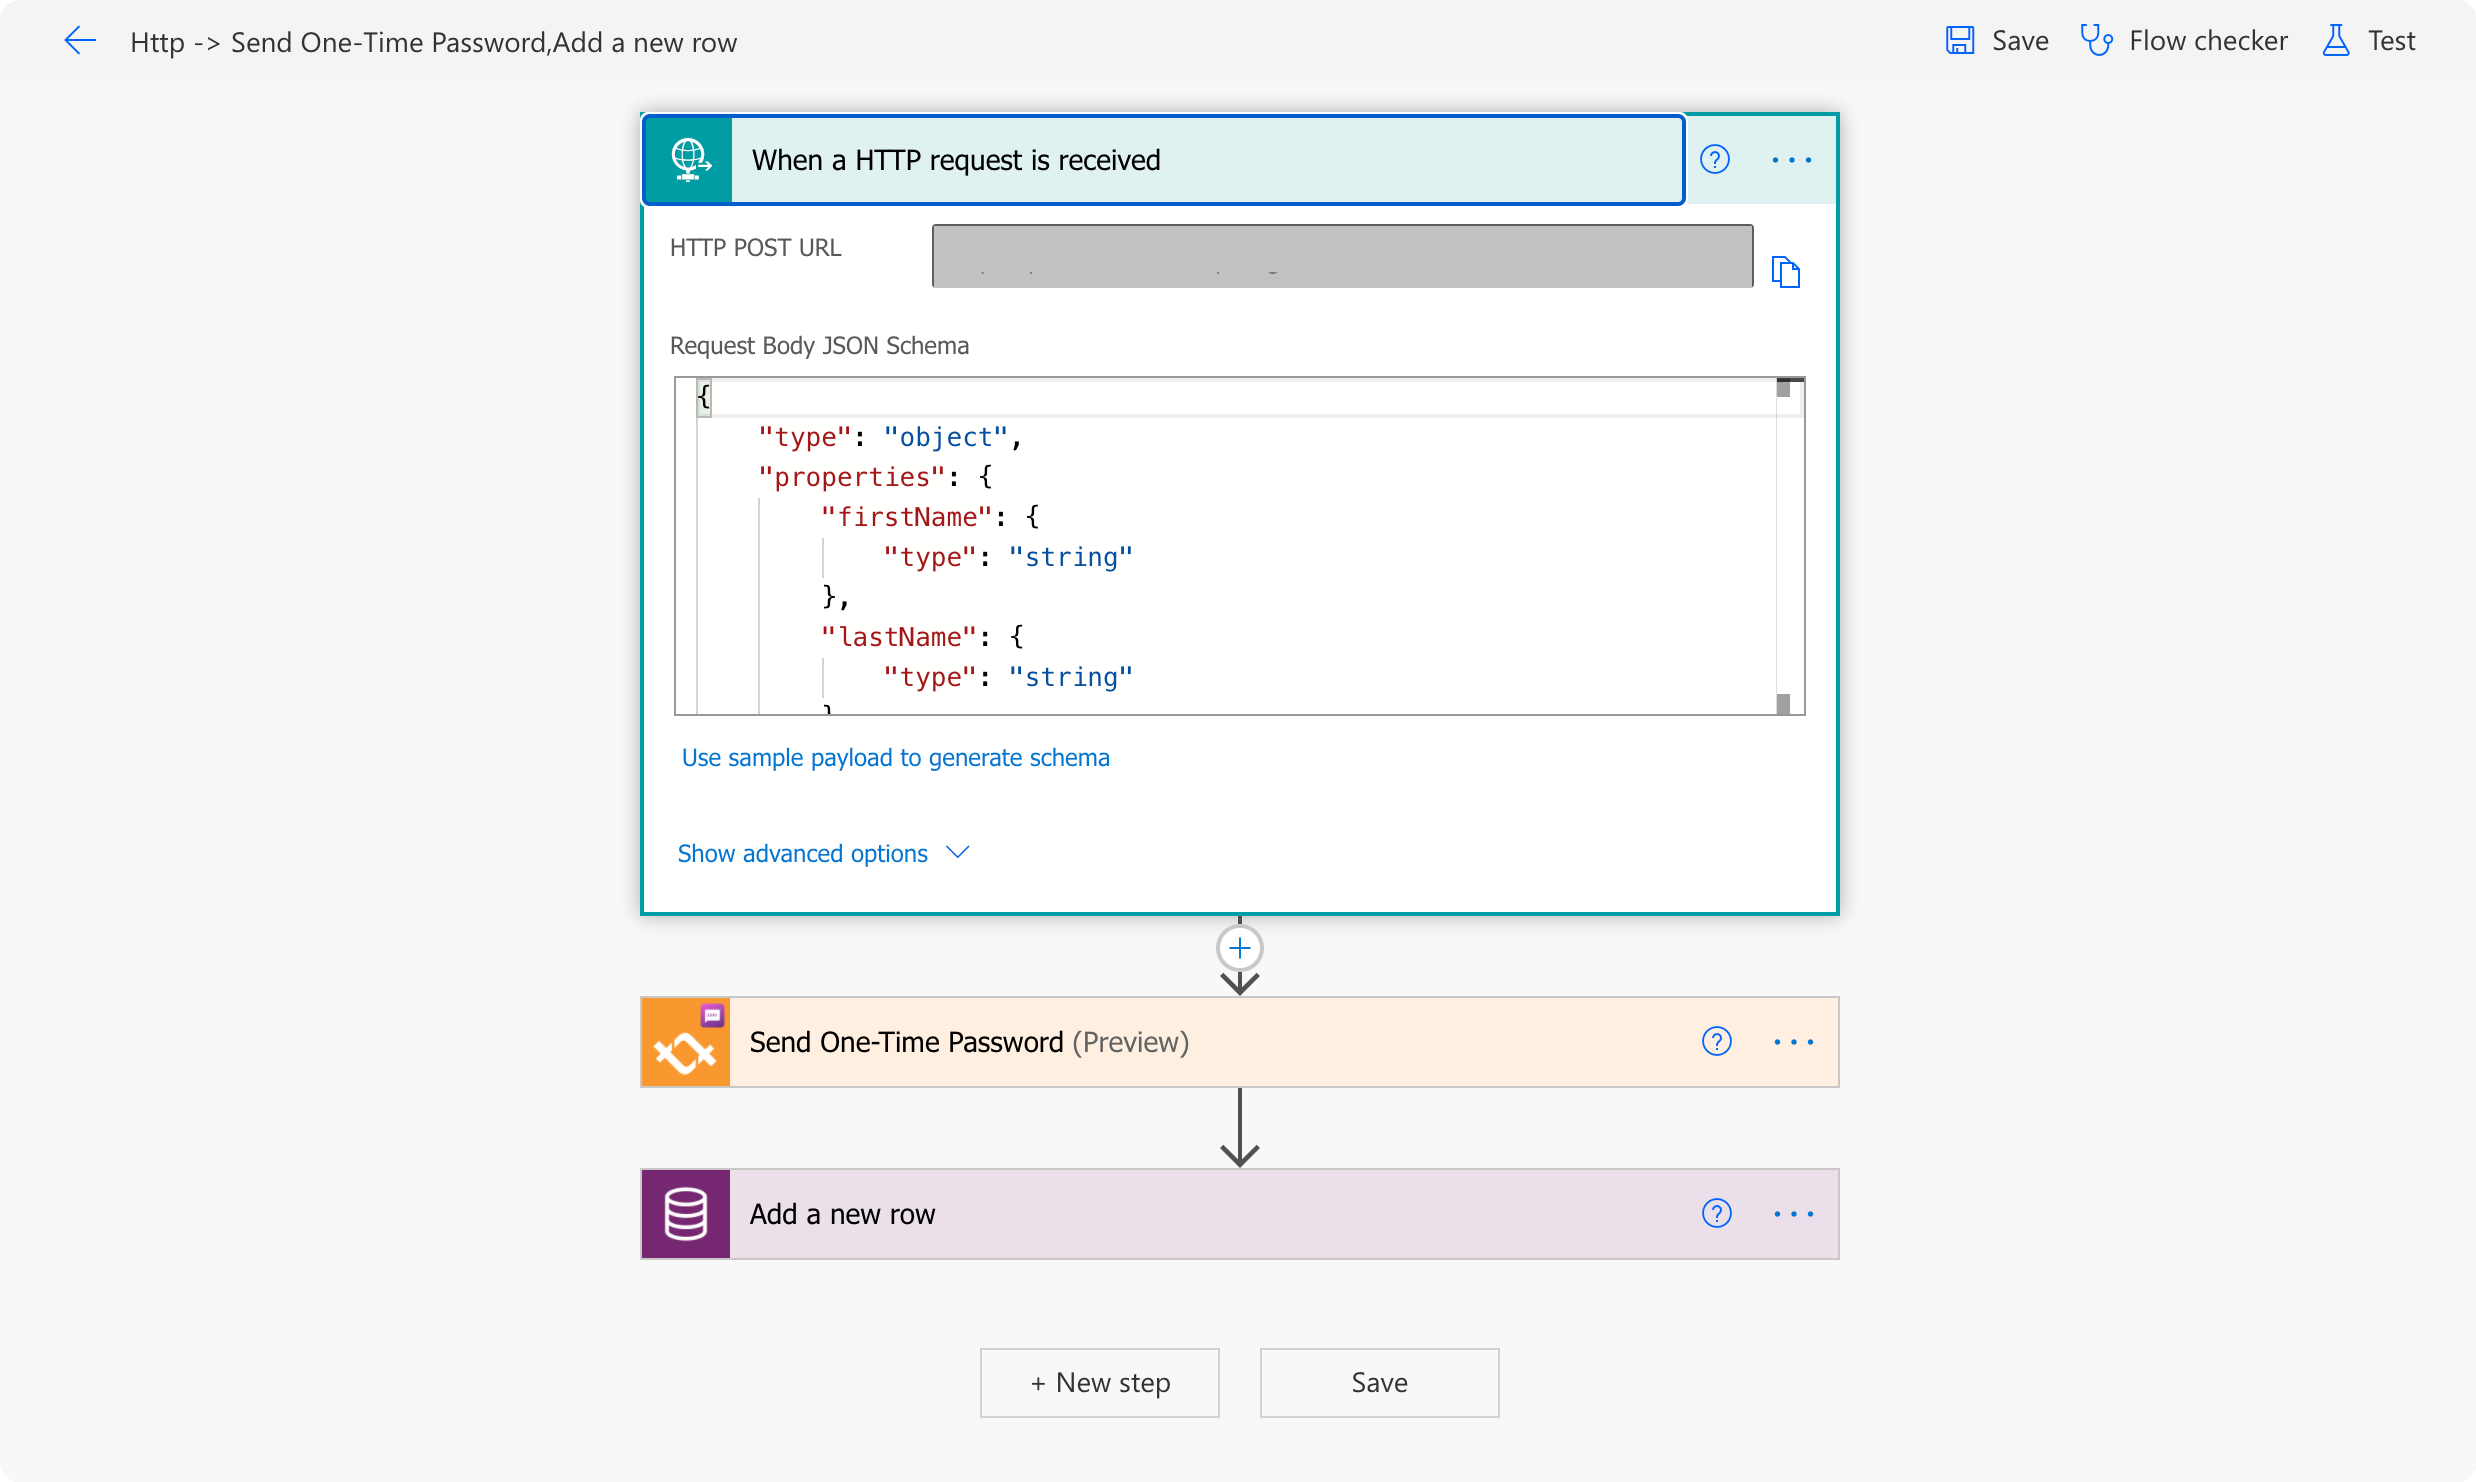
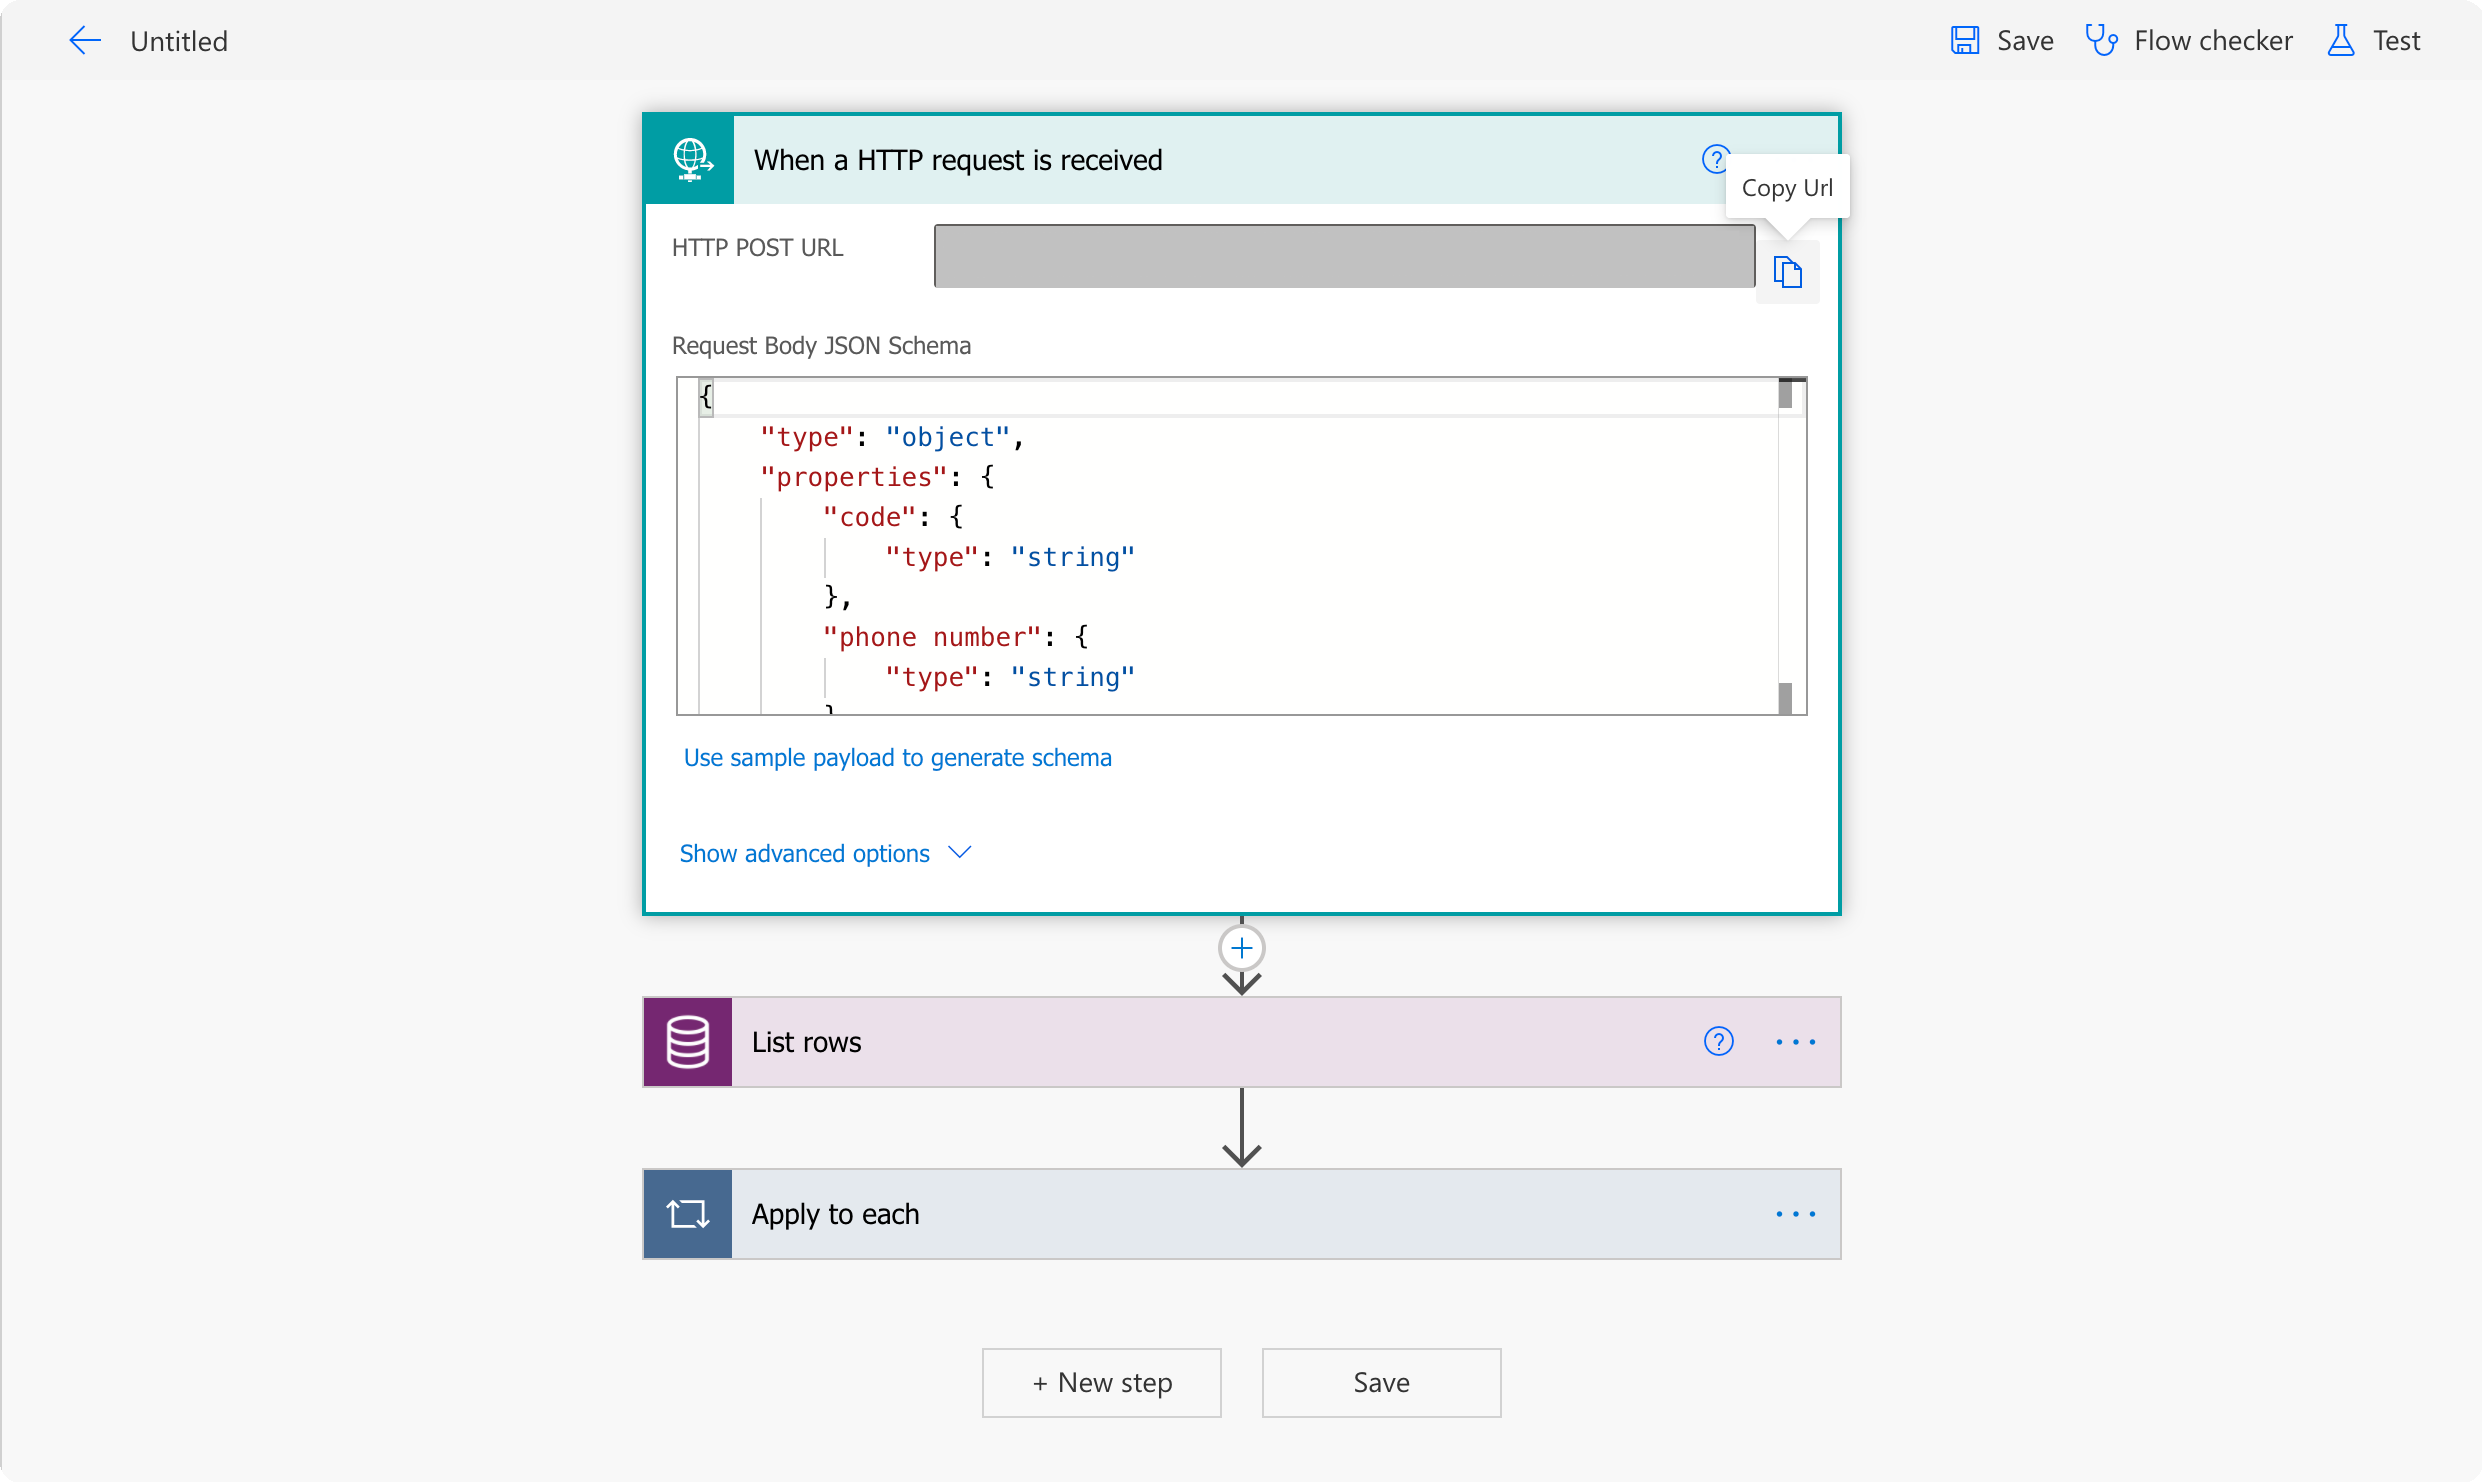
4. In the design window pop-up, click the Skip button.5. In the Search, type in When an HTTP request is received and select the corresponding trigger.
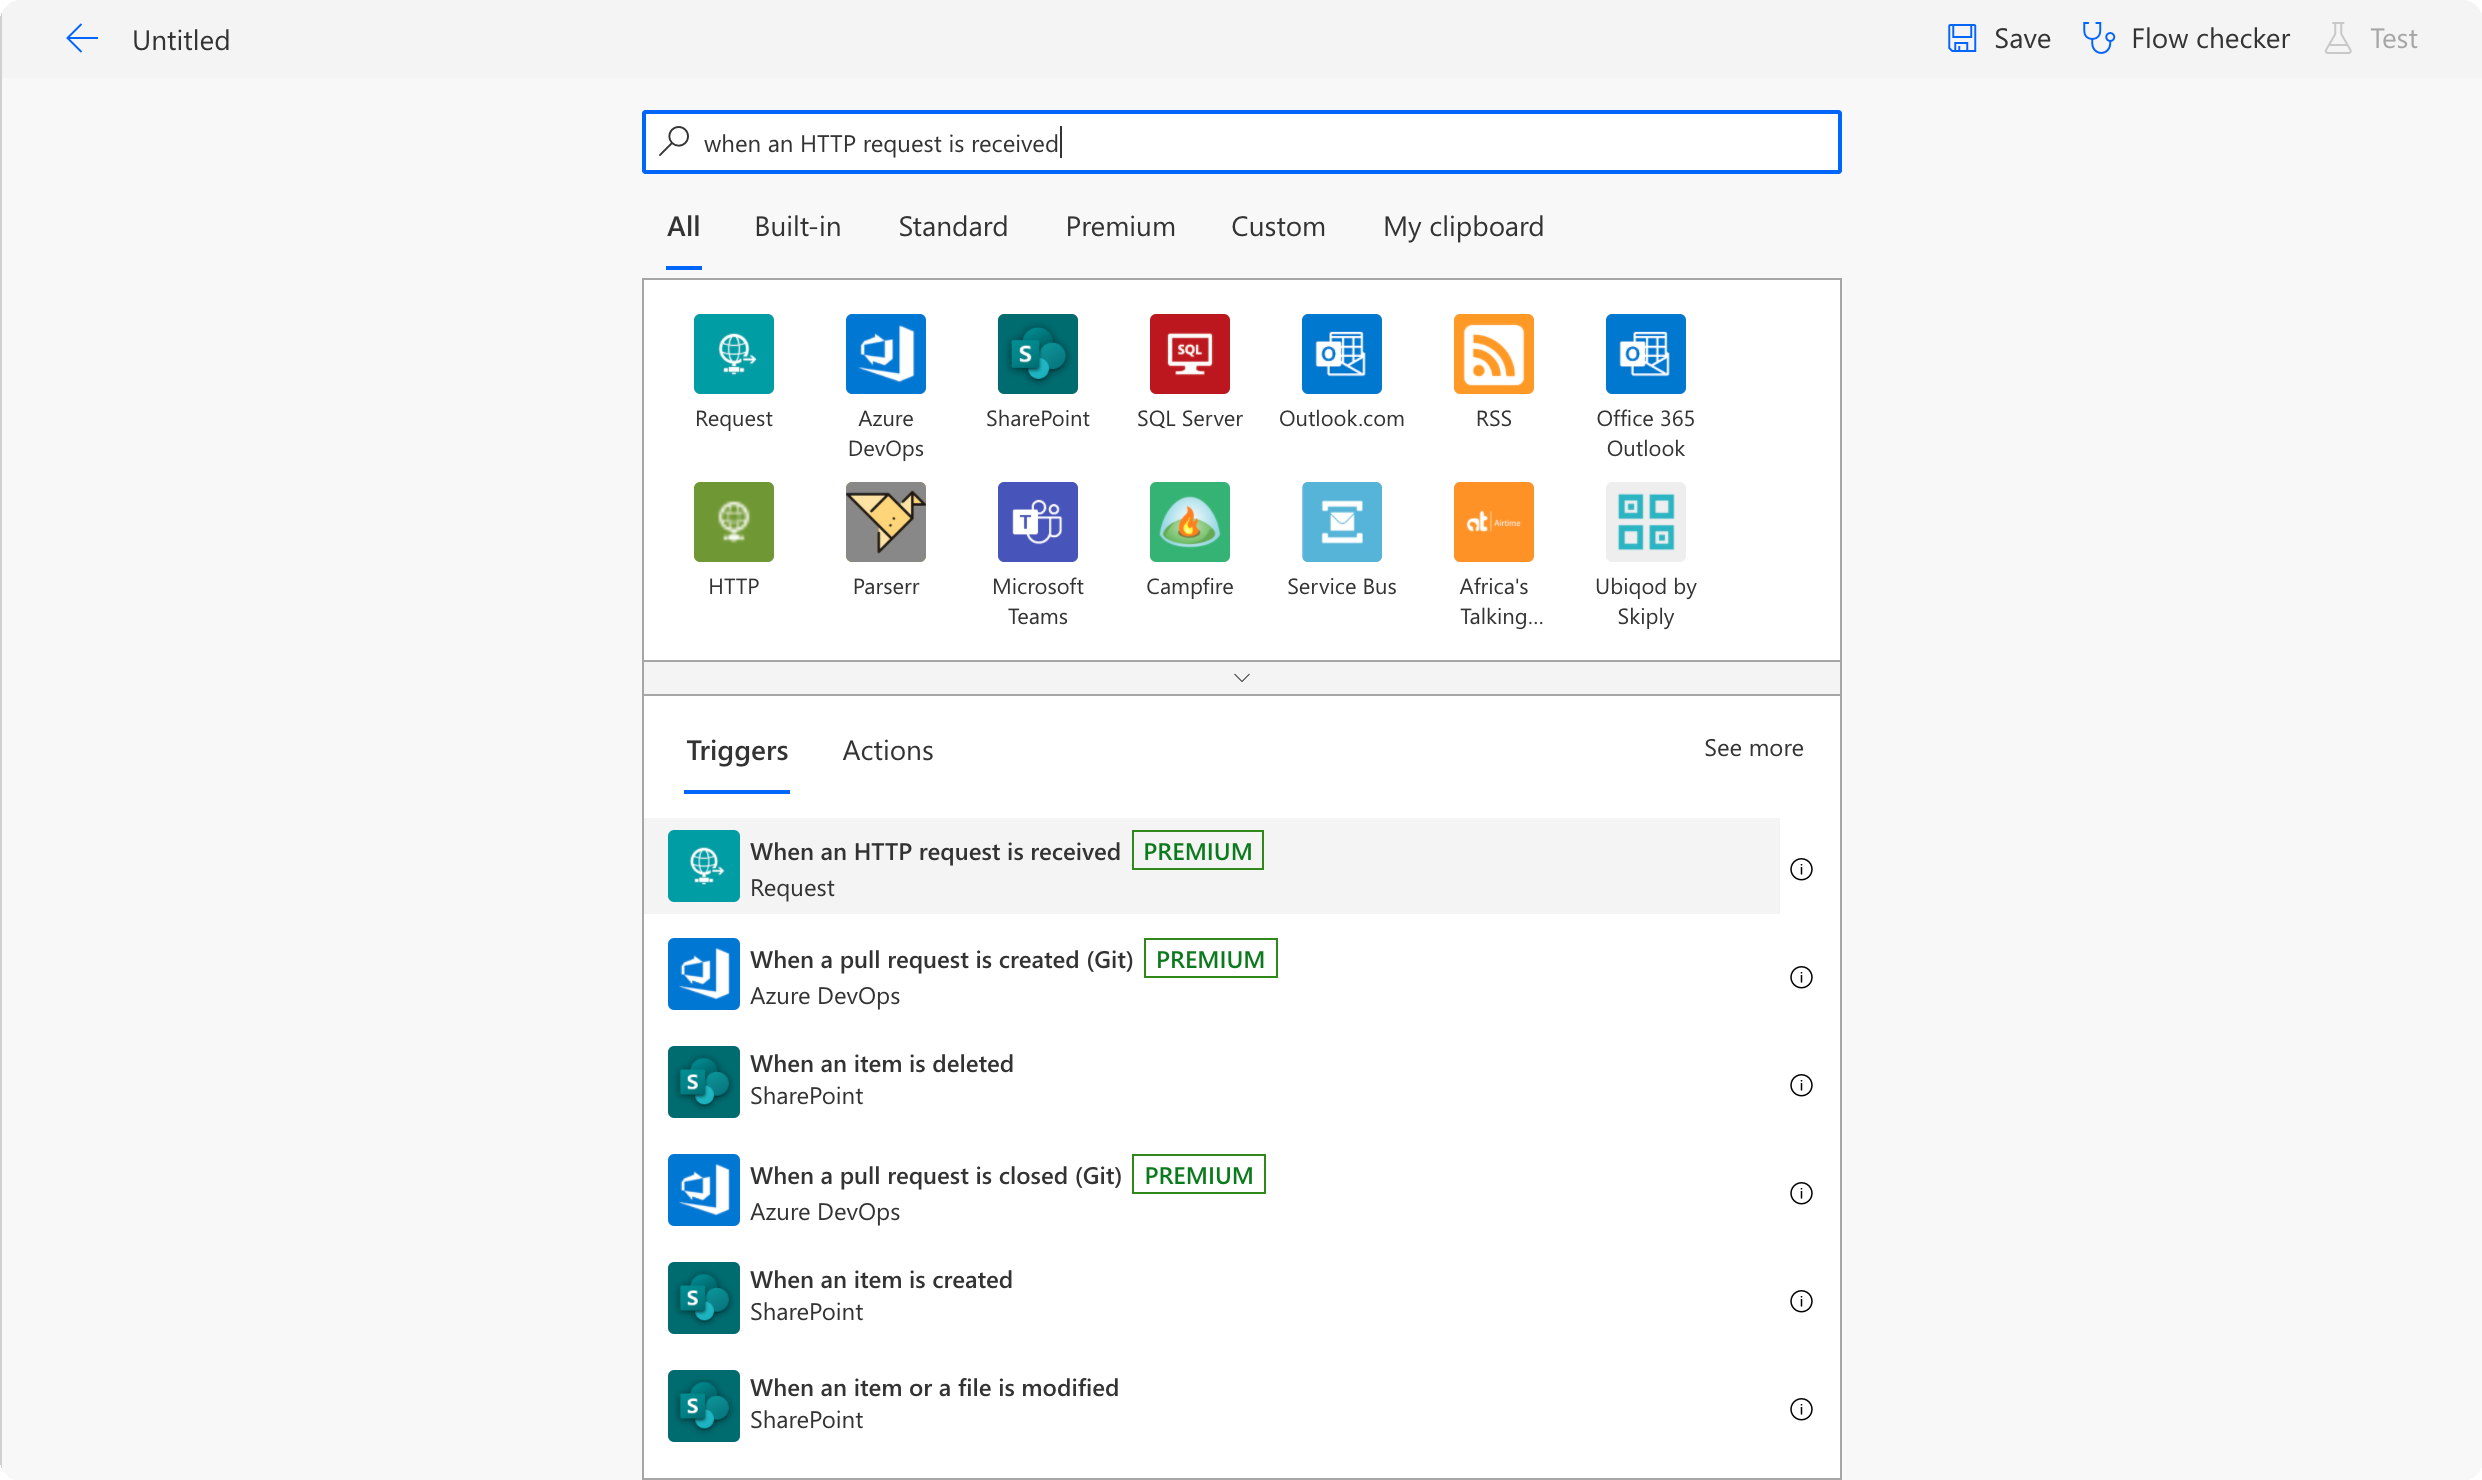
6. Click on the Use sample payload to generate schema, and in the new pop-up input the following data:
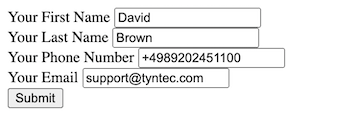
<div class="geshifilter"><pre class="php geshifilter-php"><span class="br0">{</span><span class="st0">"firstName"</span><span class="sy0">:</span><span class="st0">"David"</span><span class="sy0">,</span><span class="st0">"lastName"</span><span class="sy0">:</span><span class="st0">"Brown"</span><span class="sy0">,</span><span class="st0">"phone number"</span><span class="sy0">:</span><span class="st0">"+4989202451100"</span><span class="sy0">,</span><span class="st0">"email"</span><span class="sy0">:</span><span class="st0">"support@tyntec.com"</span><span class="br0">}</span></pre></div>Then, click on Done.
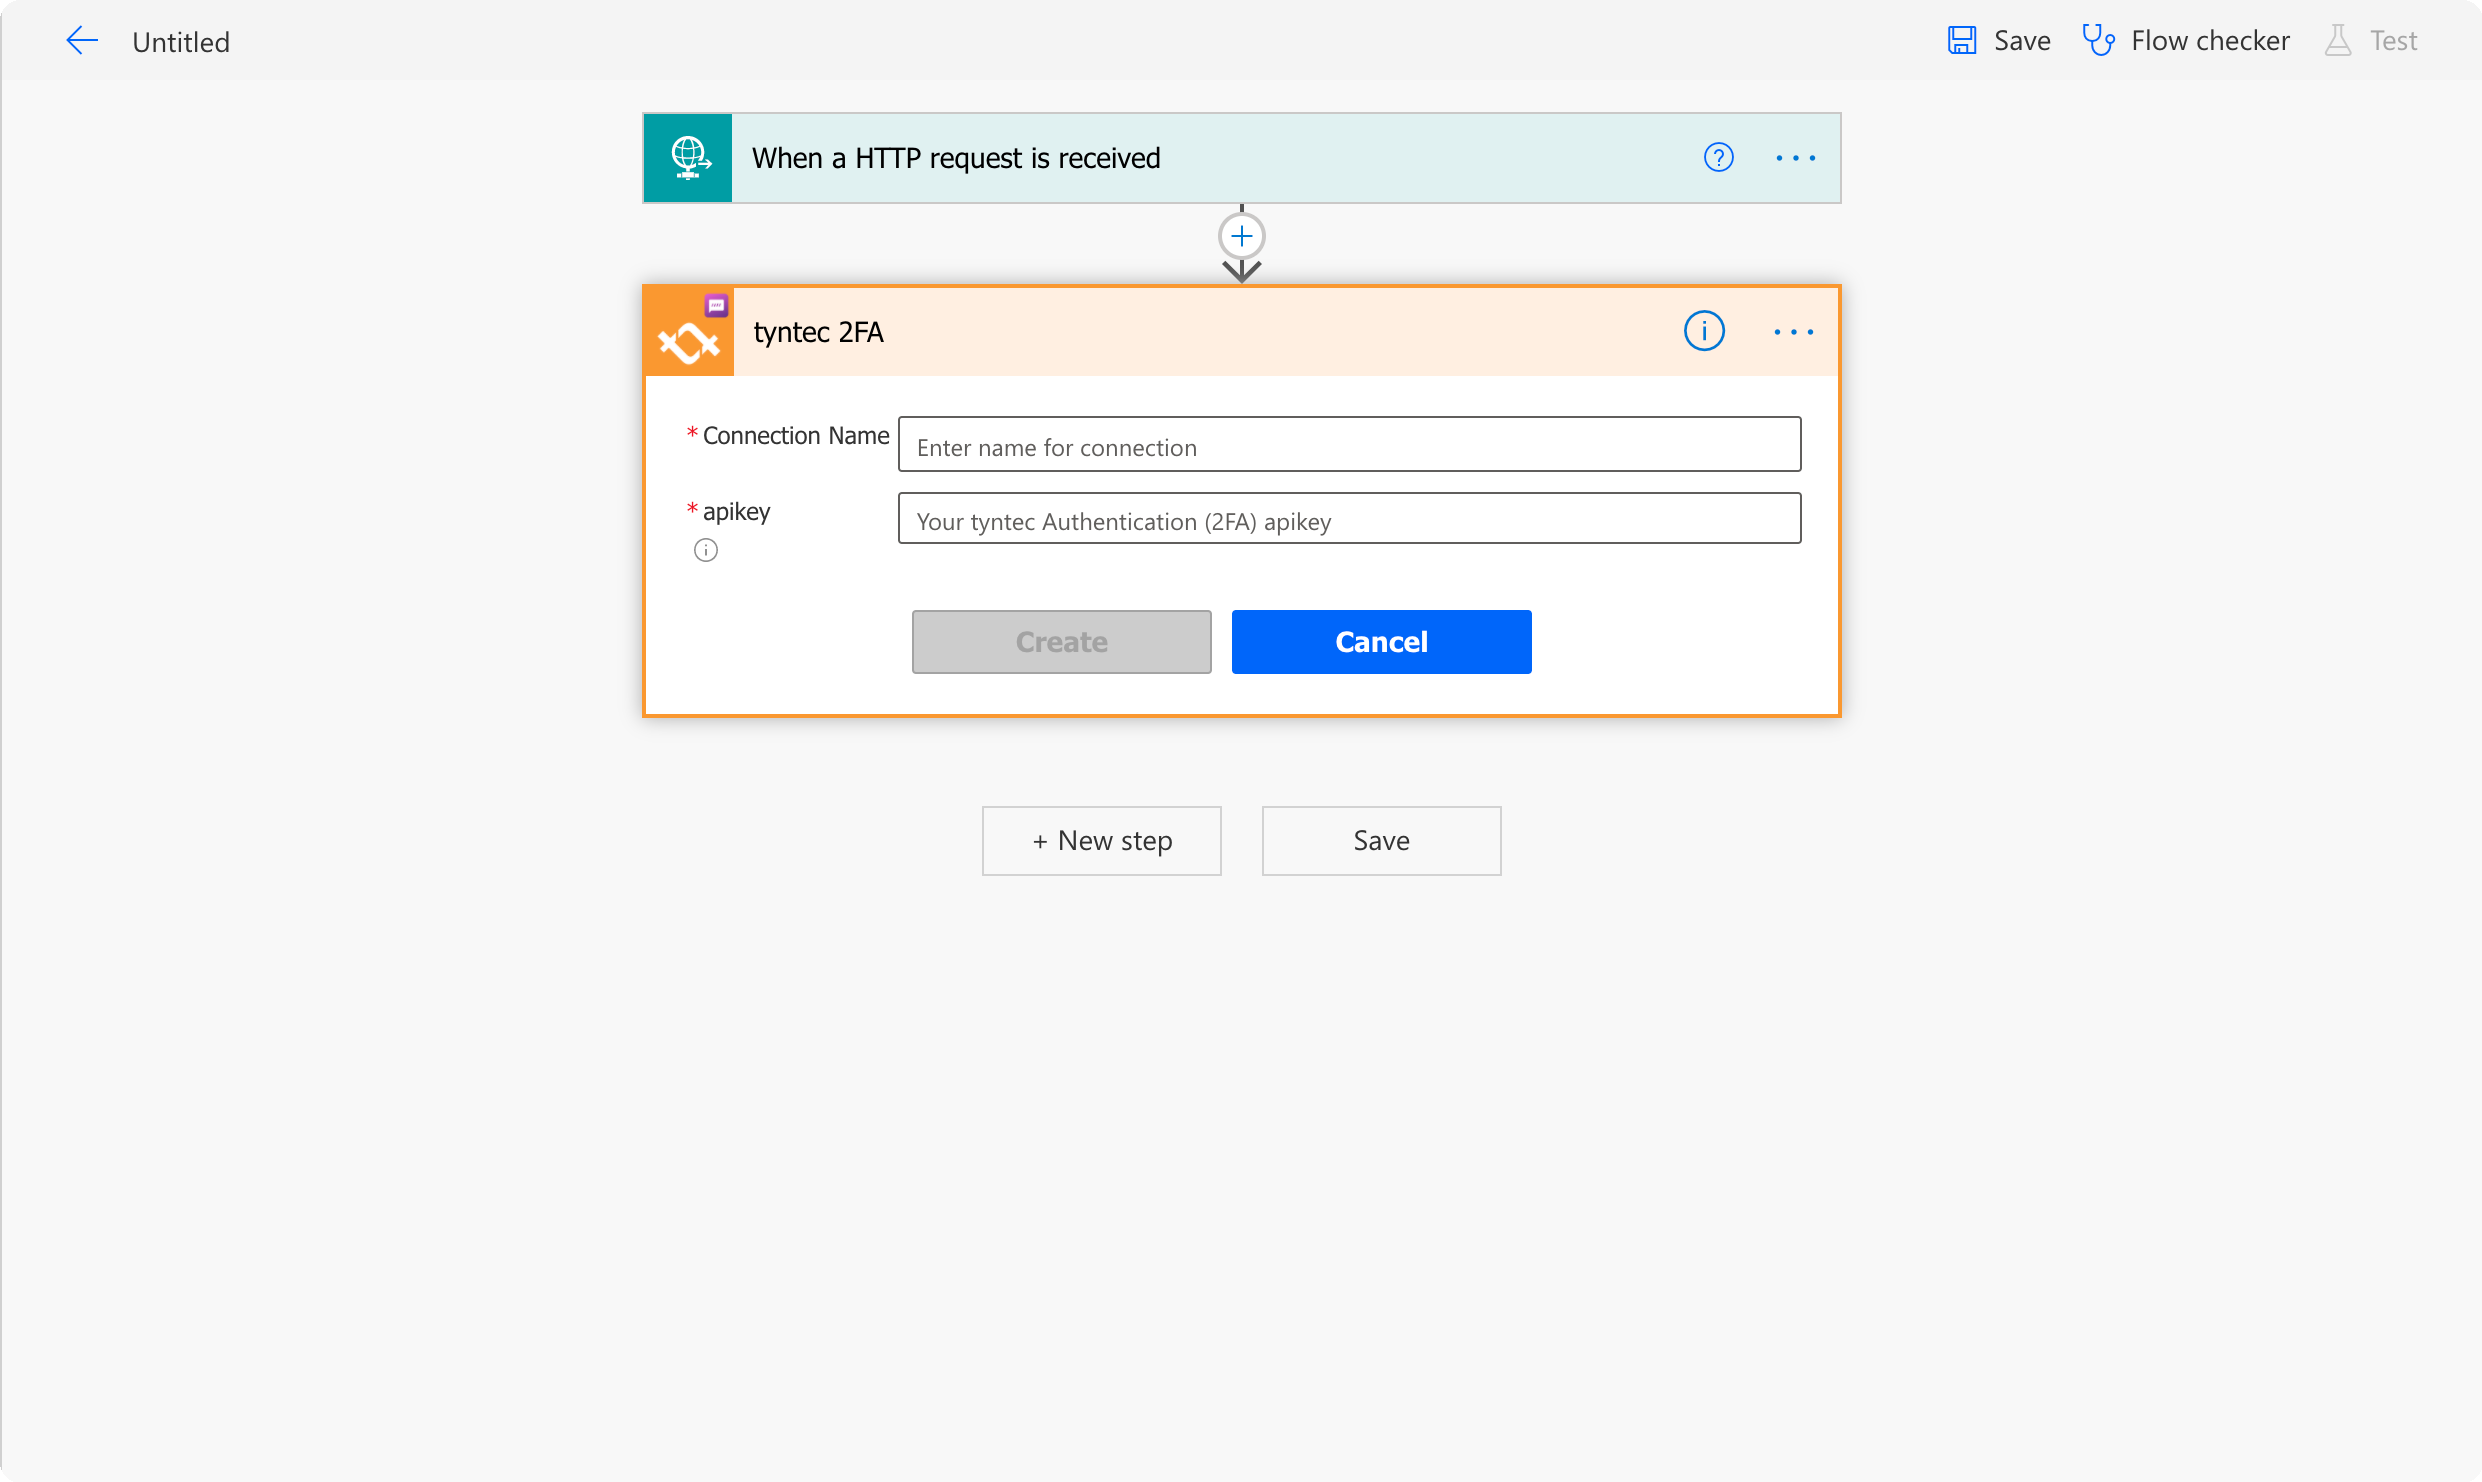
7. Now is the time to create a new action. Click on the + New step. In the step selection, search for tyntec 2FA, and select the Send One-Time Password action.
8. If it is your first time using the tyntec 2FA connector, the connector will automatically try to create a connection. Name your Connection and set your apikey to your tyntec API key.
9. Afterward, the Send One-Time Password action updates itself to show you different fields
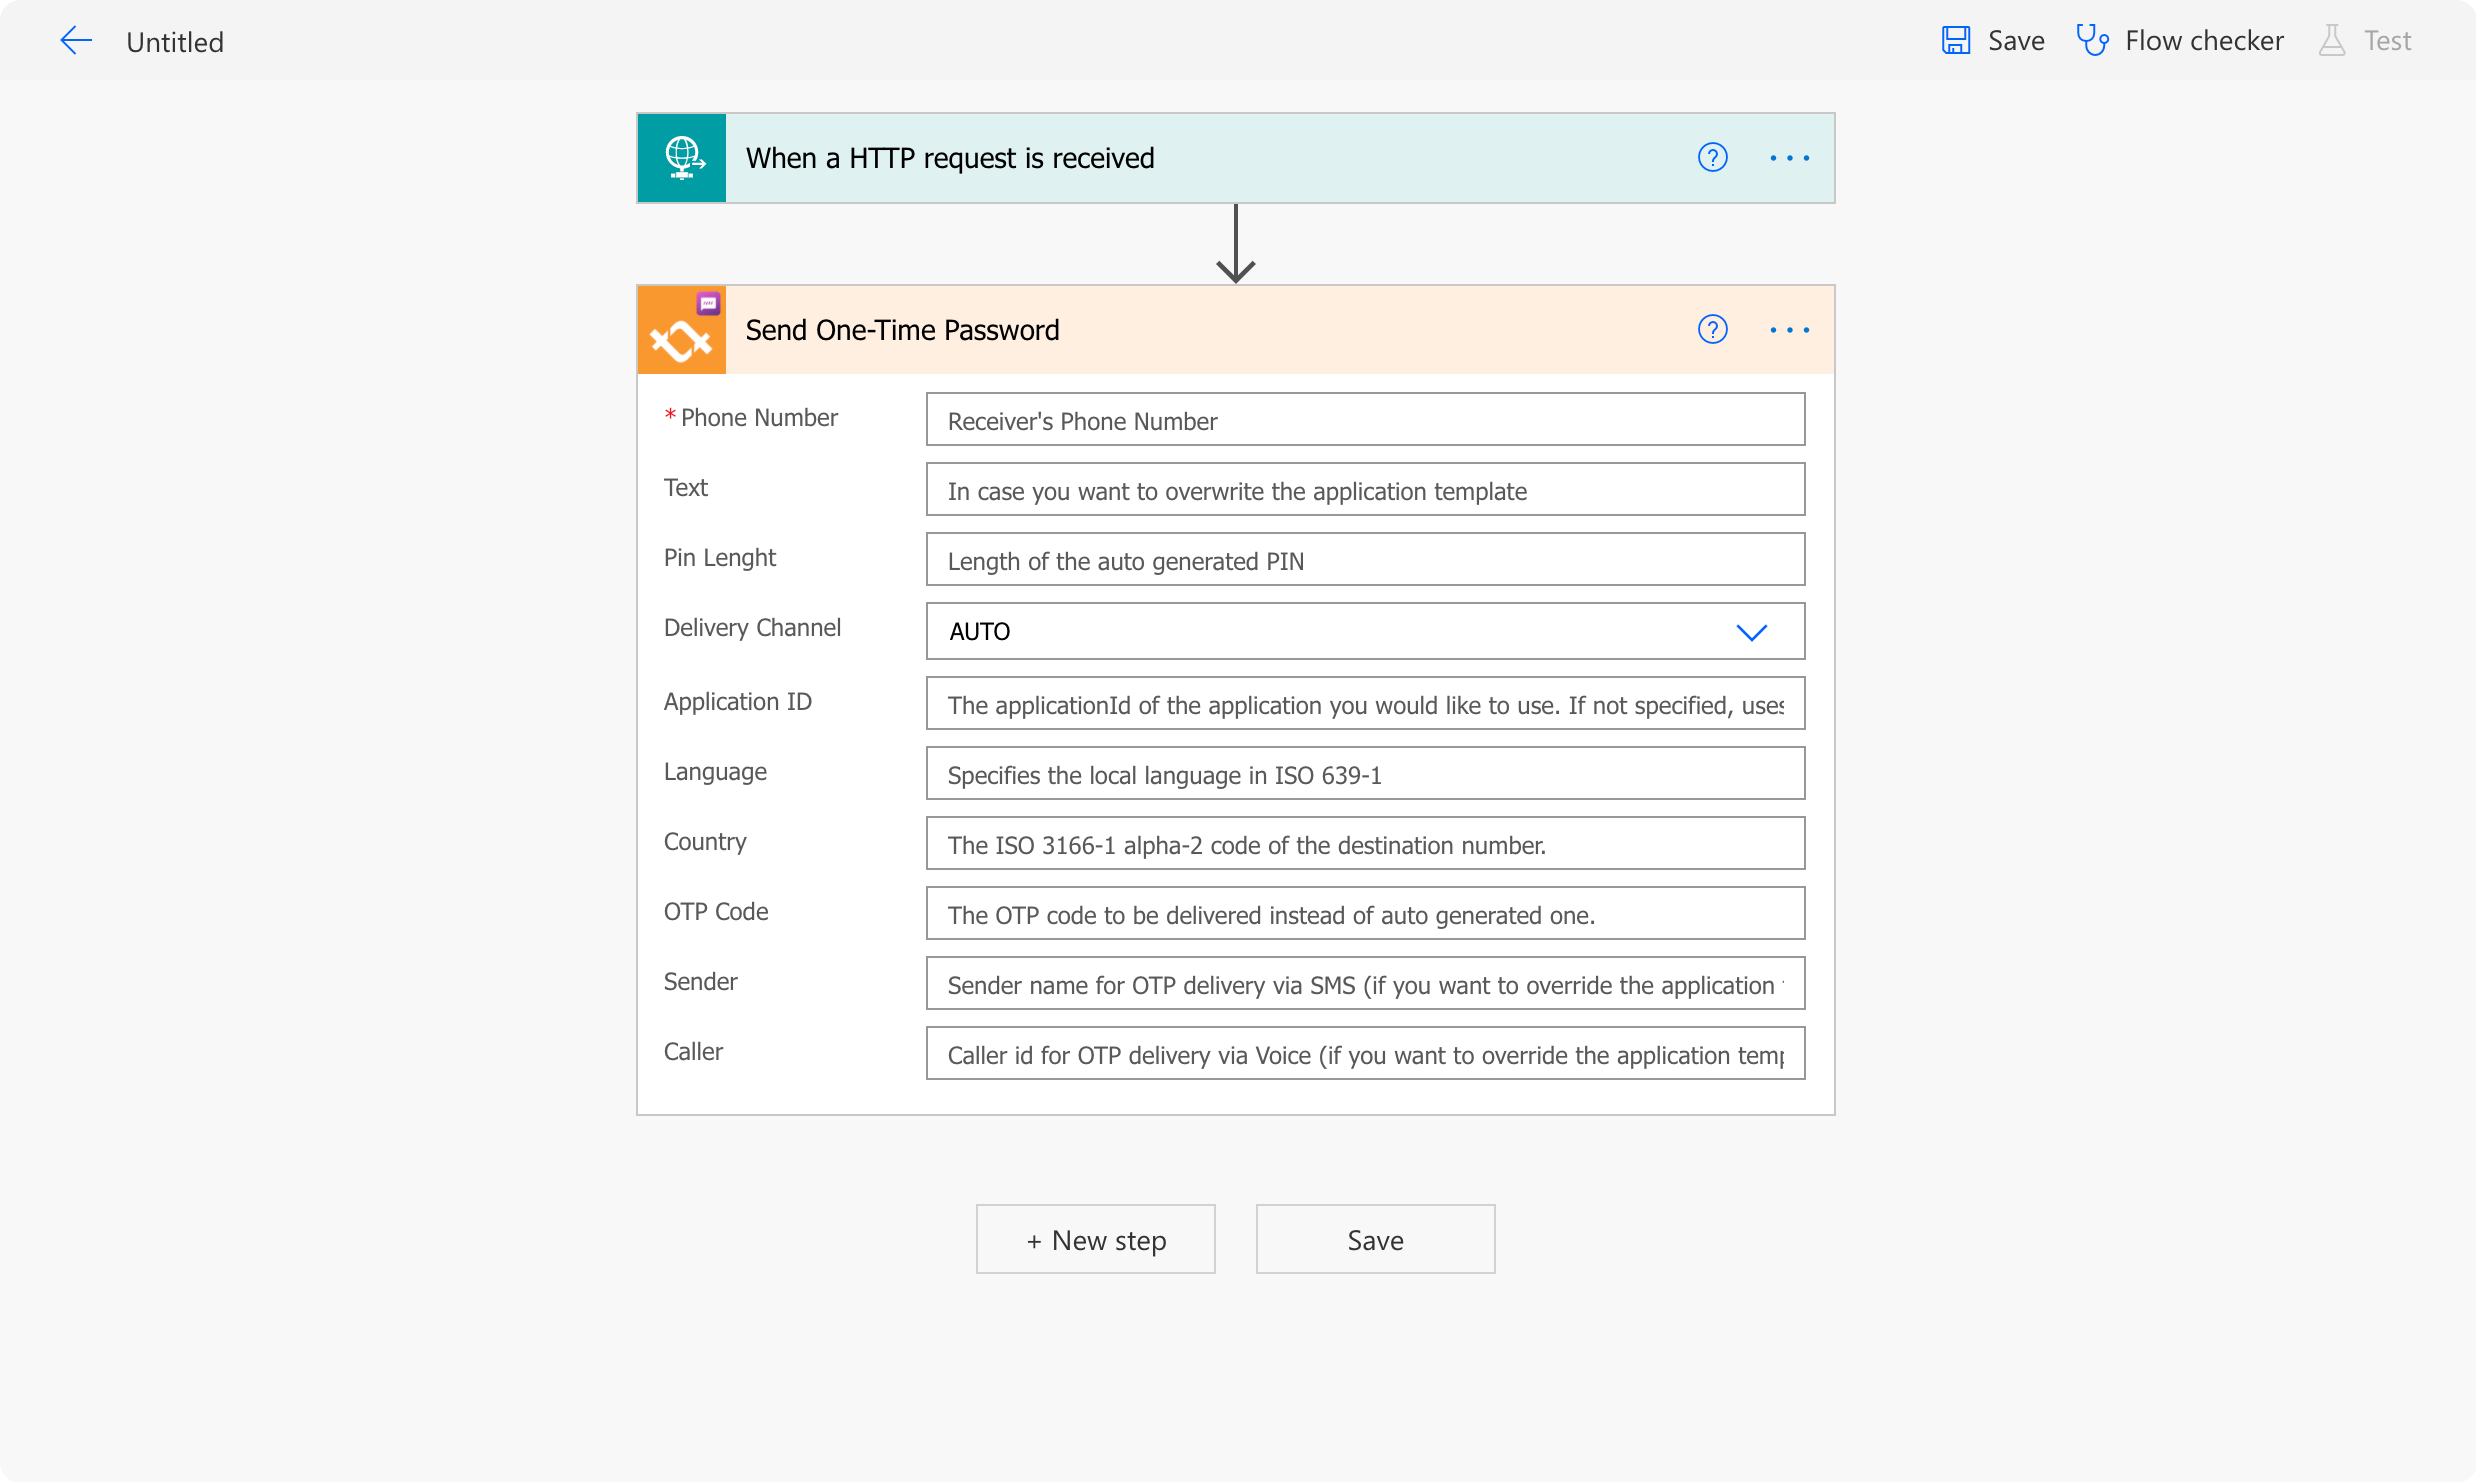
10. Set the Phone Number field to Phone number dynamic content from your HTTP request. If you want, you can adjust the other values according to your needs and API reference.
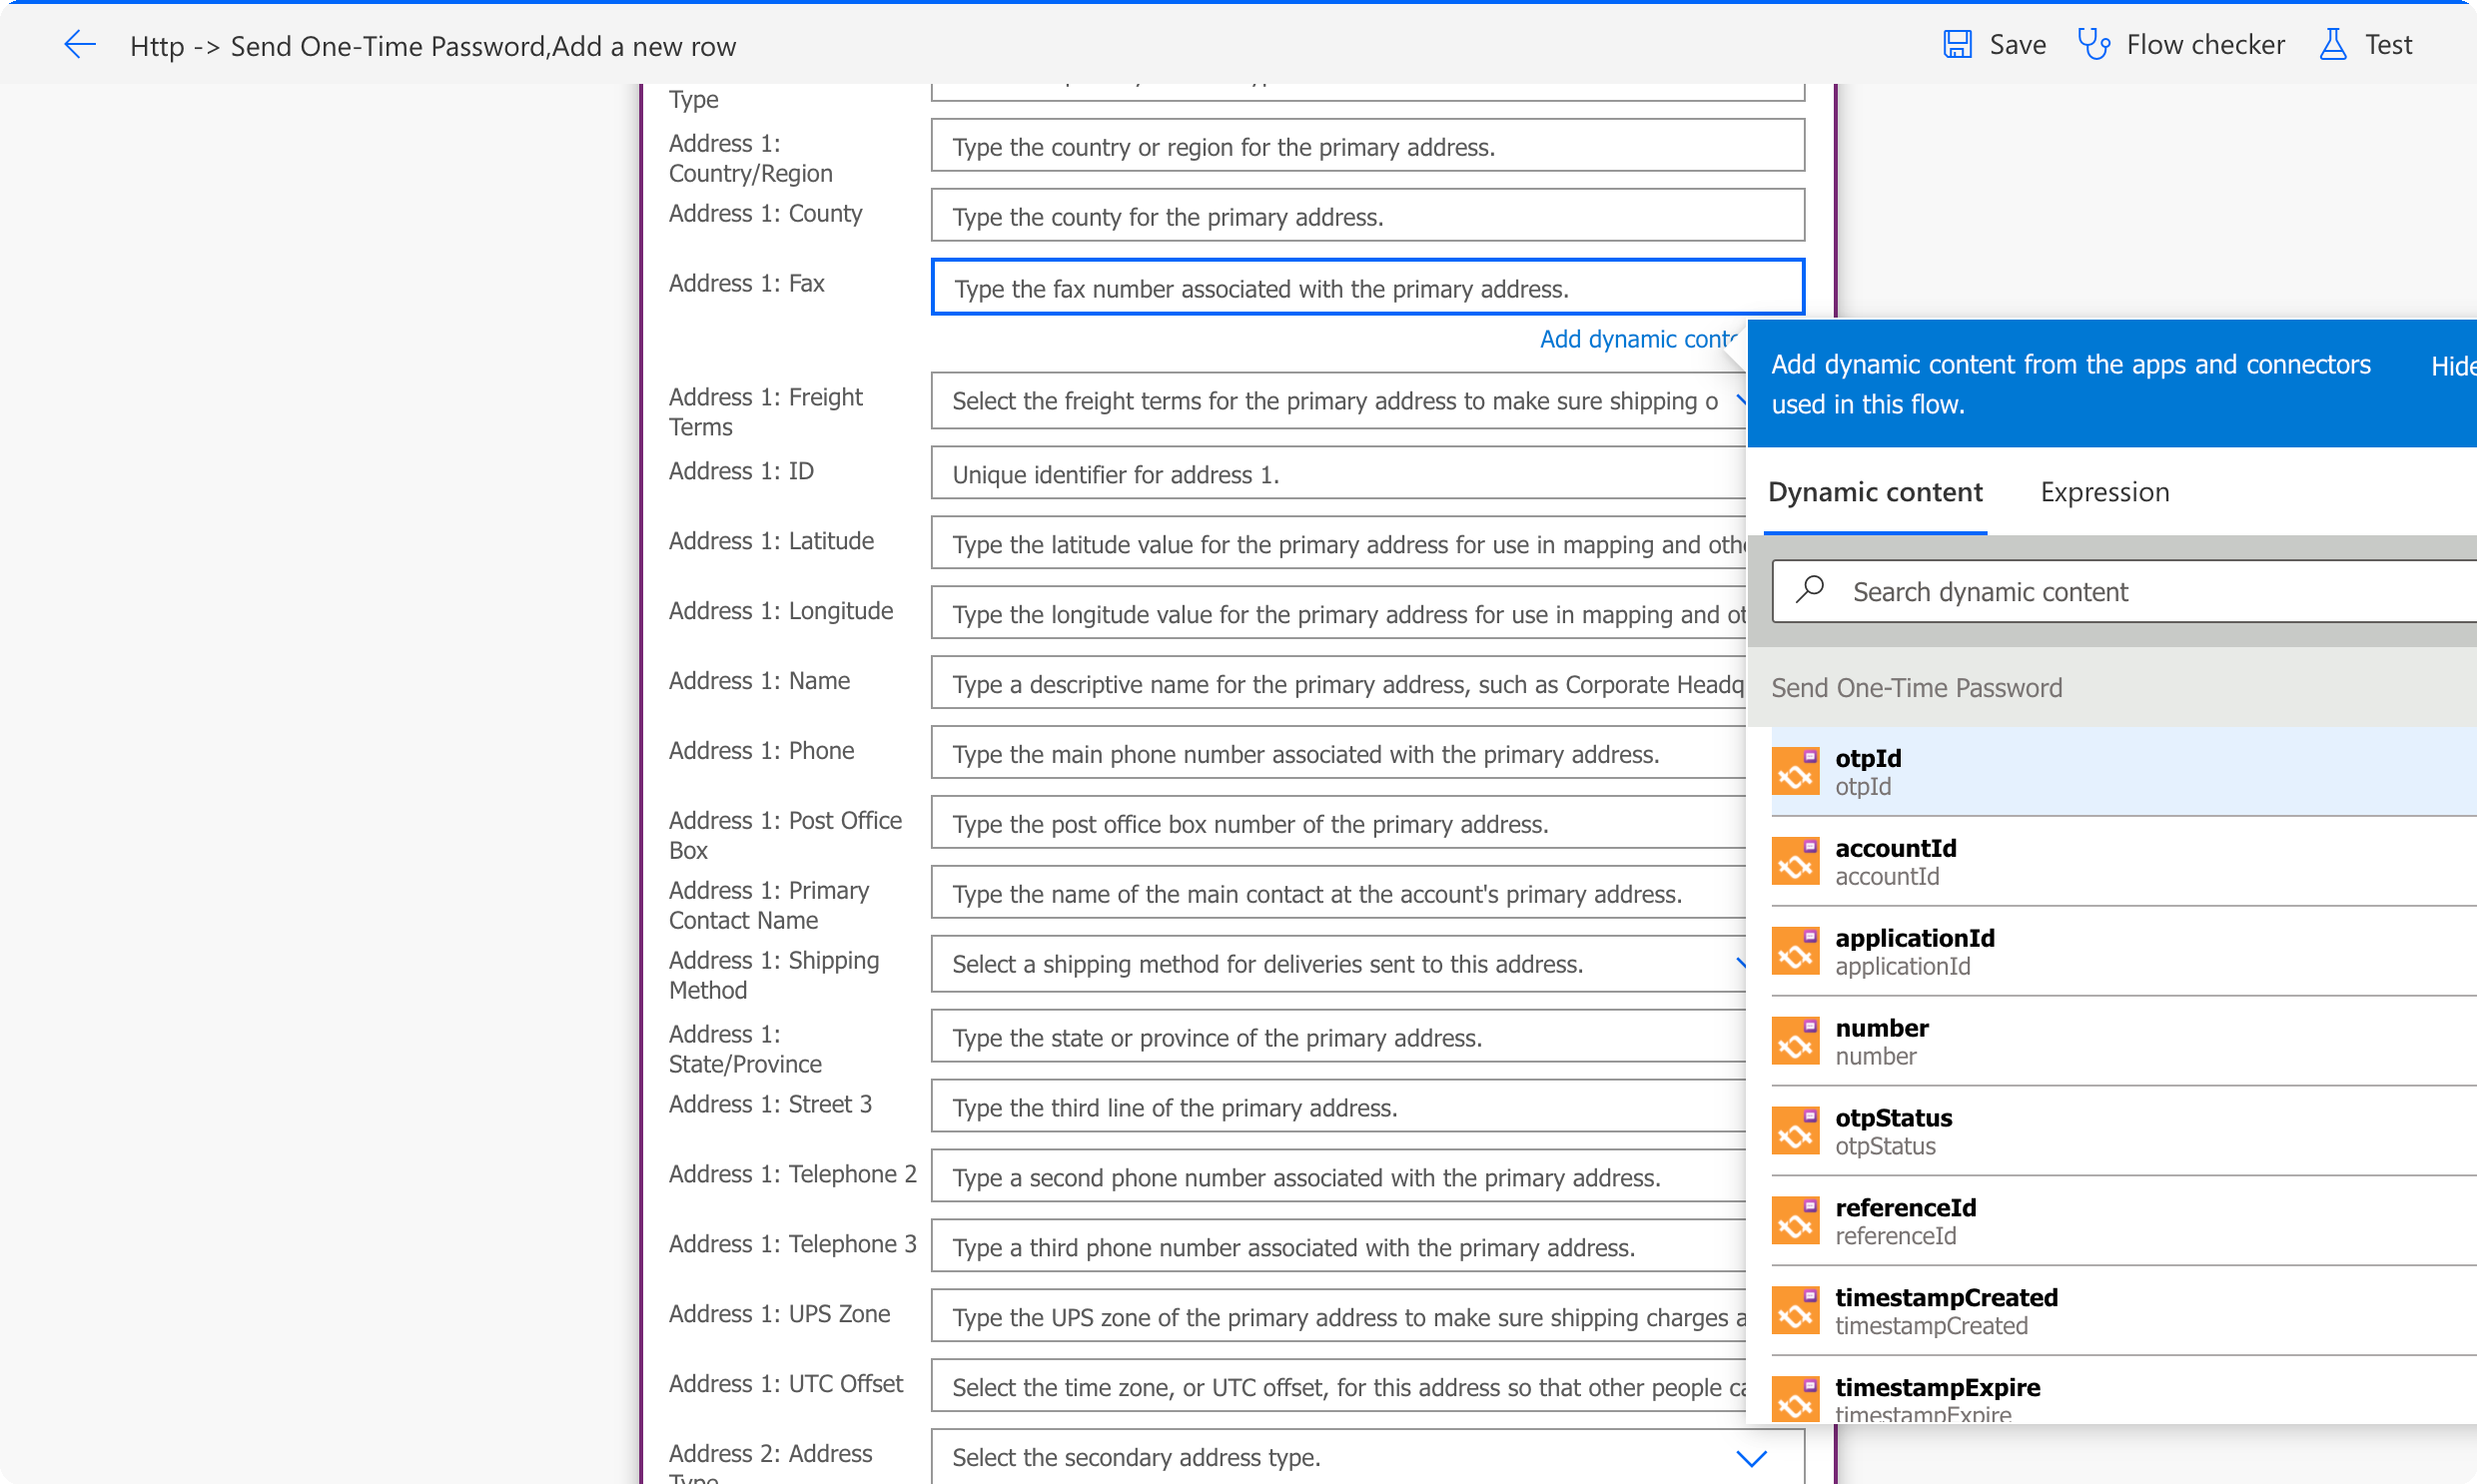
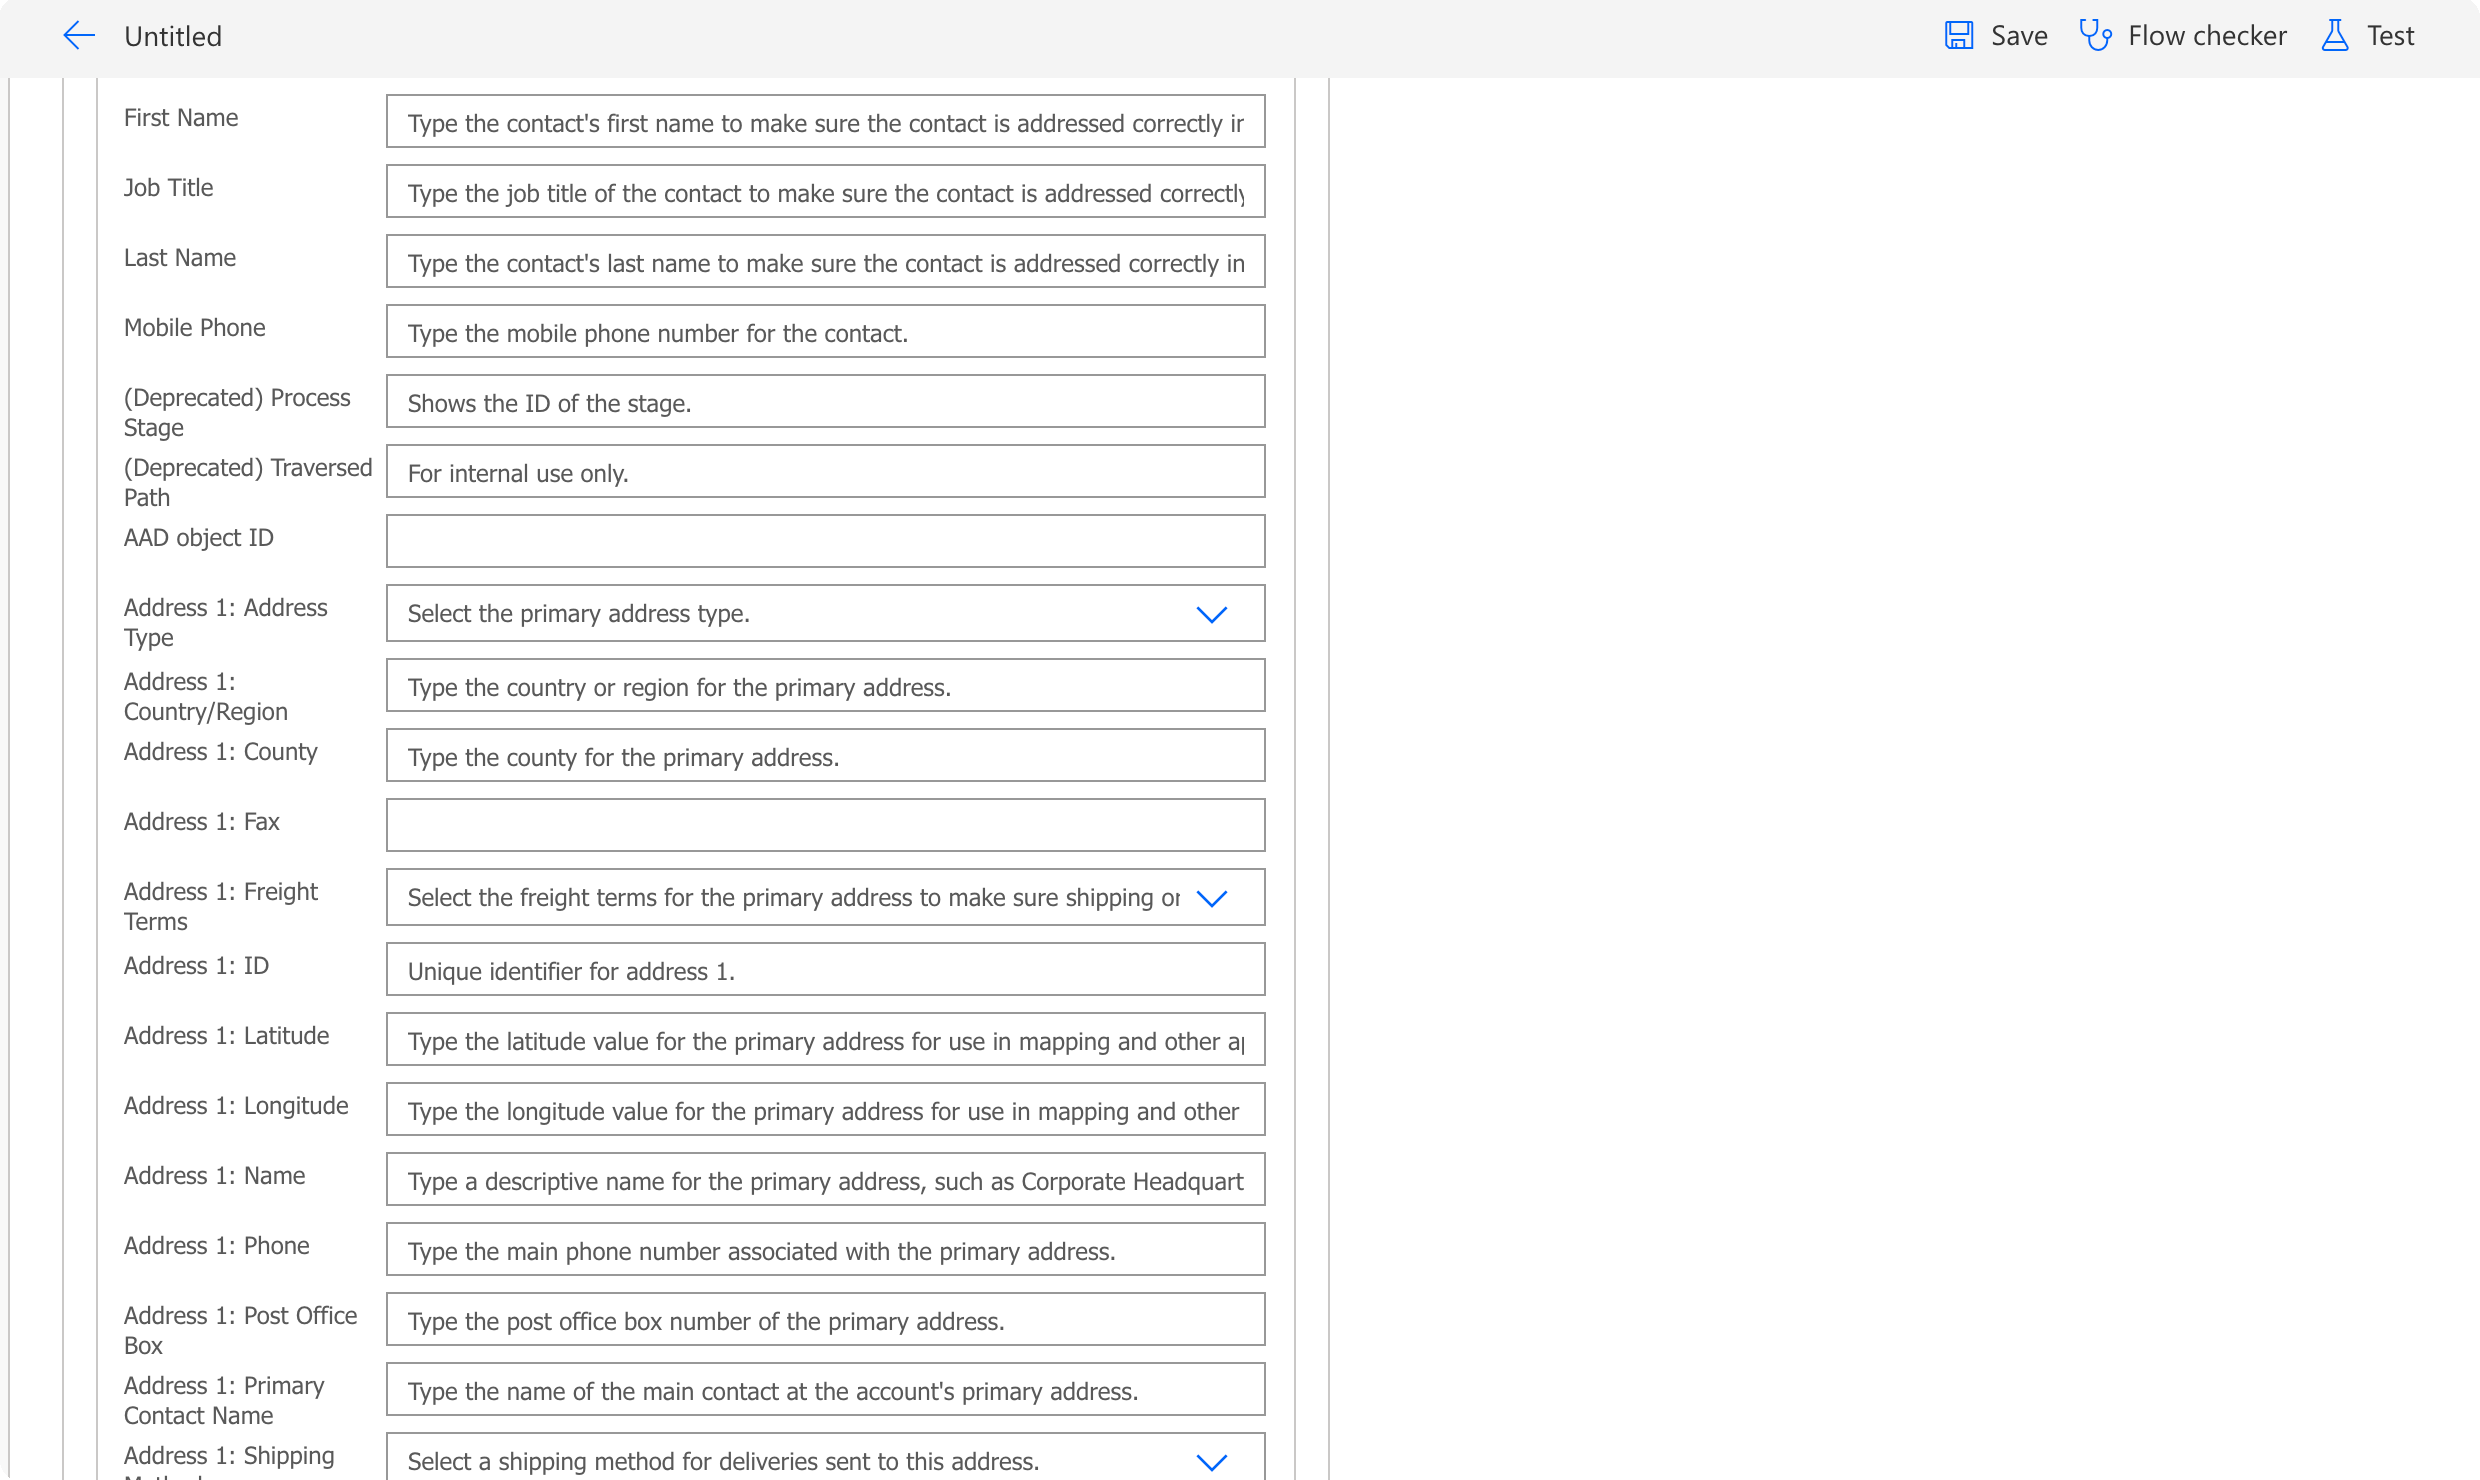
11. Click on the + New step. In the step selection, search for Common Data Service, and Add a new row select the action. Set the Table name to Contacts.12. Afterward, the Add a new row action updates itself to show you different fields. Set the Last Name to Last Name dynamic content, the First Name to First Name dynamic content, Email to email dynamic content, Mobile Phone to the Phone number dynamic content, and Description to Not Verified.
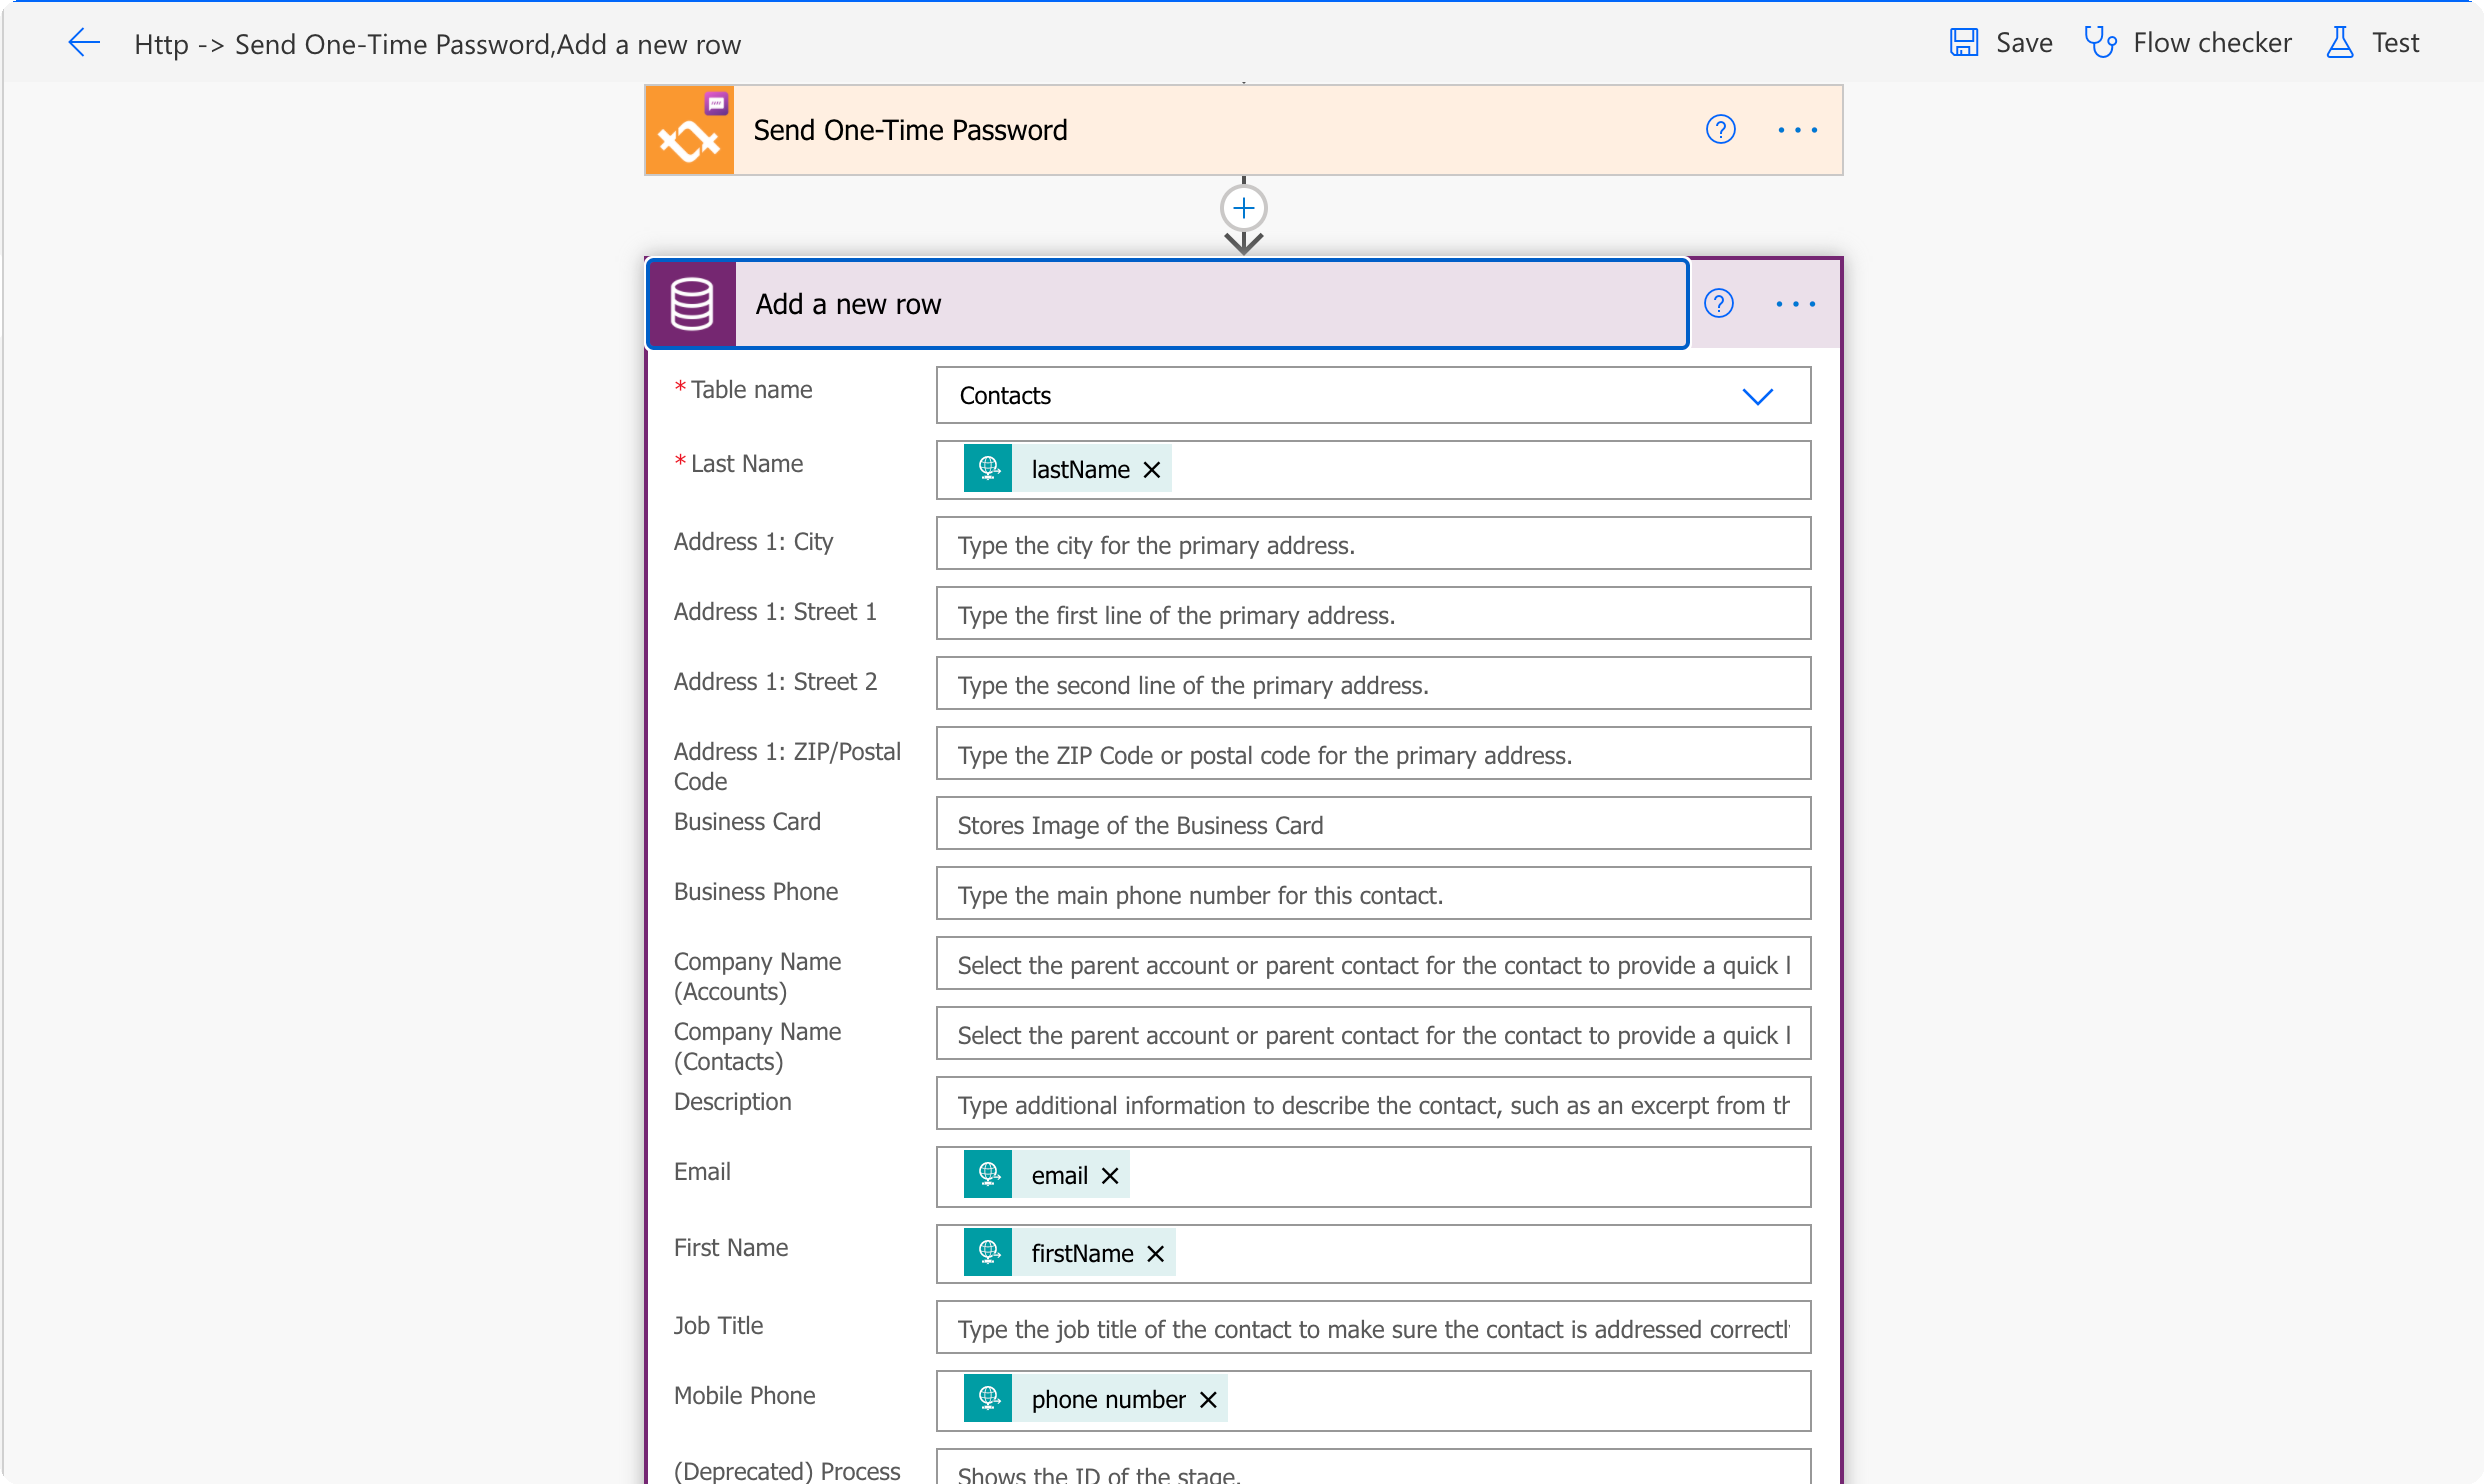
13. Then set Address 1: Fax to otpID dynamic content.
14. Lastly Save your Flow using the Save button. After Save, go to your trigger and copy the HTTP POST URL. You will need it in Step Four.
Congratulations on your working Flow!
Step Three: Create a Flow for verifying your OTP and contact
Let’s start with creating a second Flow that receives information from your HTML form, verifies your OTP, and updates the contact.
1.Open to your Power Automate
2. In the left dropdown menu, click the Create button
3. From all possible Flow types, select Automated—from blank.
4. In the design window pop-up, click the Skip button.
5. In the Search, type in When an HTTP request is received and select the corresponding trigger.
6. Click on the Use sample payload to generate schema, and in the new pop-up input the following data:
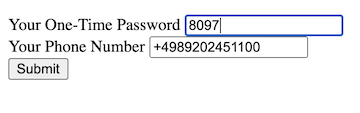
<div class="geshifilter"><pre class="php geshifilter-php"><span class="br0">{</span><span class="st0">"code"</span><span class="sy0">:</span><span class="st0">"123"</span><span class="sy0">,</span><span class="st0">"phone number"</span><span class="sy0">:</span><span class="st0">"+4989202451100"</span><span class="br0">}</span></pre></div>Then, click on Done.
7. Click on the + New step. In the step selection, search for Common Data Service, and select the List rows action.8. In the List rows action, set the Table name to Contacts. Then, click on advanced options. Set the Filter rows to mobilephone eq ‘phone number’.
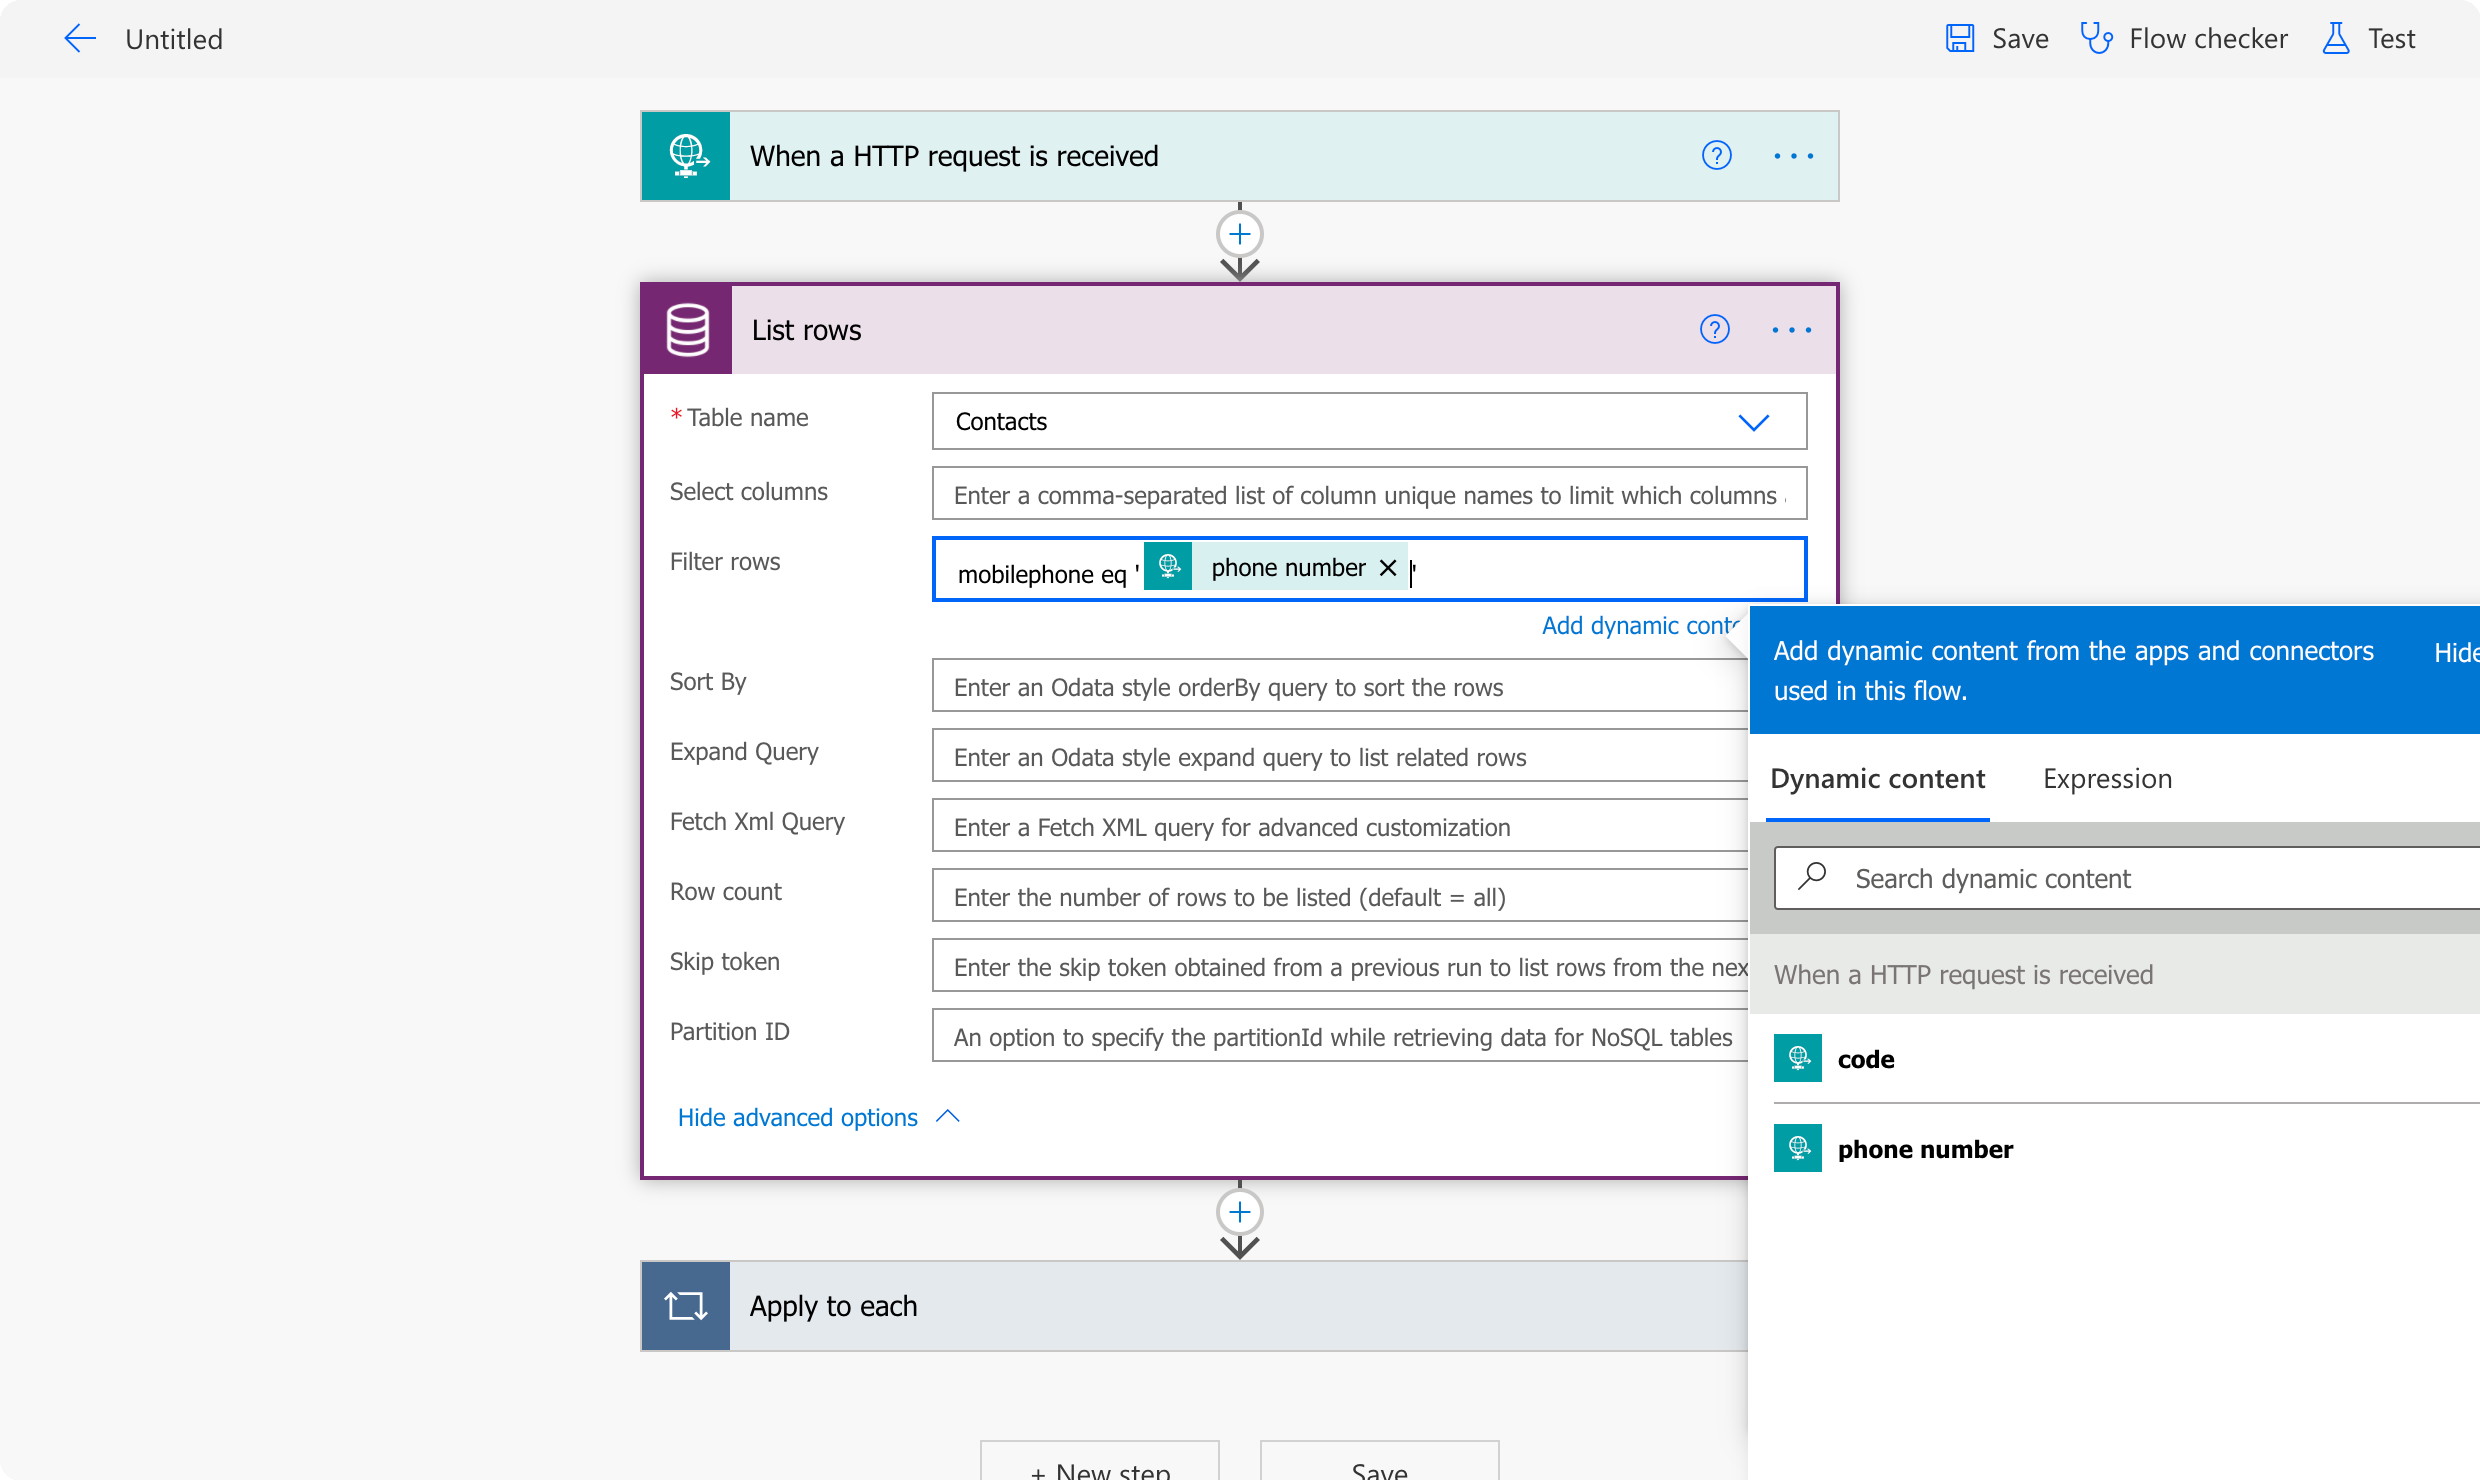
TIP: You can use the Row count = 1 to ensure you are getting only one contact.
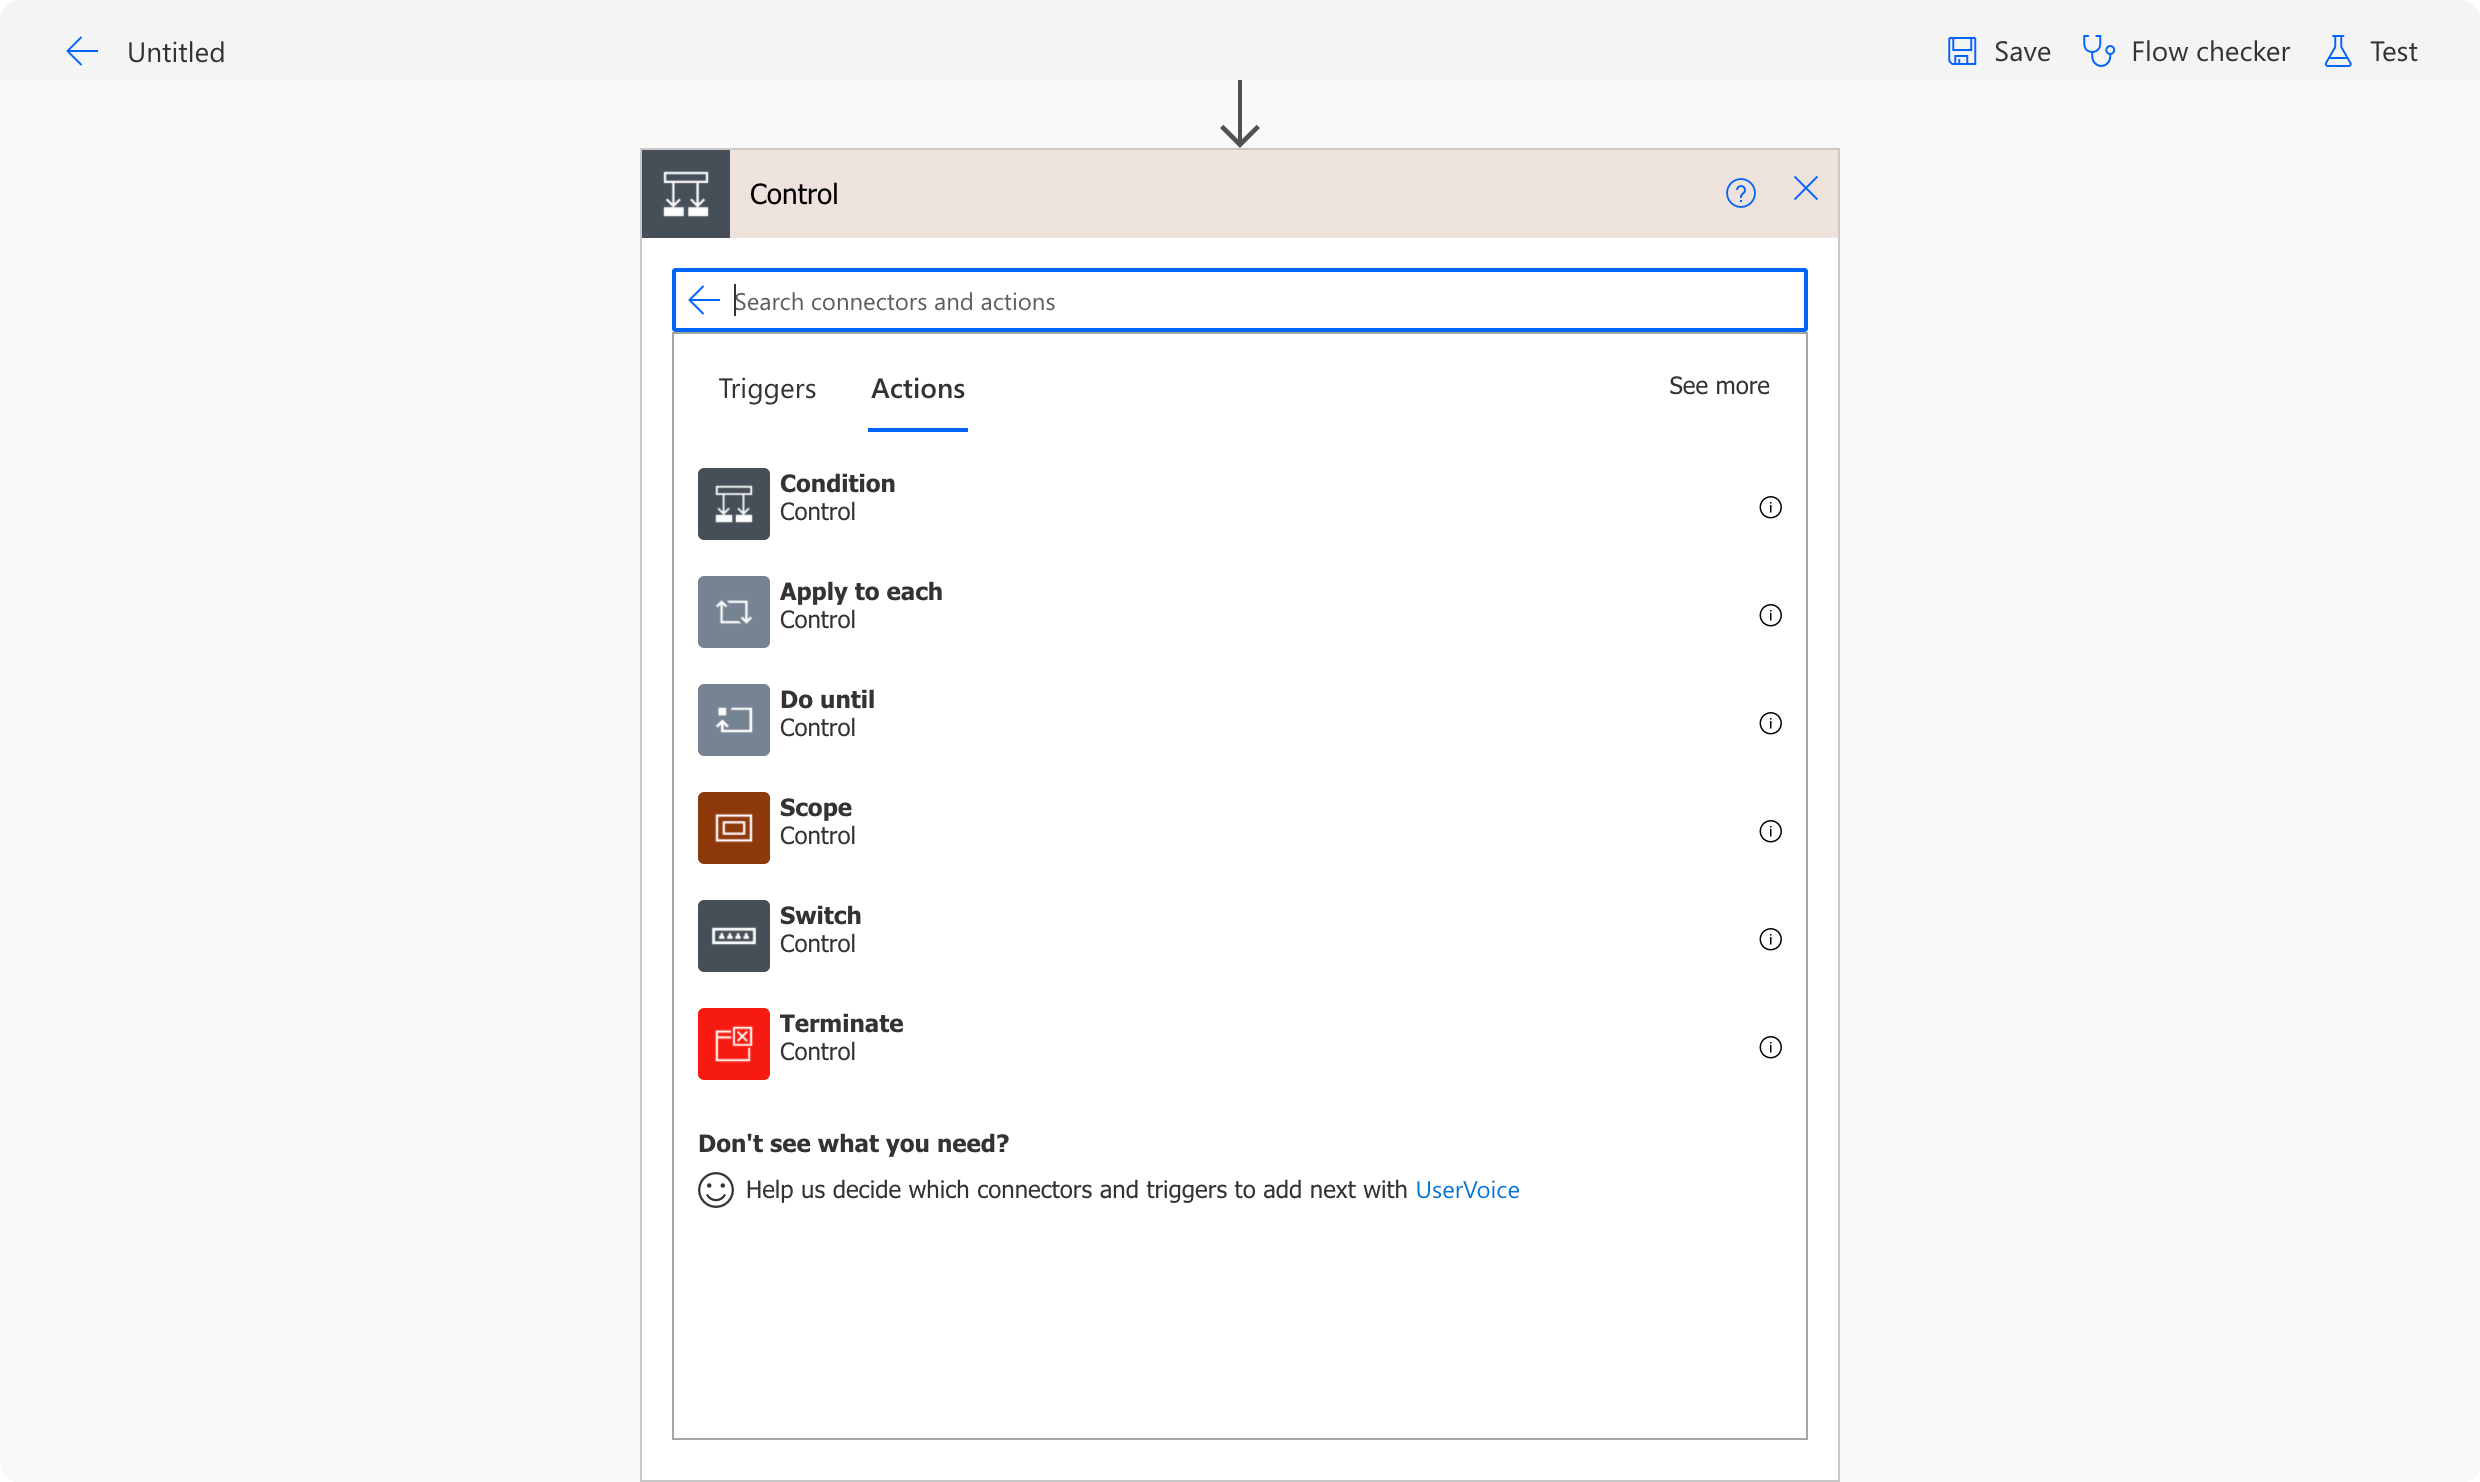
9. Click on the + New step. In the step selection, search for Control, and select the Apply to each action.
10. In the updated Apply to each action, set the Select an output from previous steps to value dynamic content.
11. Click on Add an action. In the step selection, search for Control, and select the Condition. Set the first field to Address 1: Fax dynamic content, the middle field to contains and the last one to –.
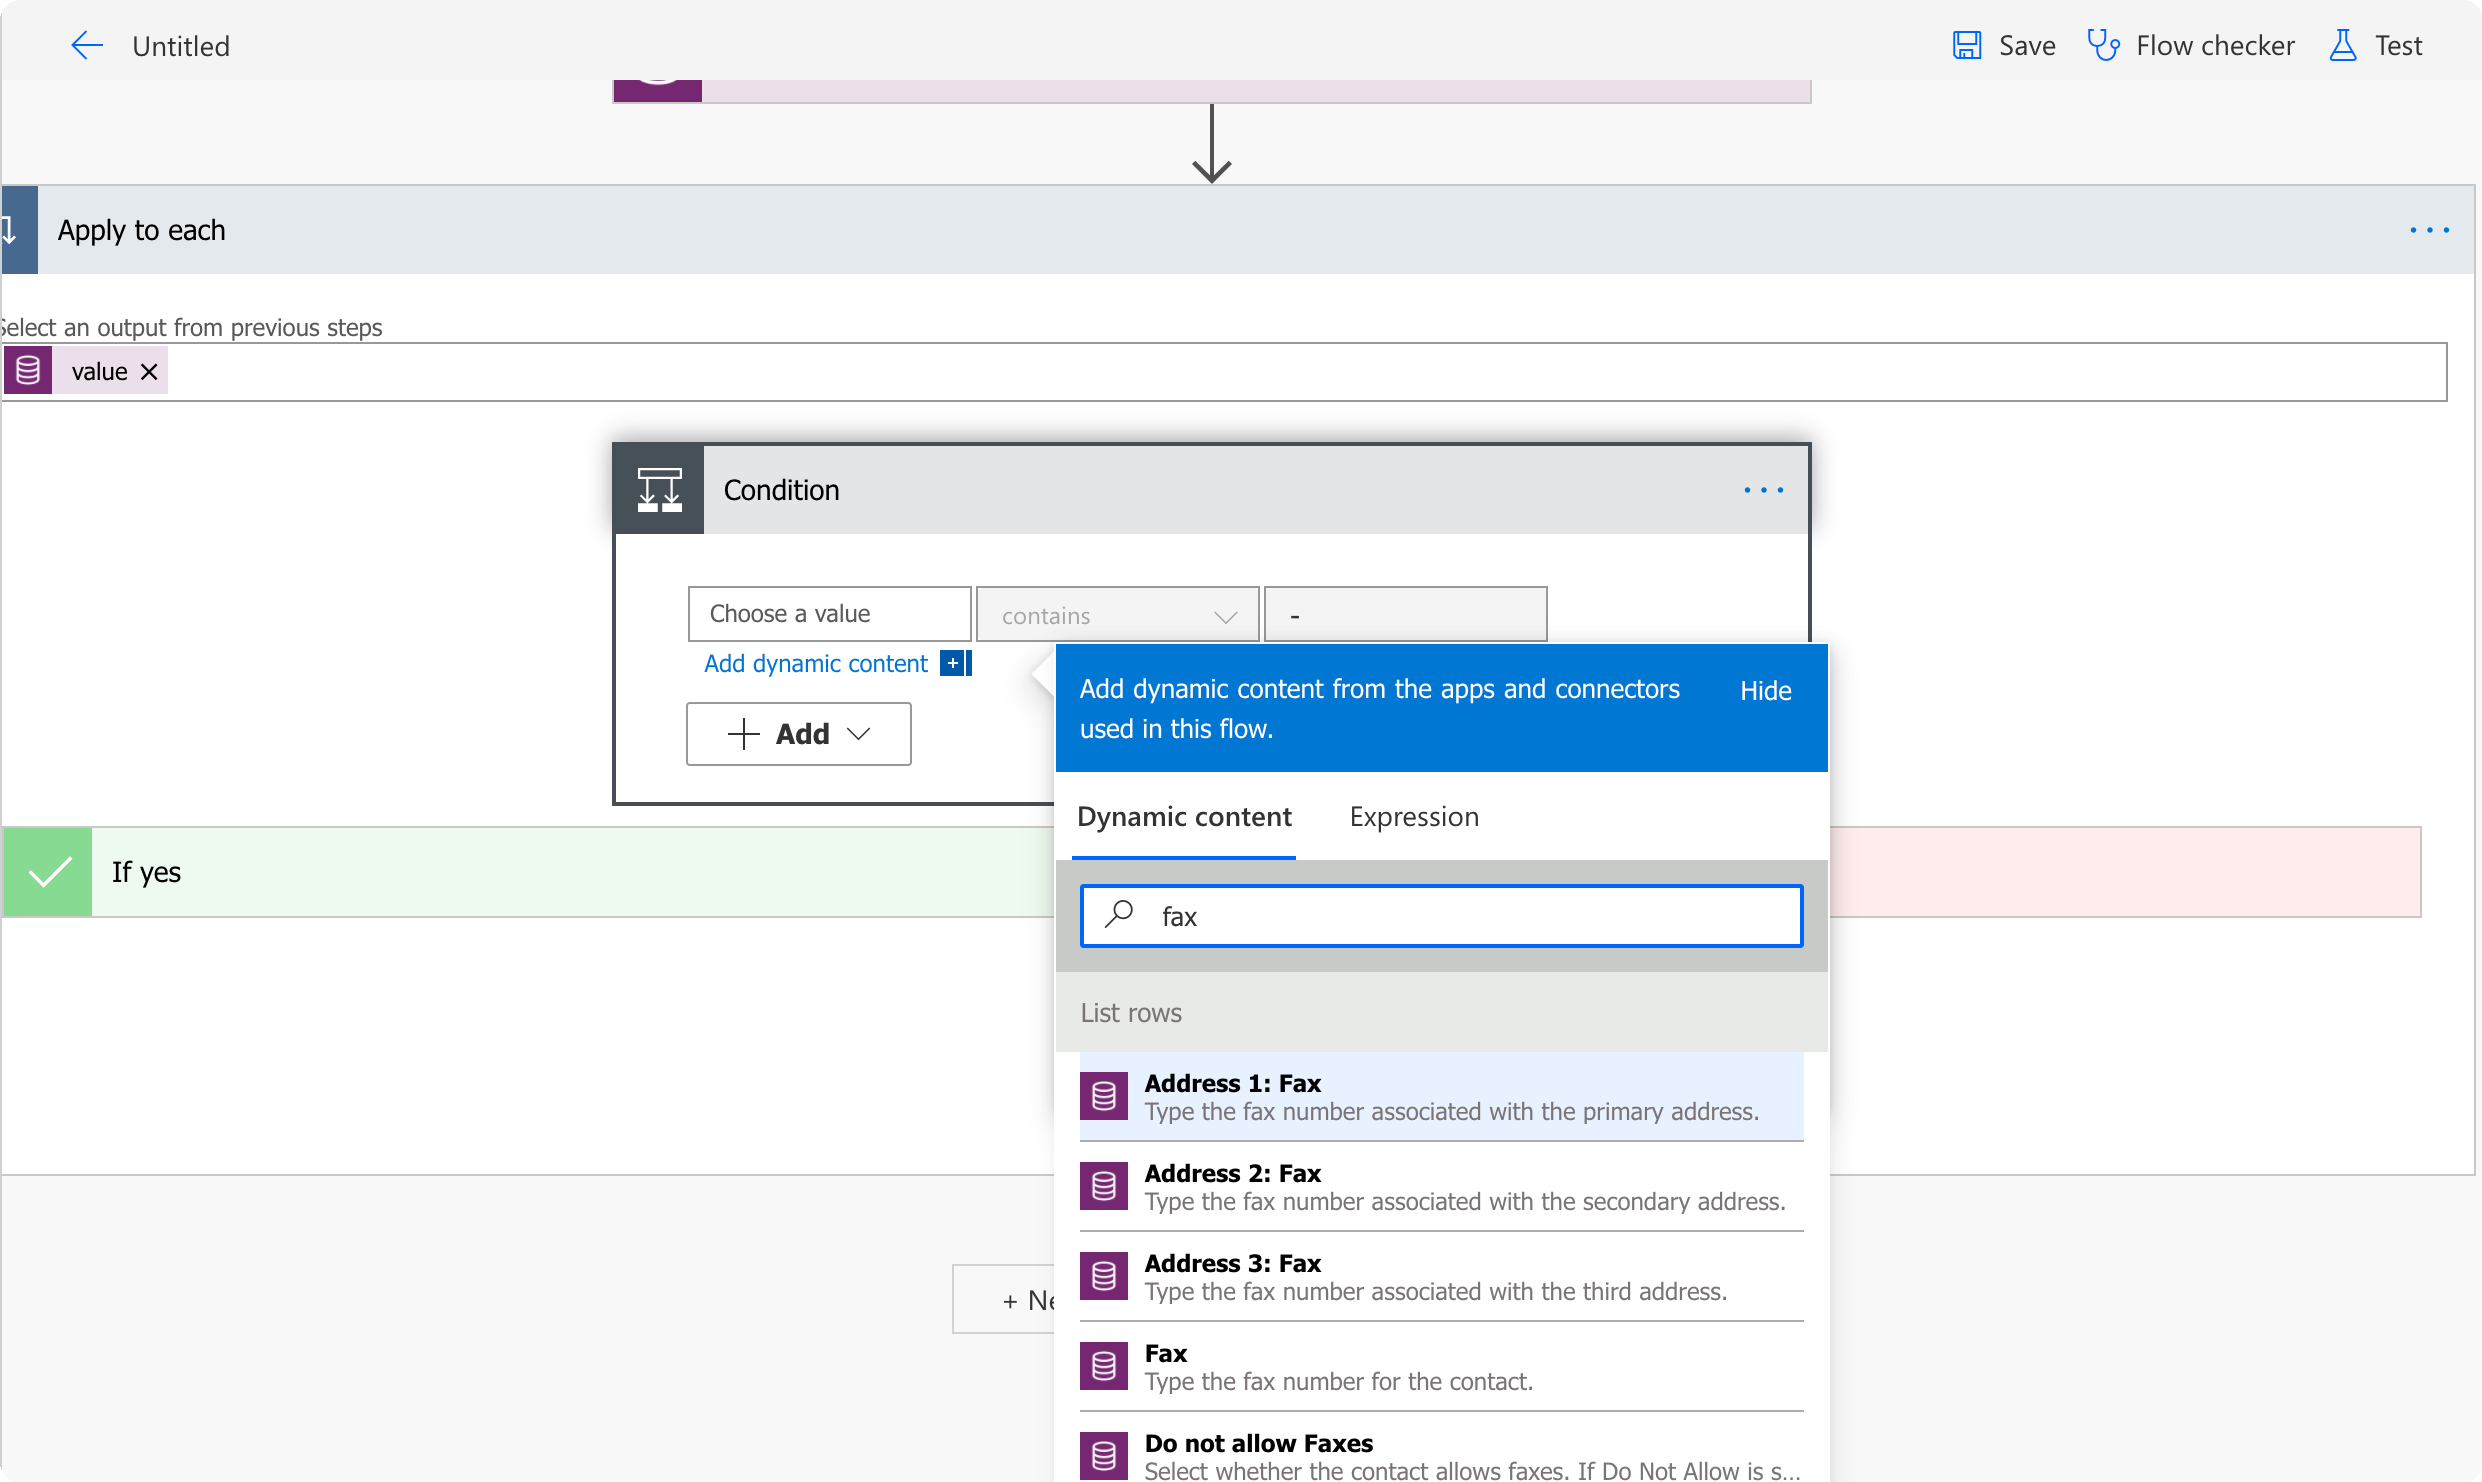
12. In the If yes branch, Click on Add an action. In the step selection, search for tyntec 2FA, and select the Verify OTP.
13. Set the One-time Password ID to Address 1: Fax dynamic content and the One-Time Password Code to code dynamic content.
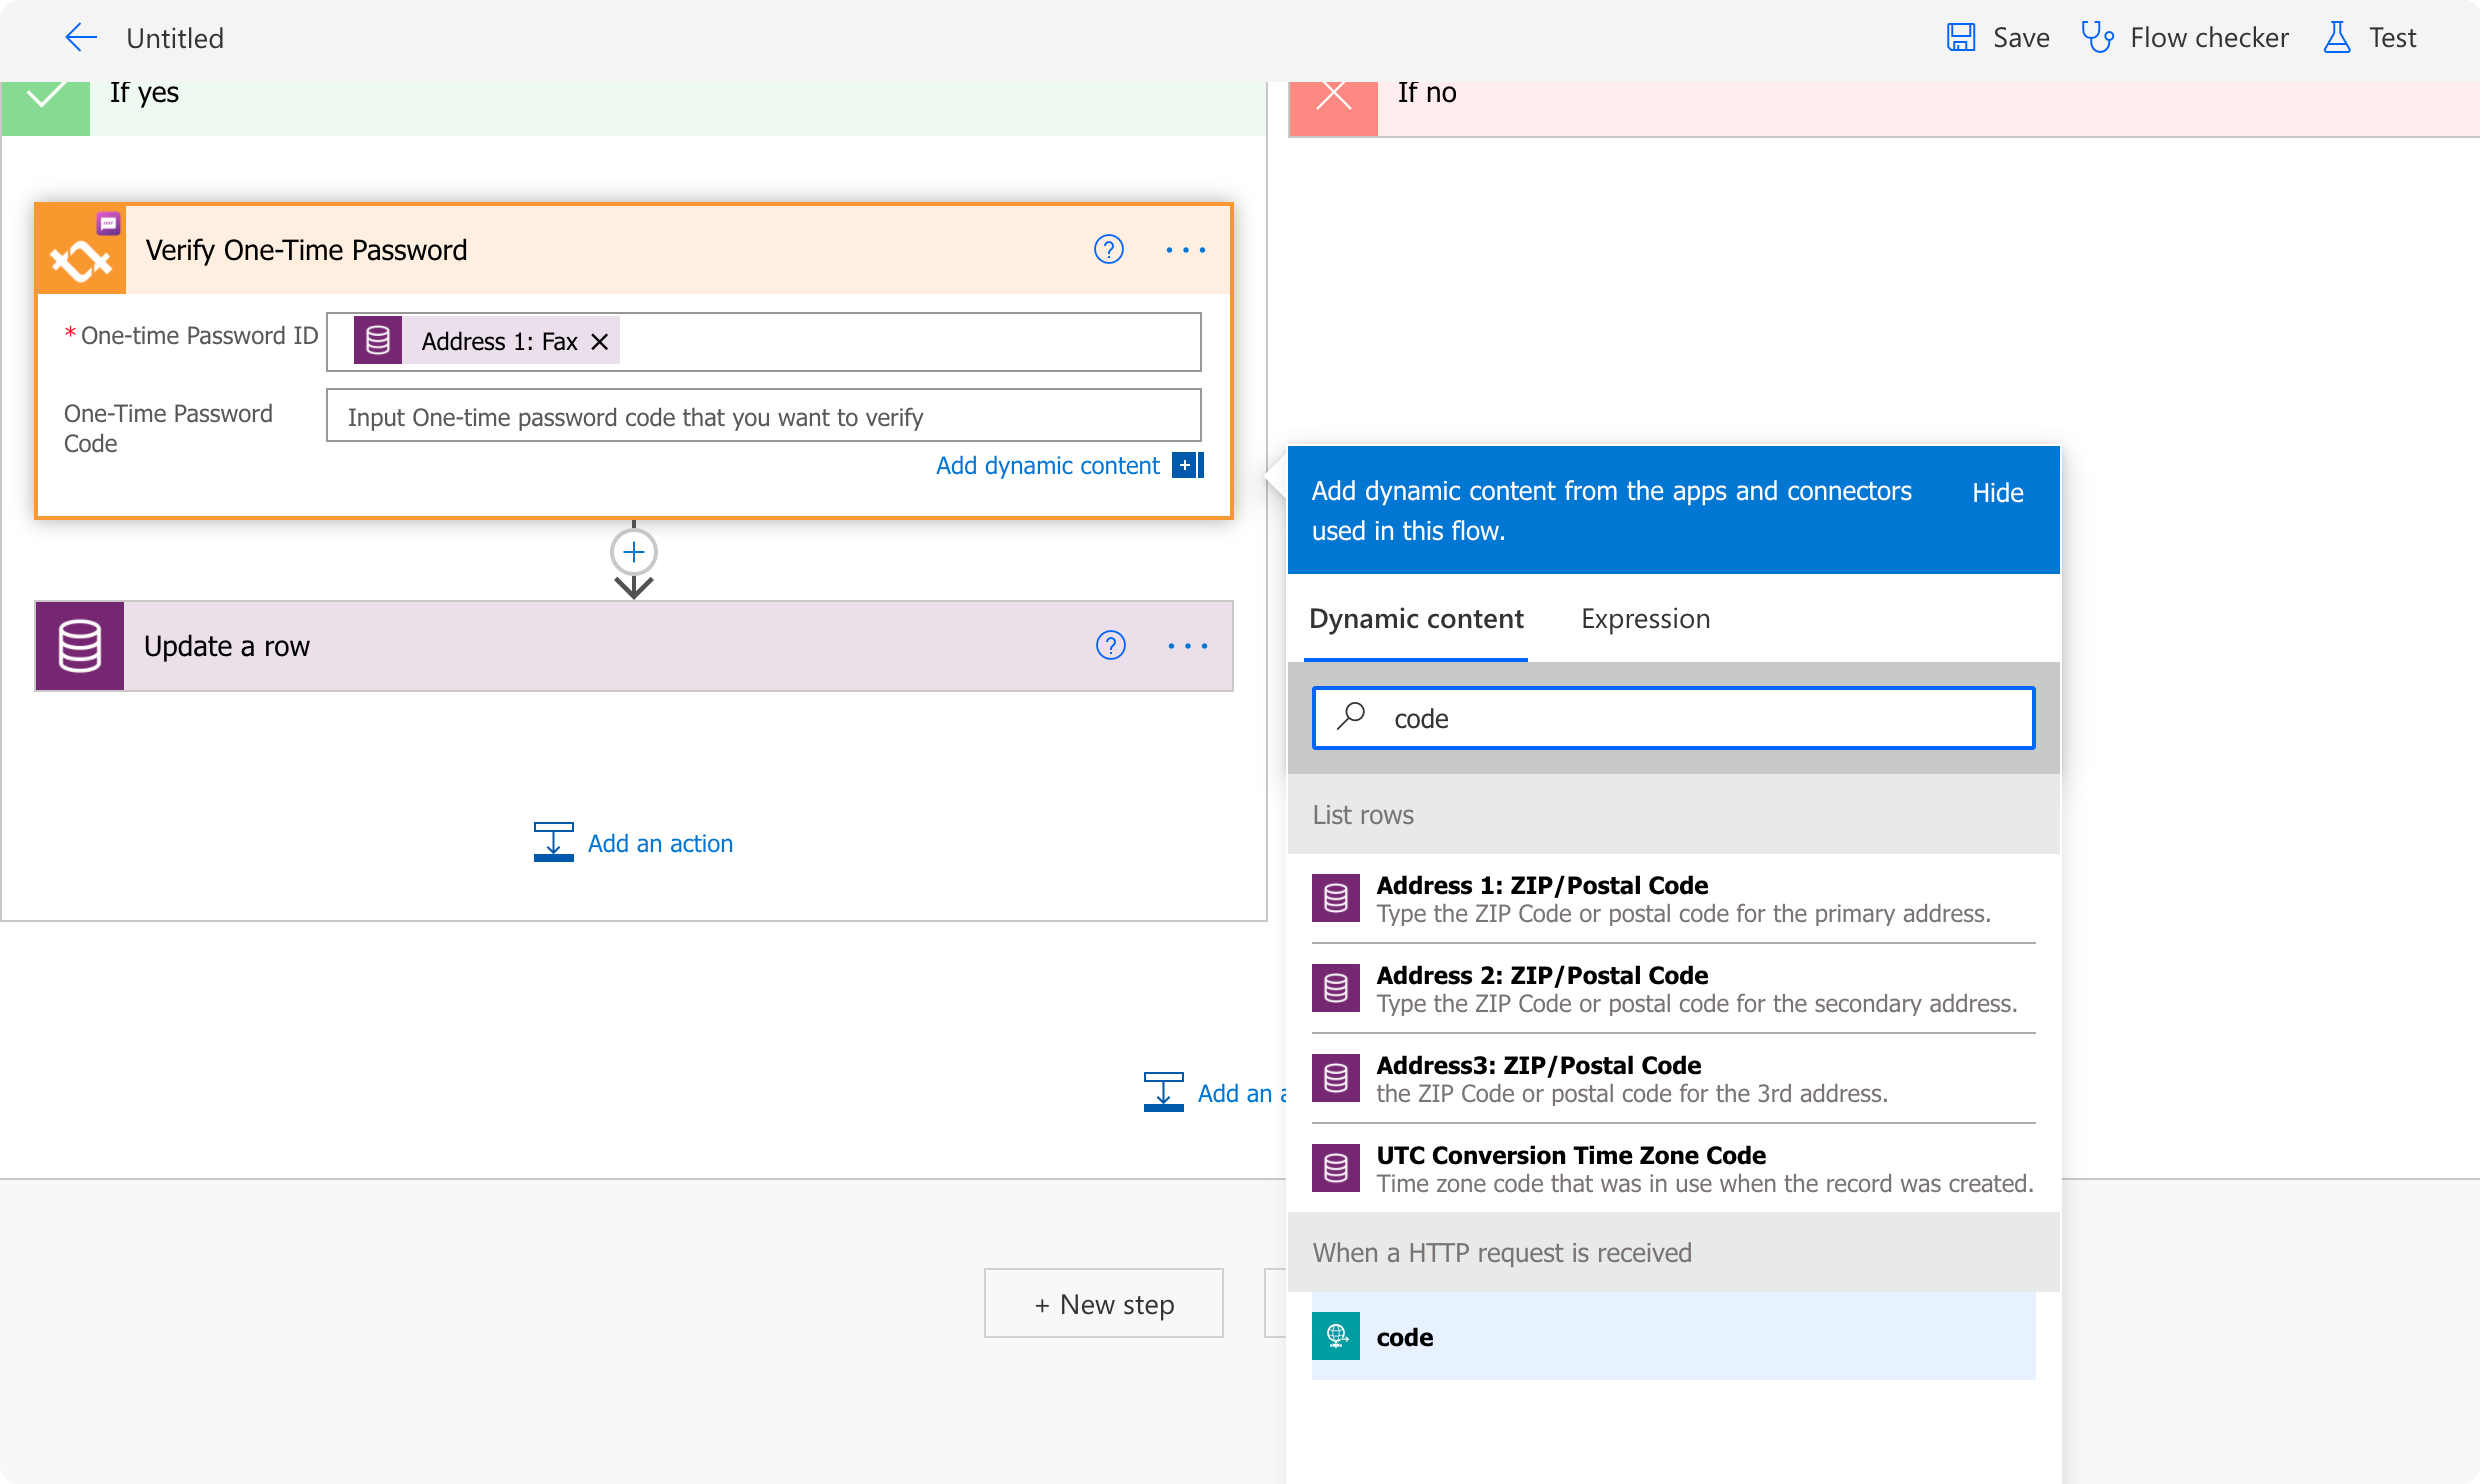
14. Then, click on Add an action. In the step selection, search for Common Data Service, and select the Update a row. Set the Table name to Contacts and Row ID to Contact dynamic content. Set Description to Verified account
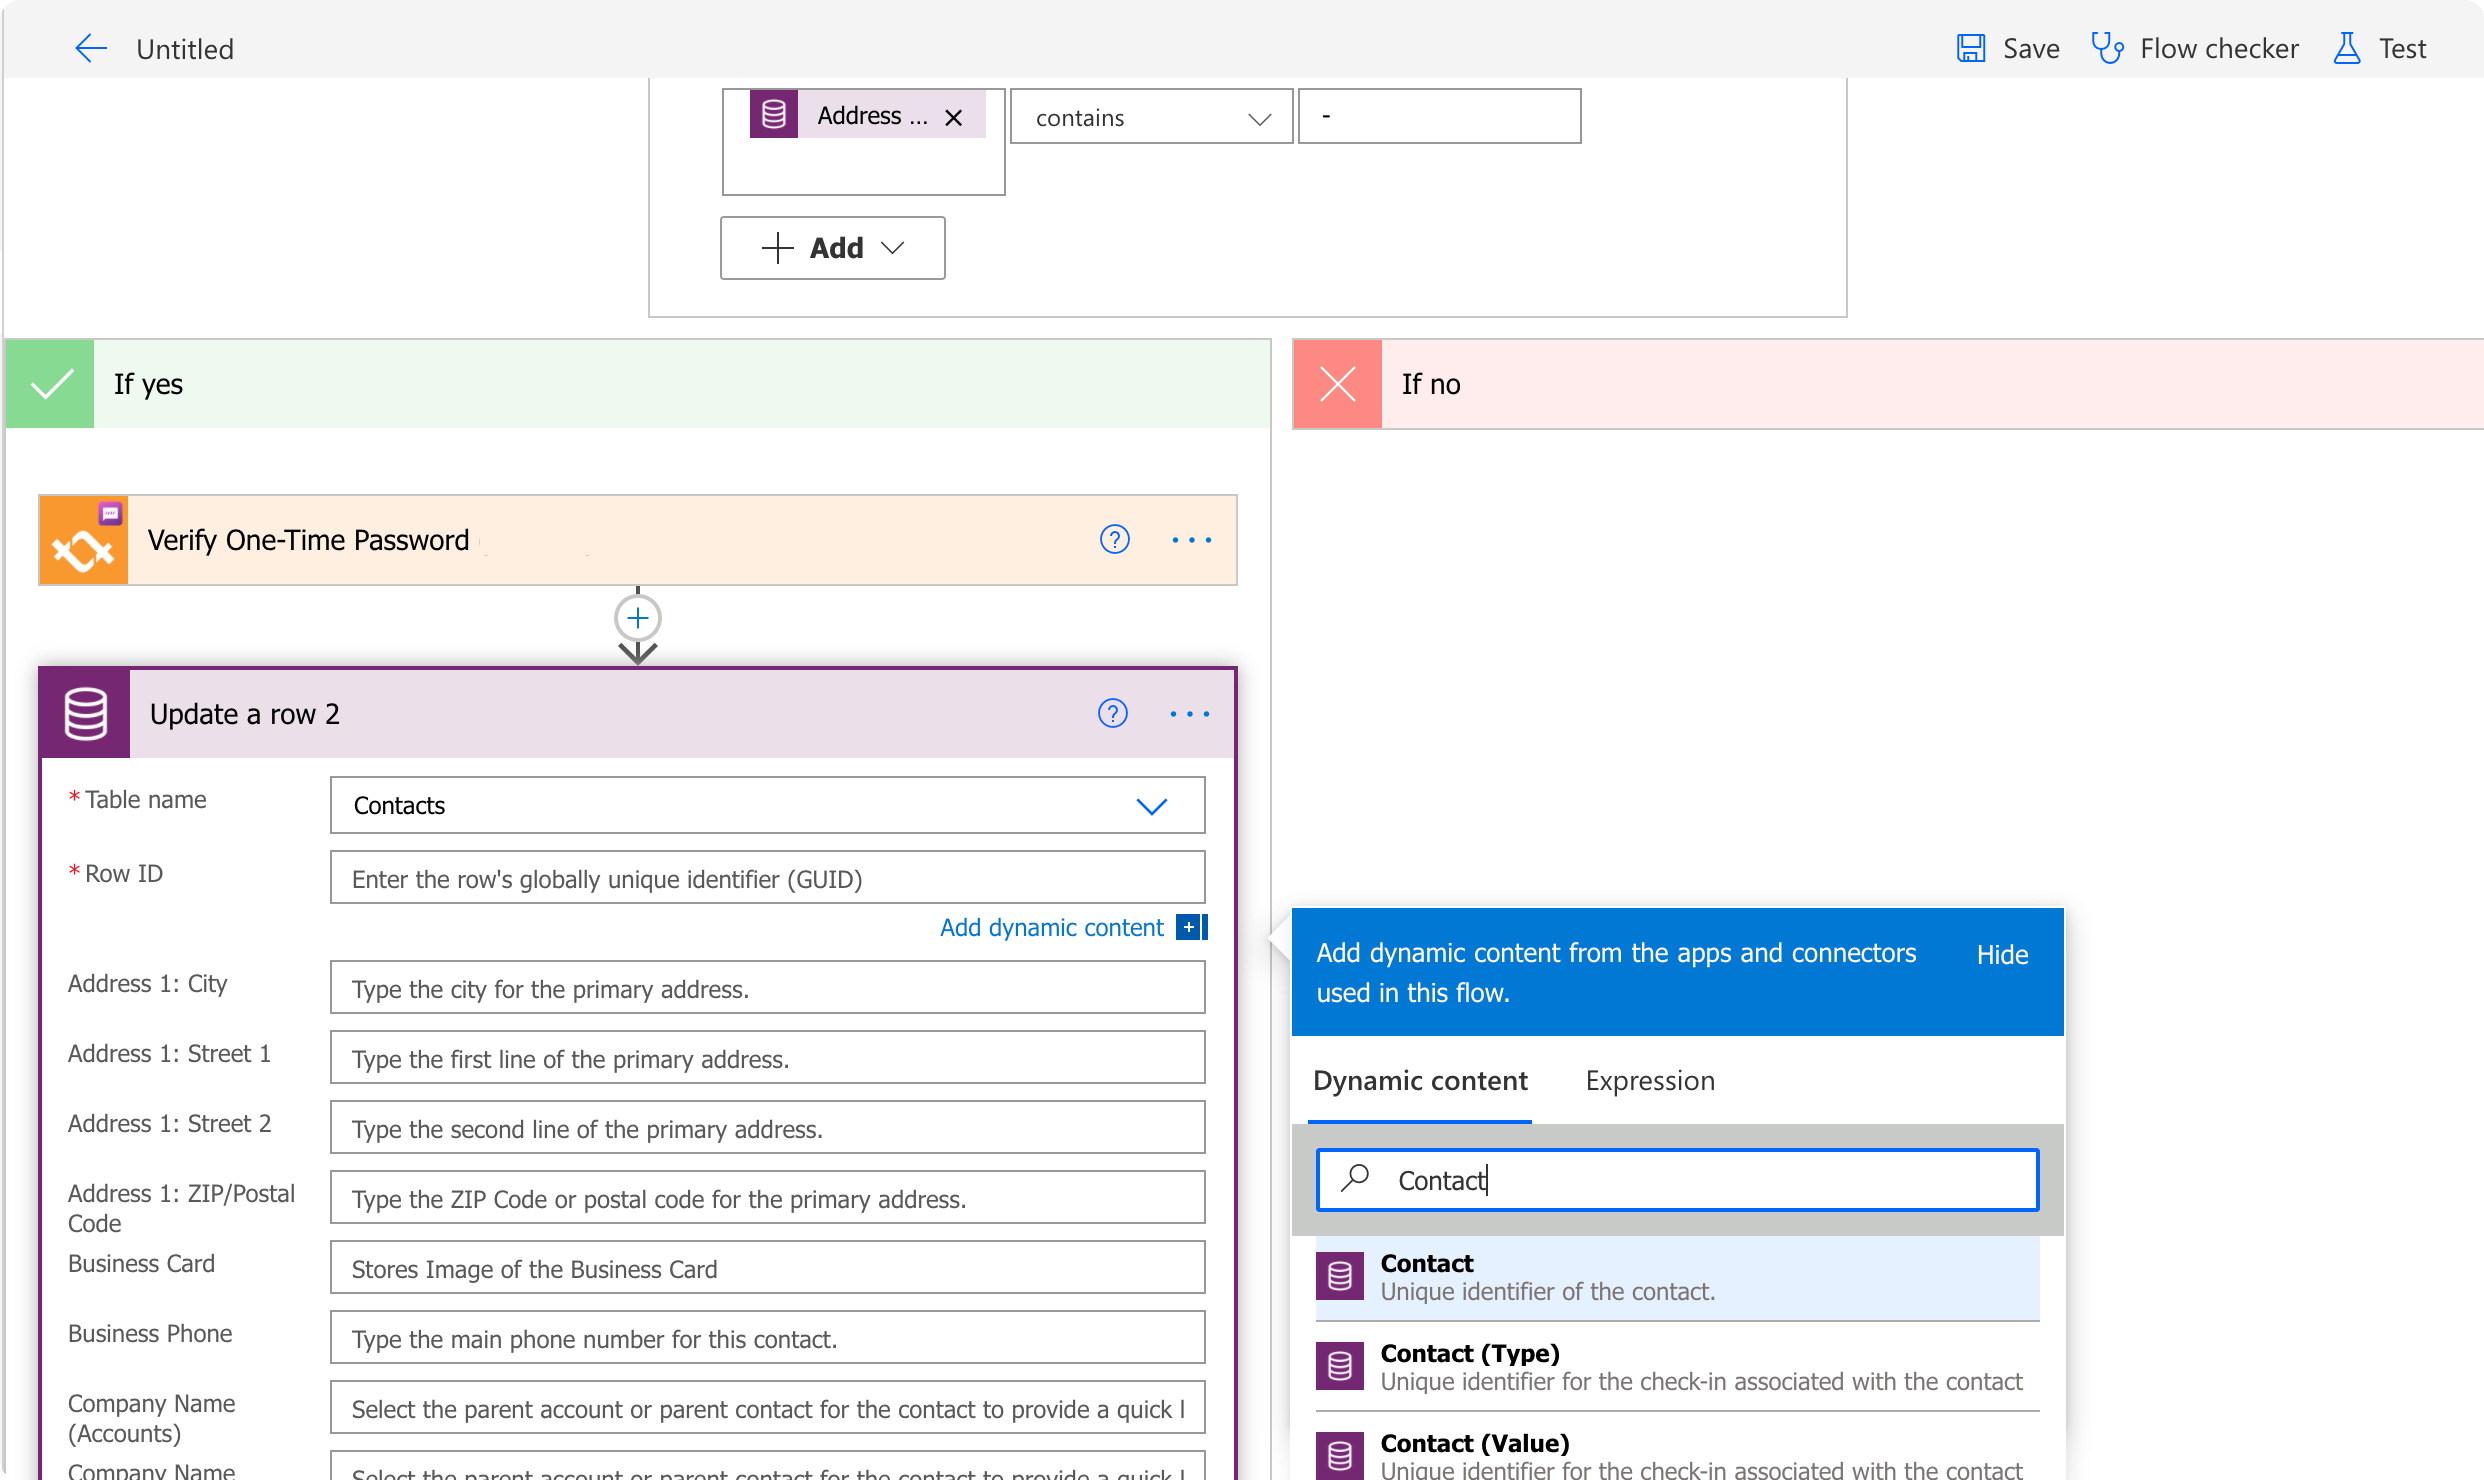
15. In the Update a row action, set Description to Verified and Address 1: Fax to single space.
16. Save your Flow. After Save, go to your trigger and copy the HTTP POST URL. You will need it in Step Four.
Congratulations, your Flows are now working and ready for new contacts.
Step Four: Test your Flows
Before you can test your Flows, you need to update your submission form.
1. Open the HTML file with your forms in your favorite editor. Replace the Sign Up URL with your first POST URL and the Verify URL to your second POST URL.
<div class="geshifilter"><pre class="php geshifilter-php"> <span class="kw2">const</span> signUpUrl <span class="sy0">=</span> action <span class="sy0">==</span> <span class="st0">"signUp"</span> ? “Sign Up URL” <span class="sy0">:</span> <span class="st0">"Verify URL"</span></pre></div>2. Go to the testing (or your own) form and fill in your testing contact information. When you are done, click on Submit.
2. As soon as you submit your form, your first Flow starts. Grab your phone and check your SMS.

3. Go back to your verification form, input your phone number and the verification code. Then click on Submit.
4. Your second Flow now verifies your account. Go to your Microsoft Dynamics Contacts page to see the results
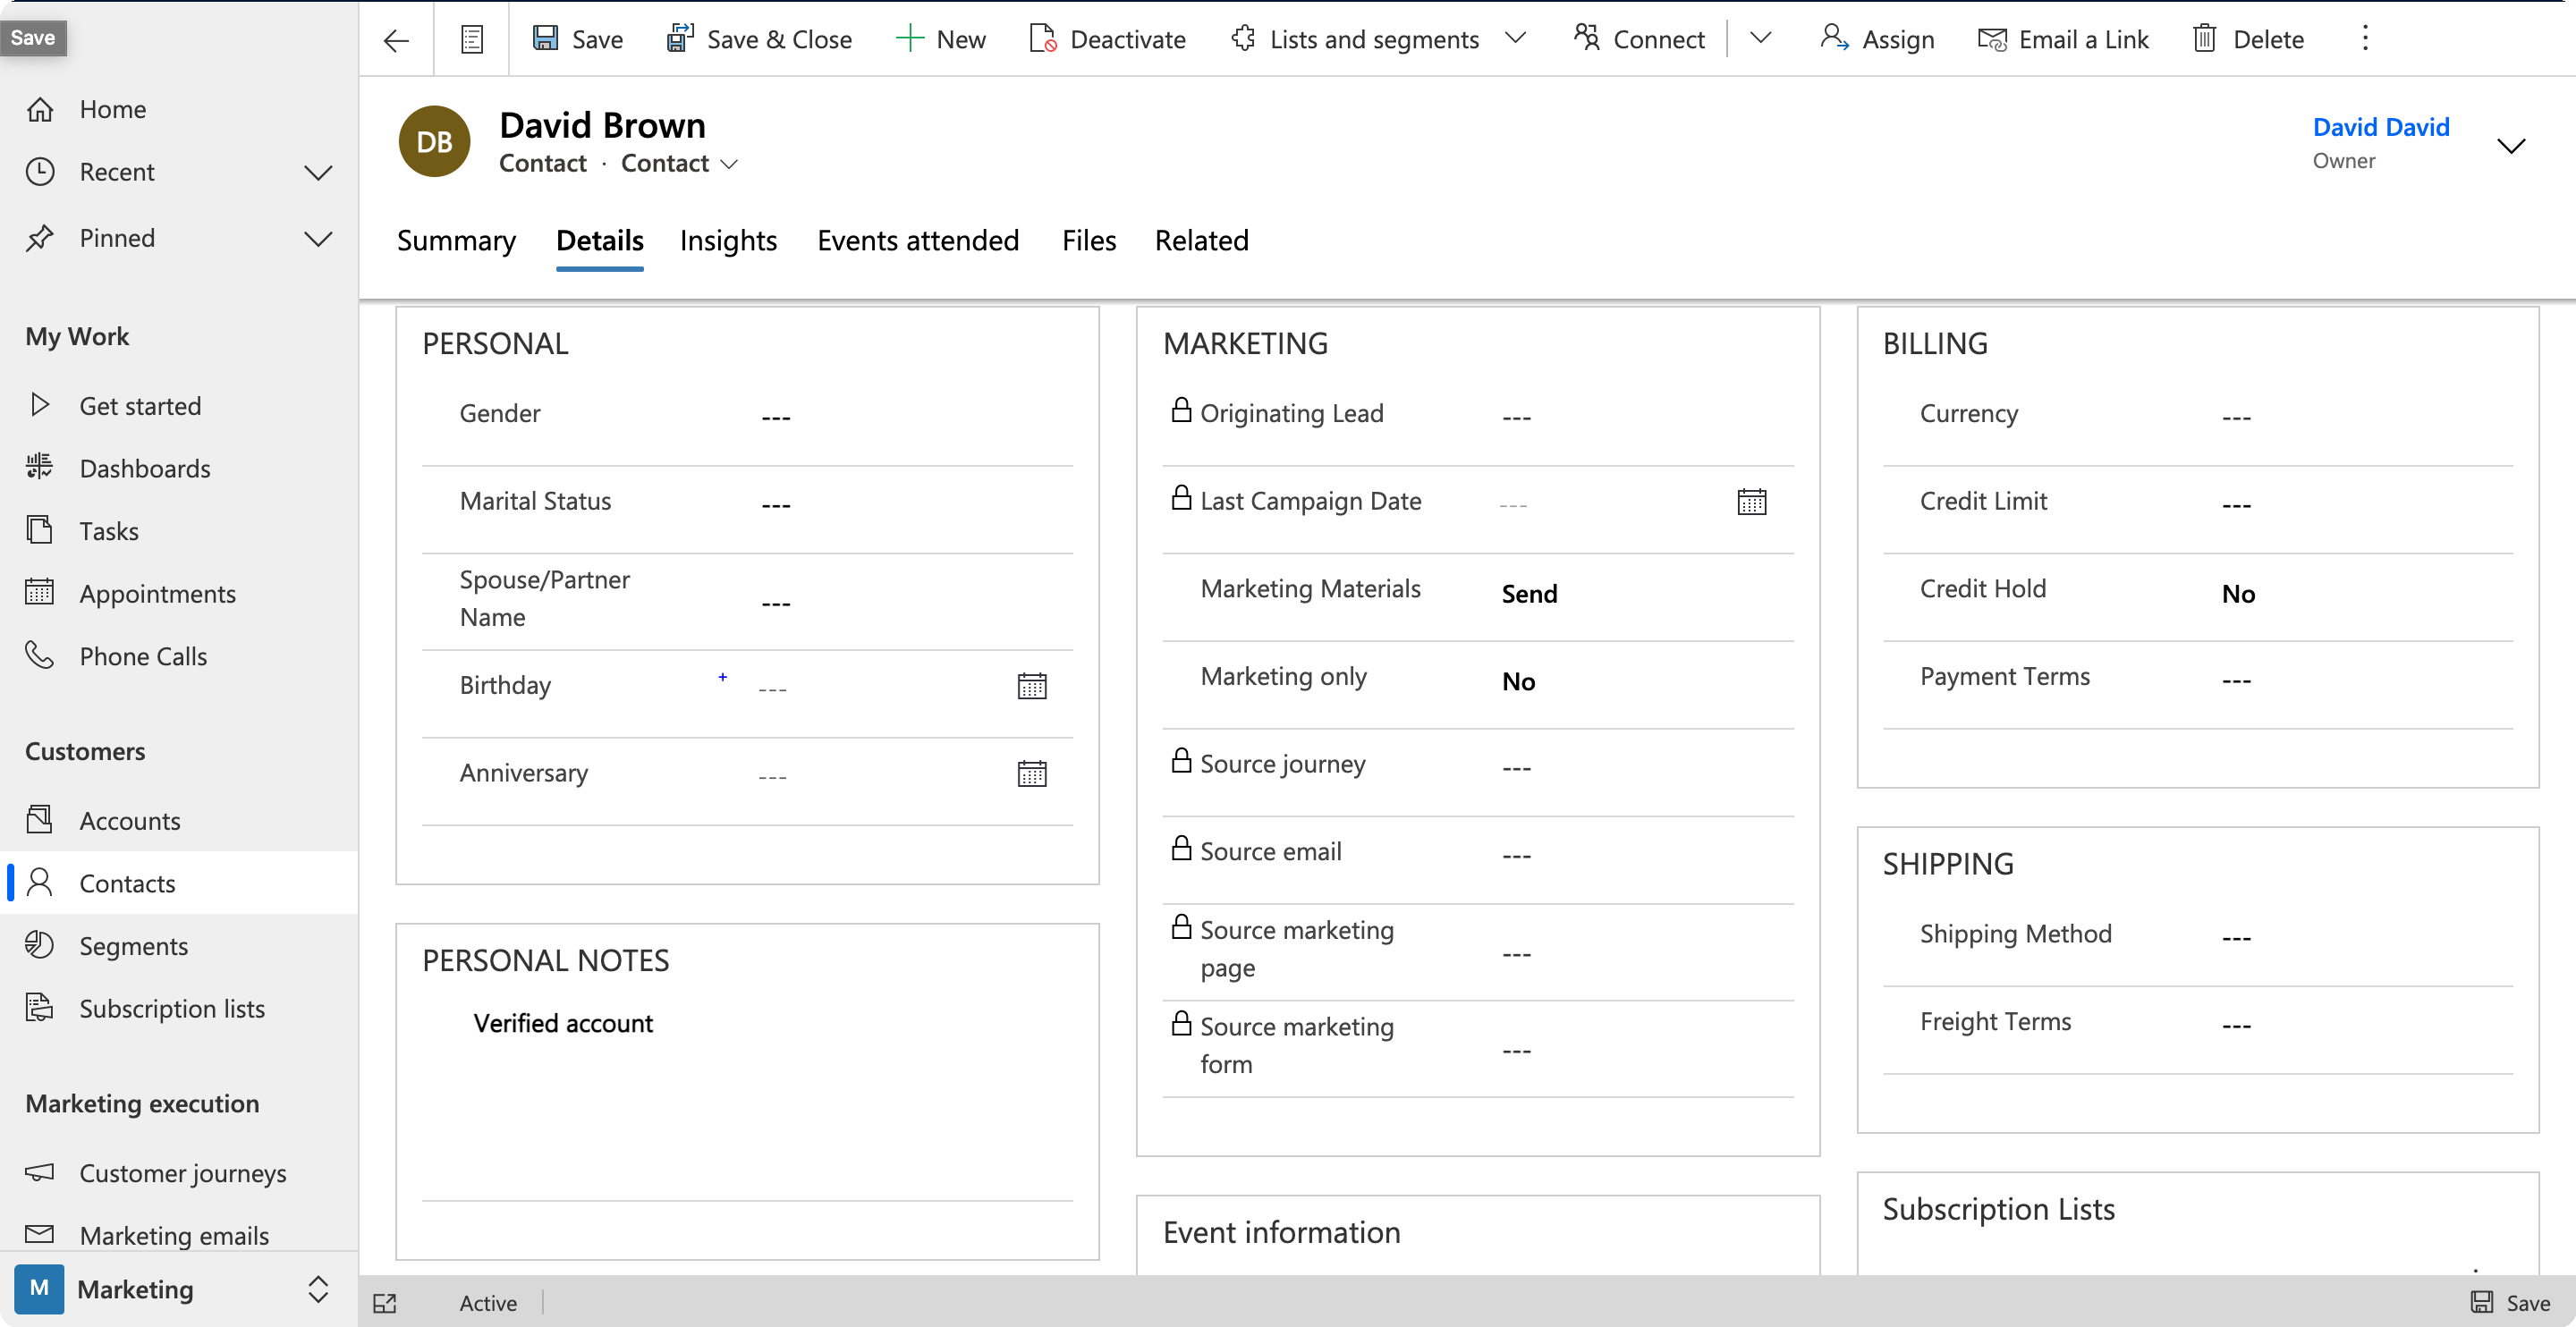
Congratulations on completing this testing integration. Any contact that is submitted through your form is secured with 2FA verification.
More?
The main power of the tyntec 2FA connector is that you can use it alongside any connector (Microsoft Forms, for example) that is in Power Automate. Using the Common Data Service you can access any table within your Dynamics environment.
To scale this integration, you could add a resend button to the verification form. That would use the Resend One-Time Password action. You could also store OTP ID as a cookie or on your backend, which would move contact creation into the 2nd Flow.
If you would want to show the user if their account is verified, you can add an HTTP action to send information back to your server. Another good idea is to have a scheduled Flow that deletes any nonverified contacts.