2FA | Integration with Hubspot via tyntec Zapier App
Hi there!
Would you like to add a user-friendly two-factor authentication (2FA) capability to your sign up form and save the new contact into your Hubspot using nothing but Zapier’s Zaps?
In this tutorial, you will learn how to automatically verify the sign-up of new users and save the contact information into your Hubspot CRM.
You will need
-
- Your tyntec API key from your tyntec account
-
- A Zapier account (you need an active Trial or a professional plan with Premium features for work with webhooks)
-
- A testing Hubspot account
-
- A testing HTML Form
-
- A testing phone number to receive OTP
-
- Your Favorite Text editor
Step One: Create a submission form
For your quick start with Zap, we’ve prepared a sample HTML code.
It contains two similar forms (the signup form and the verification code form) that send user input to given URL addresses. In your Text editor, create a new HTML file and paste the following code.
Disclaimer: The following code is for testing purposes only.
<div class="geshifilter"><pre class="php geshifilter-php"><span class="sy0"><</span>html<span class="sy0">></span>
<span class="sy0"><</span>head<span class="sy0">></span>
<span class="sy0"><</span>script<span class="sy0">></span>
<span class="kw2">function</span> signUp<span class="br0">(</span><span class="br0">)</span> <span class="br0">{</span>
document<span class="sy0">.</span>getElementById<span class="br0">(</span><span class="st_h">'verify'</span><span class="br0">)</span><span class="sy0">.</span>style<span class="sy0">.</span>visibility <span class="sy0">=</span> <span class="st0">"visible"</span><span class="sy0">;</span>
document<span class="sy0">.</span>getElementById<span class="br0">(</span><span class="st_h">'sign up'</span><span class="br0">)</span><span class="sy0">.</span>style<span class="sy0">.</span>visibility <span class="sy0">=</span> <span class="st0">"hidden"</span><span class="sy0">;</span>
<span class="br0">}</span>
<span class="kw2"></script></span>
<span class="sy0"><</span>title<span class="sy0">></span>Sign up Form<span class="sy0"></</span>title<span class="sy0">></span>
<span class="sy0"></</span>head<span class="sy0">></span>
<span class="sy0"><</span>body<span class="sy0">></span>
<span class="sy0"><</span>form action<span class="sy0">=</span><span class="st0">"First URL"</span> method<span class="sy0">=</span><span class="st0">"POST"</span> target<span class="sy0">=</span><span class="st0">"_blank"</span> id<span class="sy0">=</span><span class="st0">"sign up"</span><span class="sy0">></span>
<span class="sy0"><</span>div<span class="sy0">></span>
<span class="sy0"><</span>label <span class="kw1">for</span><span class="sy0">=</span><span class="st0">"firstName"</span><span class="sy0">></span>Your First Name<span class="sy0"></</span>label<span class="sy0">></span>
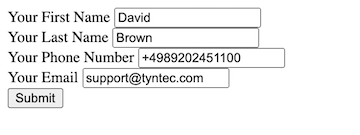
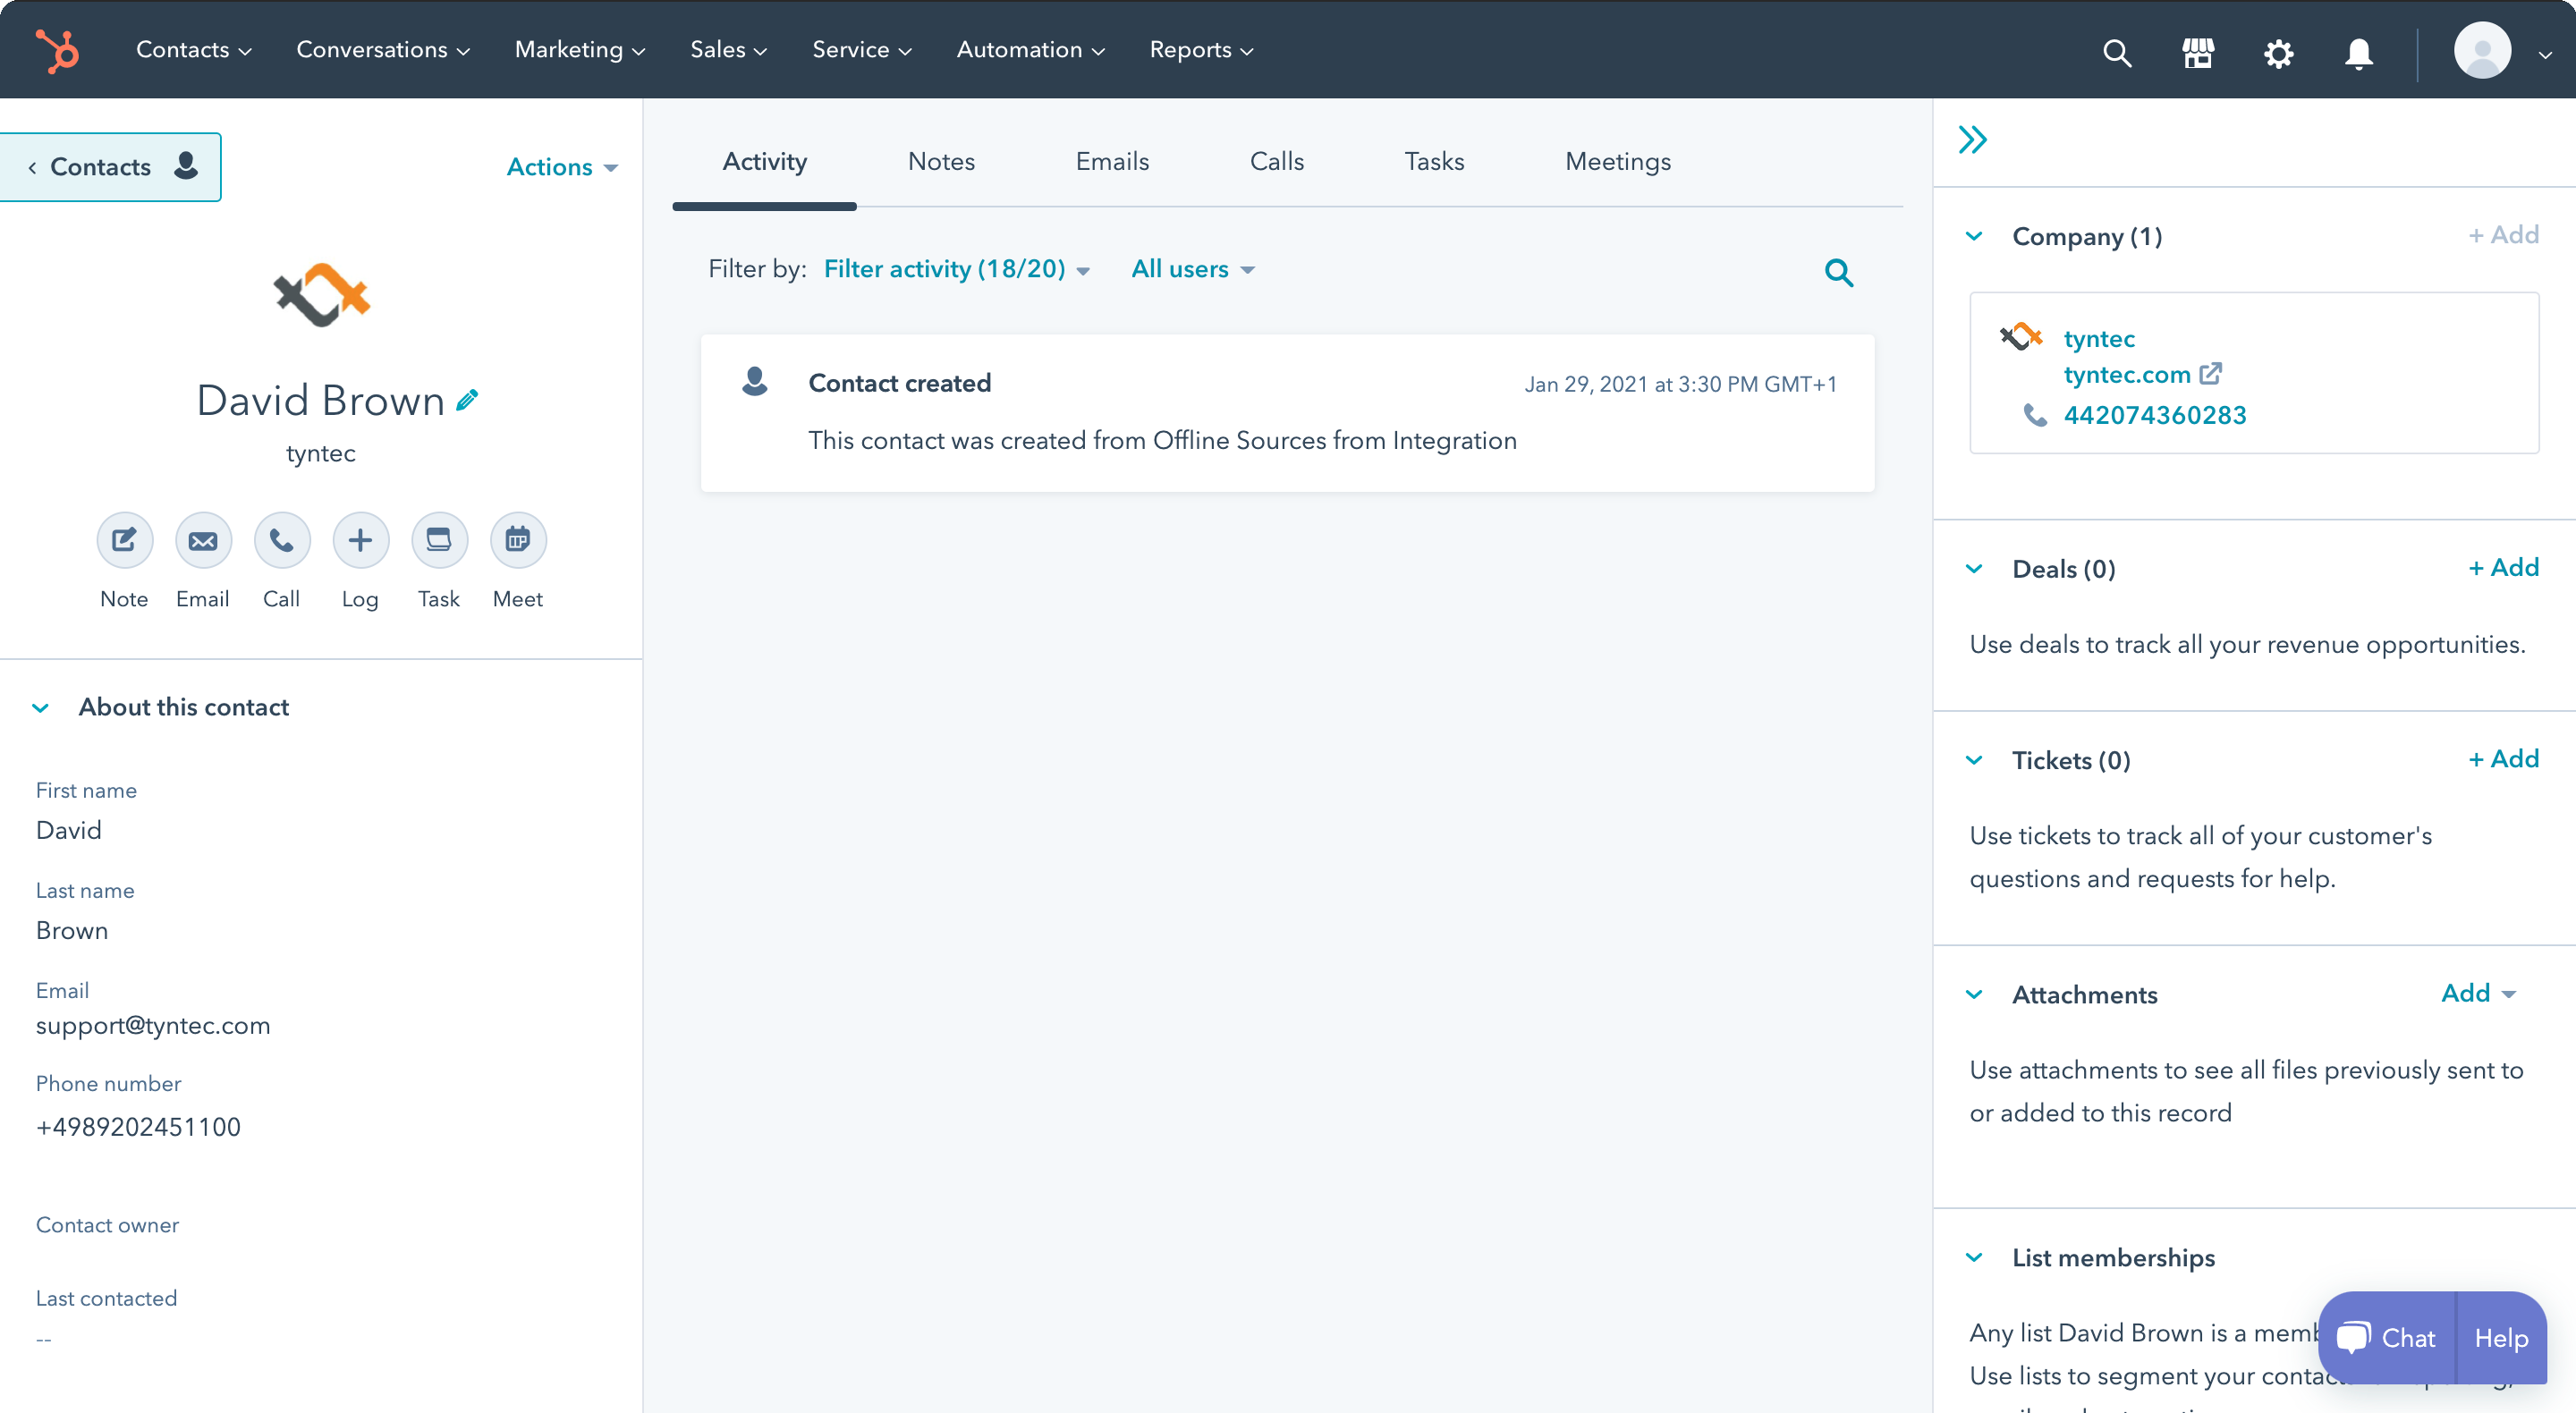
<span class="sy0"><</span>input name<span class="sy0">=</span><span class="st0">"firstName"</span> id<span class="sy0">=</span><span class="st0">"firstName"</span> value<span class="sy0">=</span><span class="st0">"David"</span><span class="sy0">></span>
<span class="sy0"></</span>div<span class="sy0">></span>
<span class="sy0"><</span>div<span class="sy0">></span>
<span class="sy0"><</span>label <span class="kw1">for</span><span class="sy0">=</span><span class="st0">"lastName"</span><span class="sy0">></span>Your Last Name<span class="sy0"></</span>label<span class="sy0">></span>
<span class="sy0"><</span>input name<span class="sy0">=</span><span class="st0">"lastName"</span> id<span class="sy0">=</span><span class="st0">"lastName"</span> value<span class="sy0">=</span><span class="st0">"Brown"</span><span class="sy0">></span>
<span class="sy0"></</span>div<span class="sy0">></span>
<span class="sy0"><</span>div<span class="sy0">></span>
<span class="sy0"><</span>label <span class="kw1">for</span><span class="sy0">=</span><span class="st0">"phone number"</span><span class="sy0">></span>Your Phone Number<span class="sy0"></</span>label<span class="sy0">></span>
<span class="sy0"><</span>input name<span class="sy0">=</span><span class="st0">"phone number"</span> id<span class="sy0">=</span><span class="st0">"phone number"</span> value<span class="sy0">=</span><span class="st0">"+4989202451100"</span><span class="sy0">></span>
<span class="sy0"></</span>div<span class="sy0">></span>
<span class="sy0"><</span>div<span class="sy0">></span>
<span class="sy0"><</span>label <span class="kw1">for</span><span class="sy0">=</span><span class="st0">"emal"</span><span class="sy0">></span>Your Email<span class="sy0"></</span>label<span class="sy0">></span>
<span class="sy0"><</span>input name<span class="sy0">=</span><span class="st0">"email"</span> id<span class="sy0">=</span><span class="st0">"email"</span> value<span class="sy0">=</span><span class="st0">"support@tyntec.com"</span><span class="sy0">></span>
<span class="sy0"></</span>div<span class="sy0">></span>
<span class="sy0"><</span>div<span class="sy0">></span>
<span class="sy0"><</span>button onclick<span class="sy0">=</span><span class="st0">"signUp()"</span><span class="sy0">></span>Submit
<span class="sy0"></</span>button<span class="sy0">></span>
<span class="sy0"></</span>div<span class="sy0">></span>
<span class="sy0"></</span>form<span class="sy0">></span>
<span class="sy0"><</span>form action<span class="sy0">=</span><span class="st0">"Second URl"</span> method<span class="sy0">=</span><span class="st0">"POST"</span> target<span class="sy0">=</span><span class="st0">"_blank"</span> id<span class="sy0">=</span><span class="st0">"verify"</span> style<span class="sy0">=</span><span class="st0">"visibility: hidden;"</span><span class="sy0">></span>
<span class="sy0"><</span>div<span class="sy0">></span>
<span class="sy0"><</span>label <span class="kw1">for</span><span class="sy0">=</span><span class="st0">"code"</span><span class="sy0">></span>Your One<span class="sy0">-</span><a href="http://www.php.net/time"><span class="kw3">Time</span></a> Password<span class="sy0"></</span>label<span class="sy0">></span>
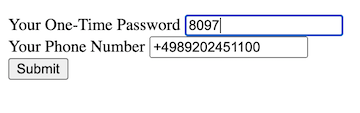
<span class="sy0"><</span>input name<span class="sy0">=</span><span class="st0">"code"</span> id<span class="sy0">=</span><span class="st0">"Code"</span> value<span class="sy0">=</span><span class="st0">""</span><span class="sy0">></span>
<span class="sy0"></</span>div<span class="sy0">></span>
<span class="sy0"><</span>div<span class="sy0">></span>
<span class="sy0"><</span>label <span class="kw1">for</span><span class="sy0">=</span><span class="st0">"phone number"</span><span class="sy0">></span>Your Phone Number<span class="sy0"></</span>label<span class="sy0">></span>
<span class="sy0"><</span>input name<span class="sy0">=</span><span class="st0">"phone number"</span> id<span class="sy0">=</span><span class="st0">"phone number"</span> value<span class="sy0">=</span><span class="st0">"+4989202451100"</span><span class="sy0">></span>
<span class="sy0"></</span>div<span class="sy0">></span>
<span class="sy0"><</span>div<span class="sy0">></span>
<span class="sy0"><</span>button<span class="sy0">></span>Submit<span class="sy0"></</span>button<span class="sy0">></span>
<span class="sy0"></</span>div<span class="sy0">></span>
<span class="sy0"></</span>form<span class="sy0">></span>
<span class="sy0"></</span>body<span class="sy0">></span></pre></div>The signUp() function switches from the first form to the second one on submission, so the end-user doesn’t see both forms at once.
Note: If you are using custom forms, make sure to always have a testing phone number value filled in the sign-up form, otherwise the first Zap won’t work. The second Zap won’t work if the second form doesn’t send a phone number and OTP code values.
Step Two: Create a Zap for sending OTP and adding a placeholder contact
Let’s start with creating a Zap that receives information from your HTML form, sends OTP, and creates an inactive contact in Hubspot.
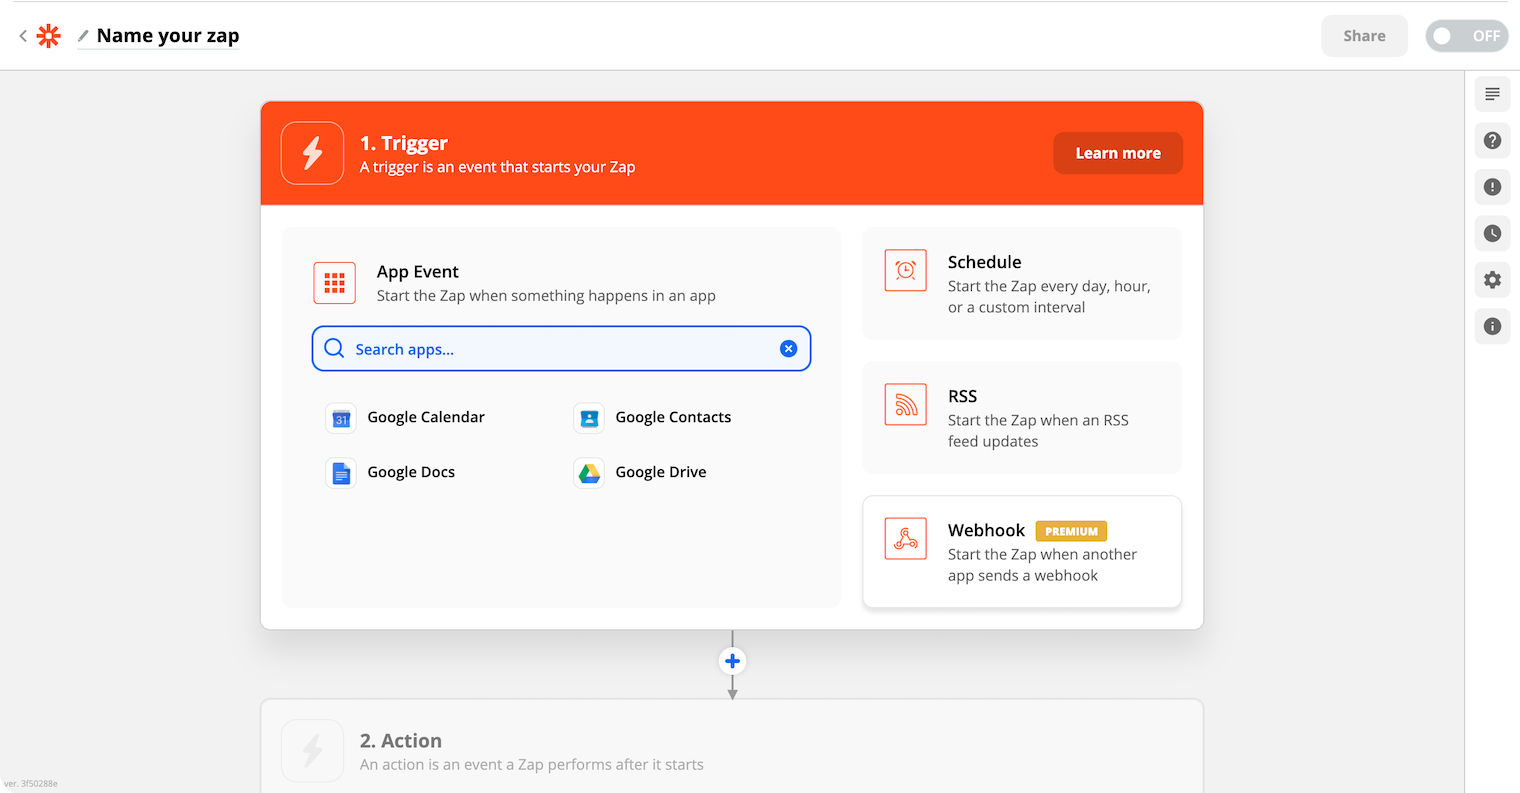
1. In your Zapier menu, click on the black Make a Zap button.
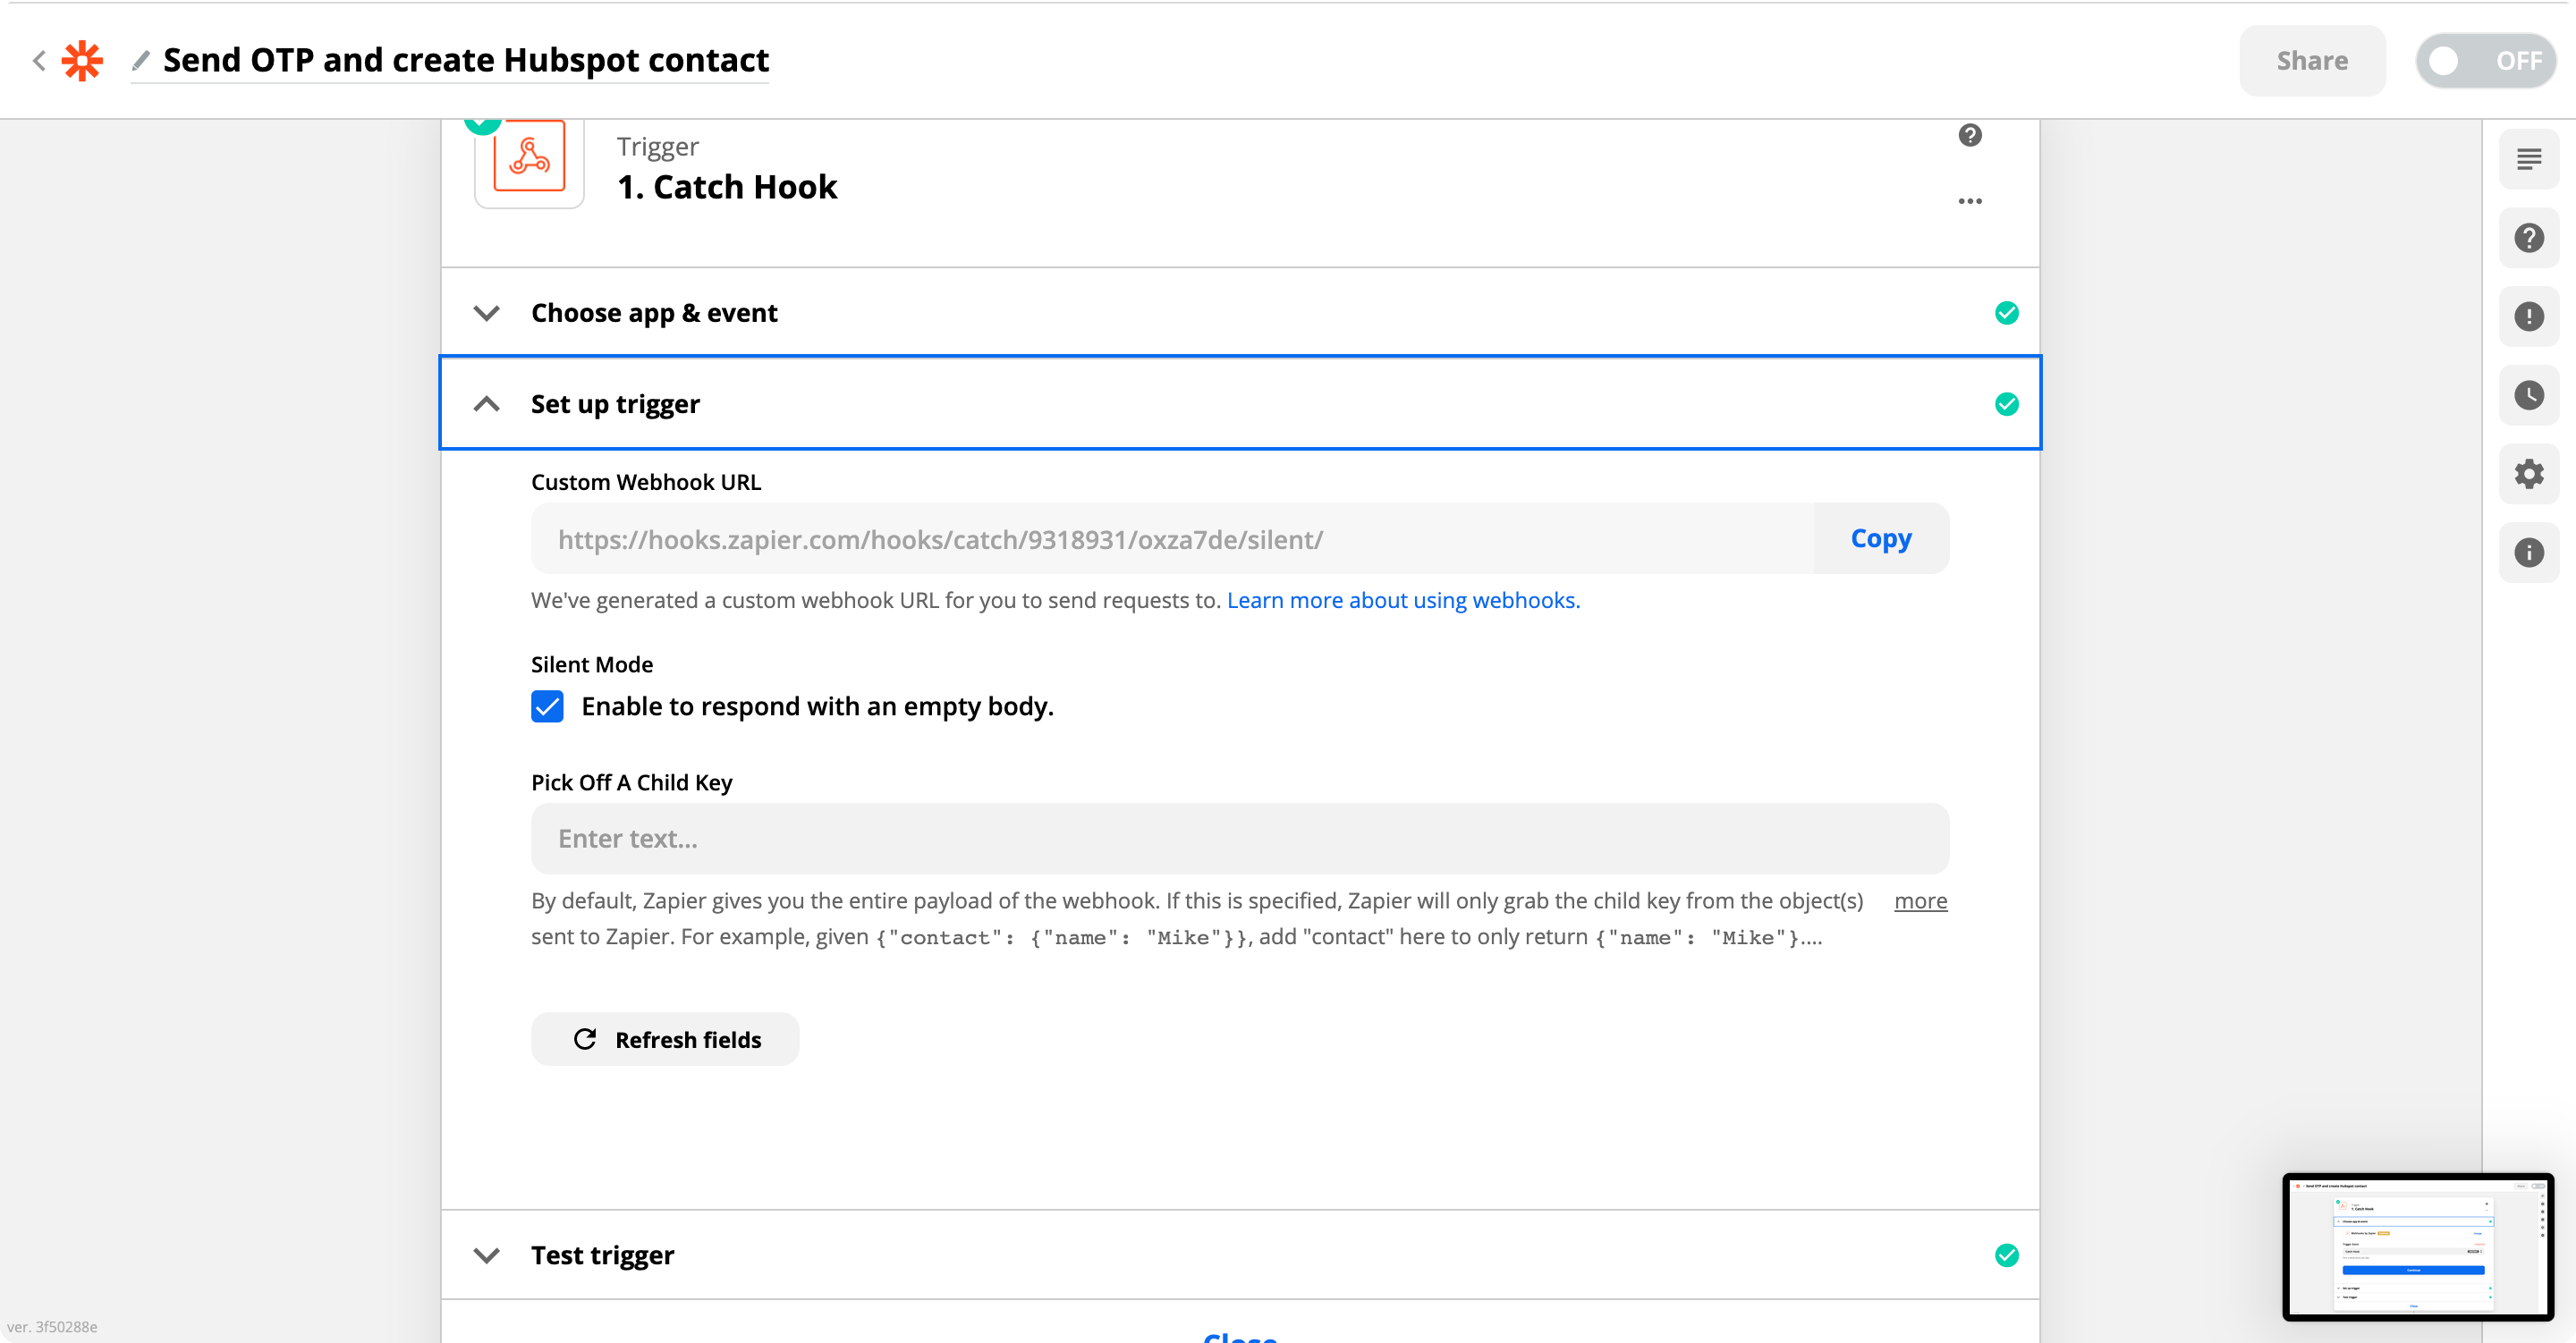
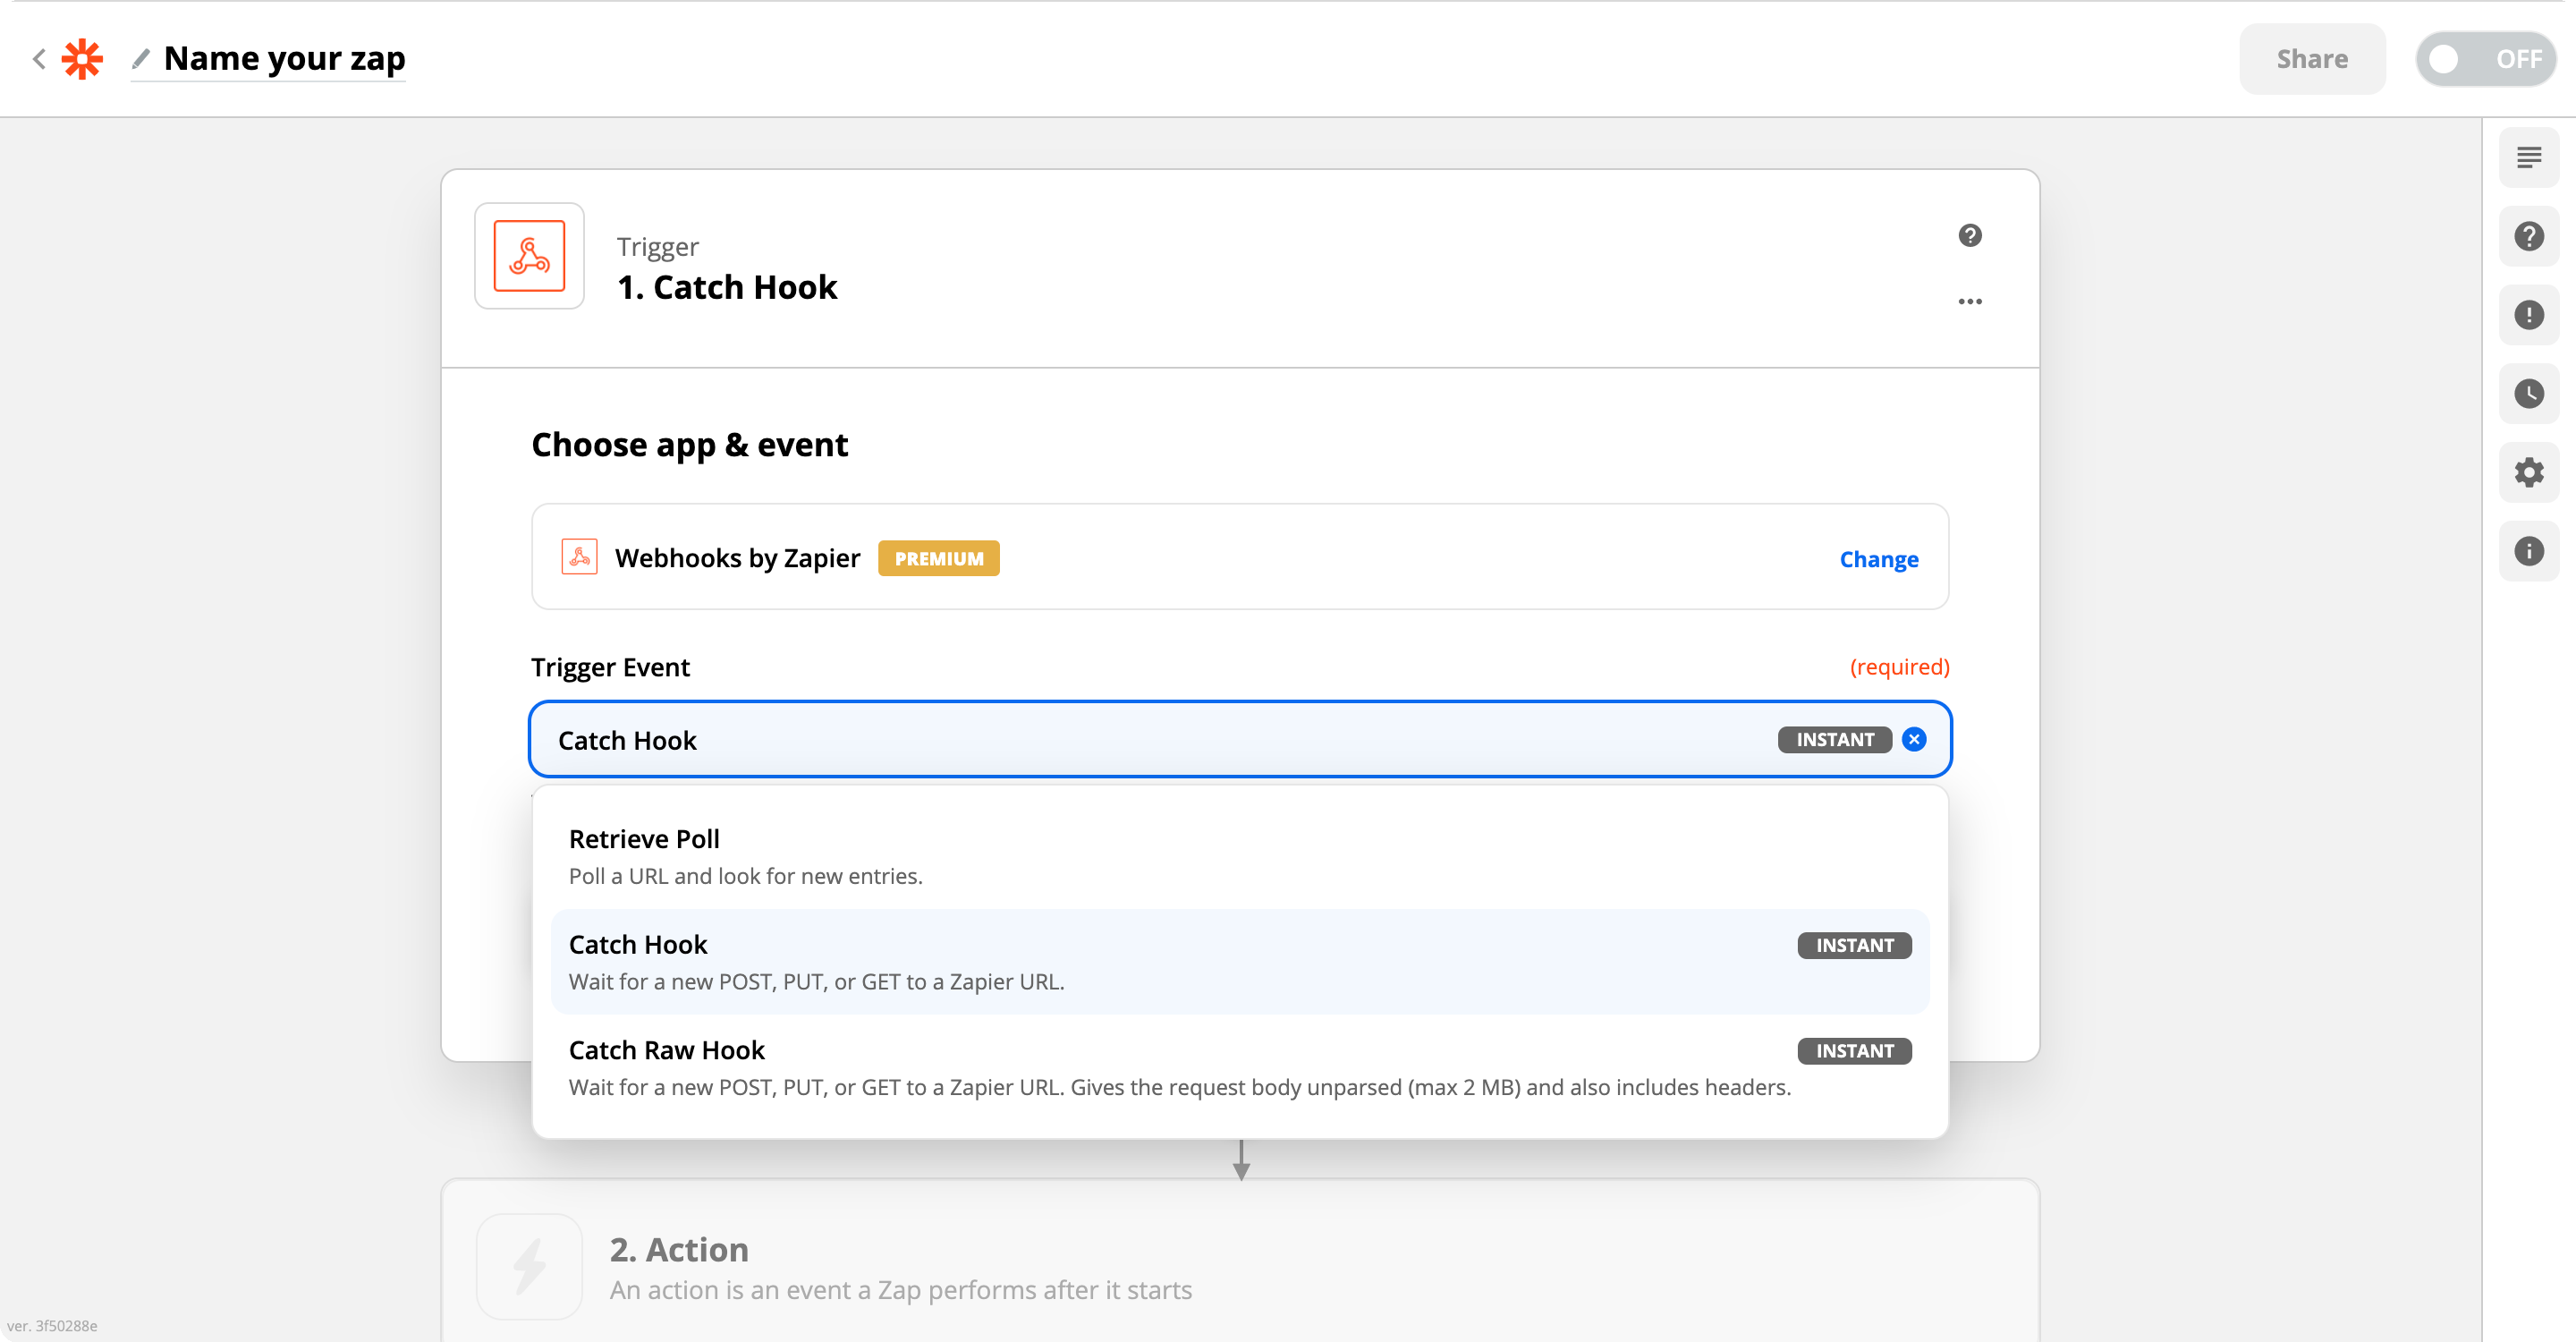
2. Choose your Trigger. Select the premium Webhook app from Zapier in the right column.
In the Trigger Event, select Catch Hook. Click Continue. In the Set up Trigger step, enable the Silent mode and copy the Custom Webhook URL. You will need it later to submit the data from your form. Click Continue.
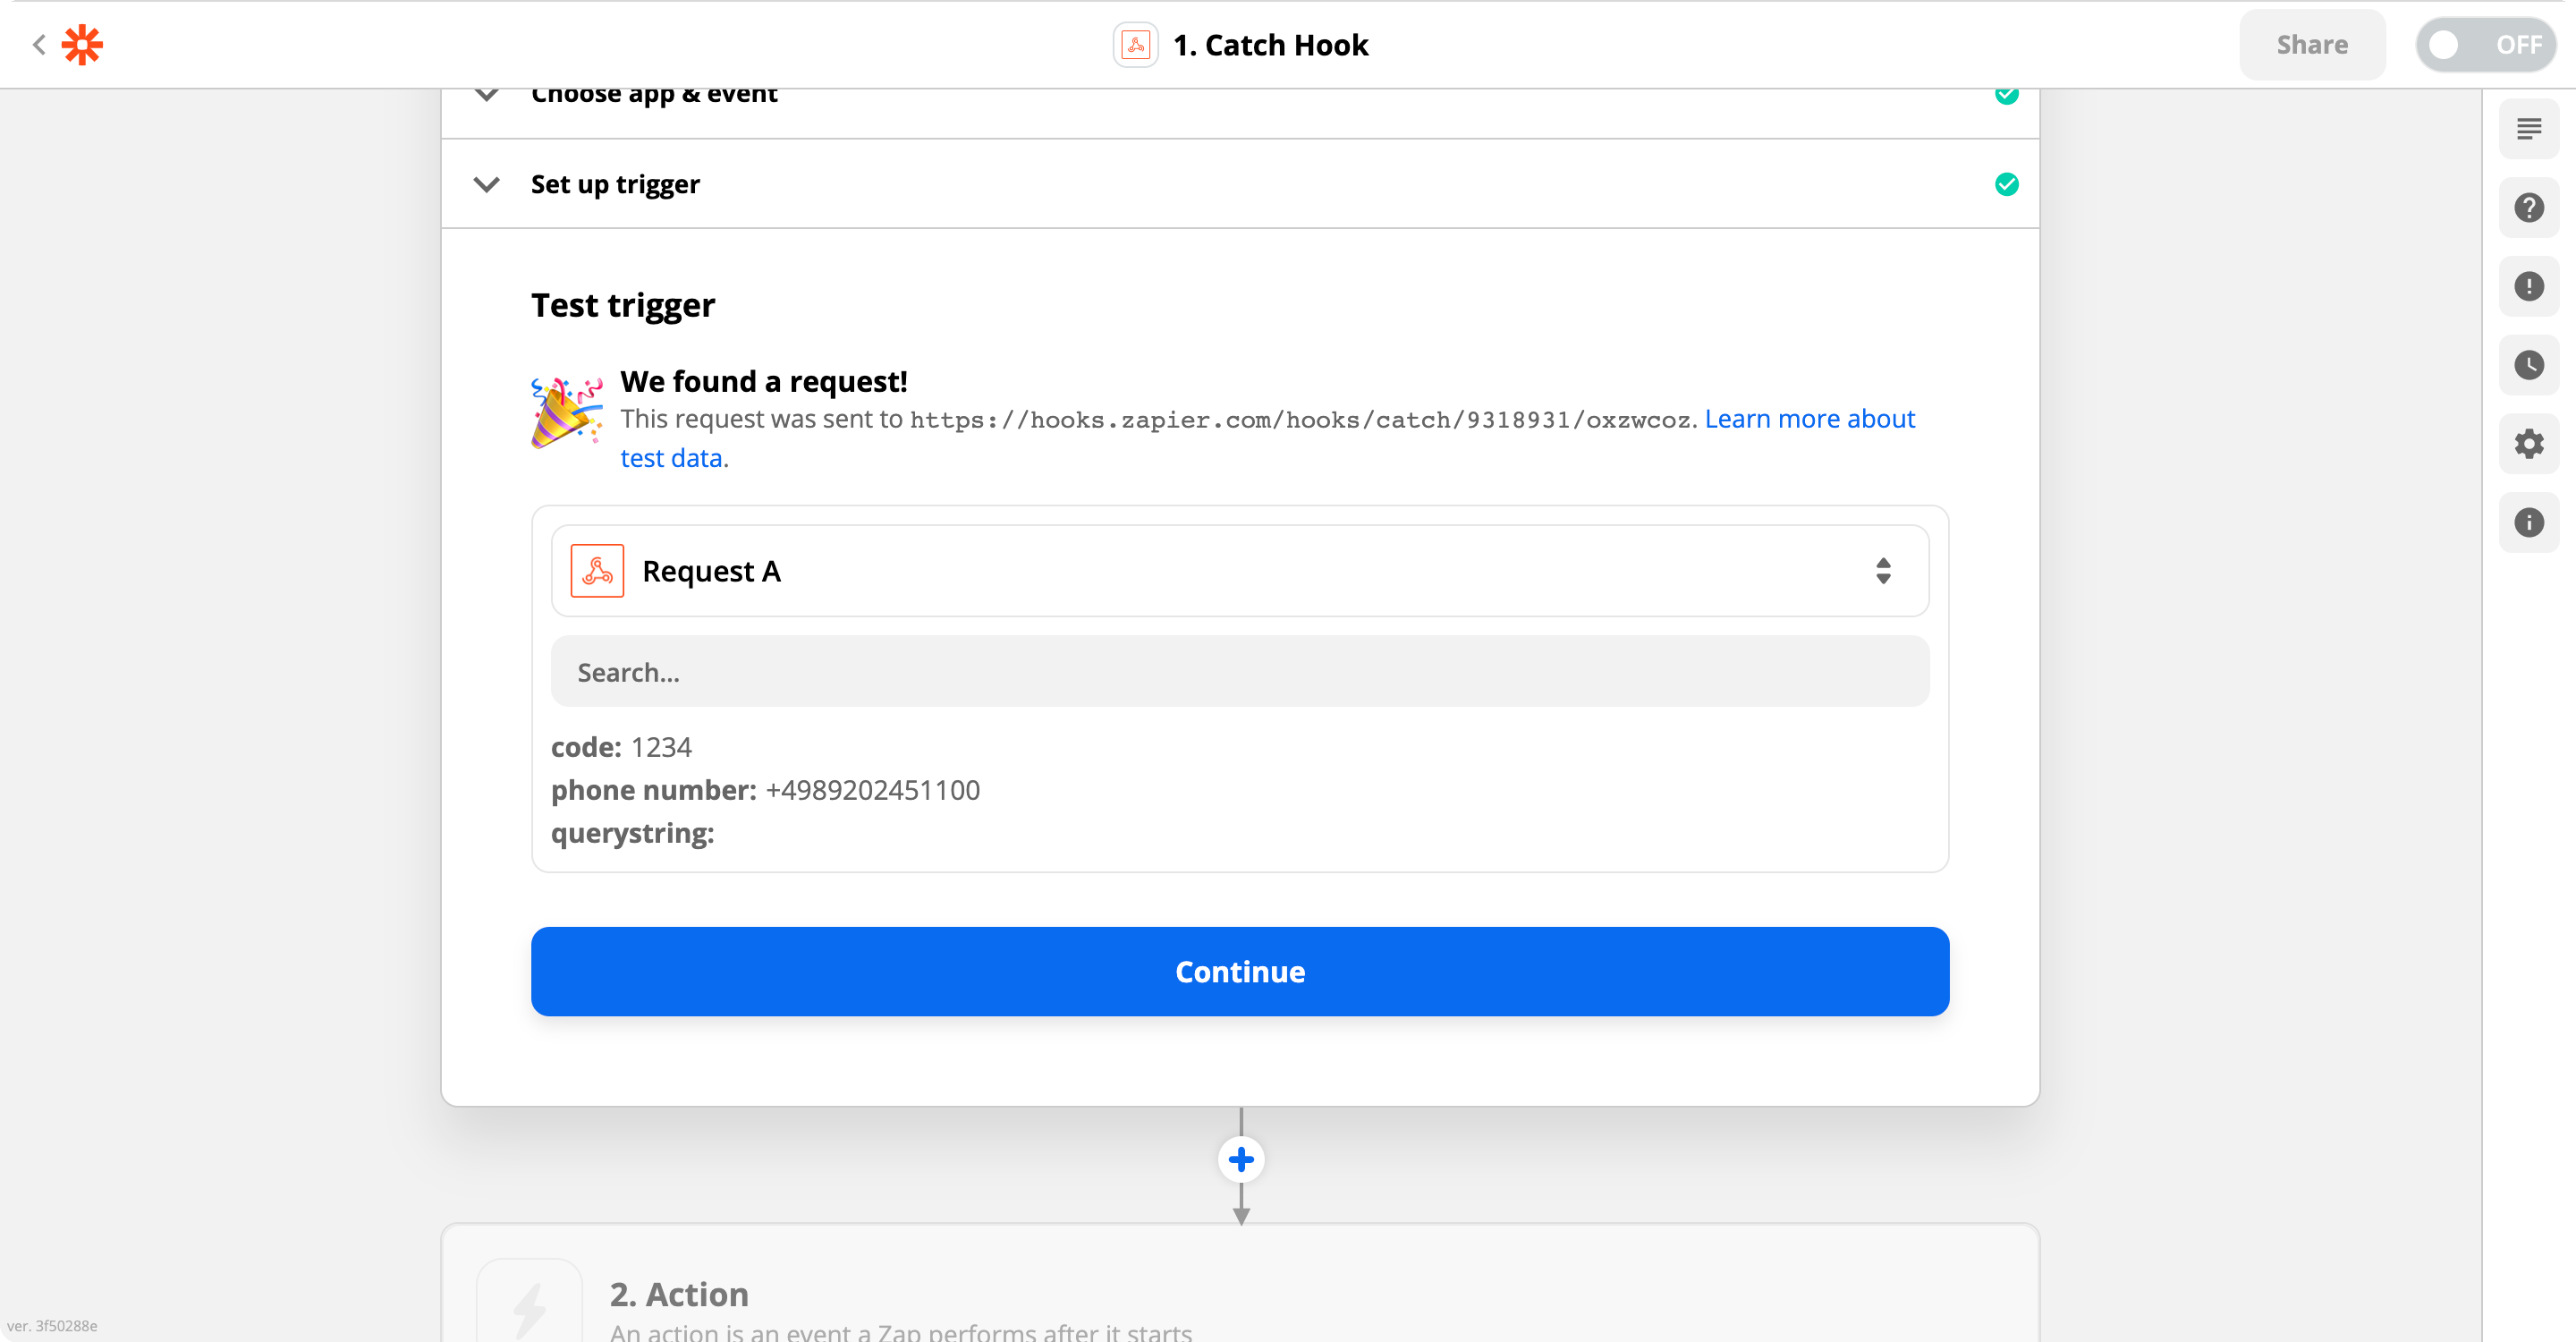
3. It is highly recommended to test this trigger. You can use your form, Postman, or our testing form to send some dummy data to the Custom Webhook URL. Be sure to include a testing phone number. When you are done, click Continue.
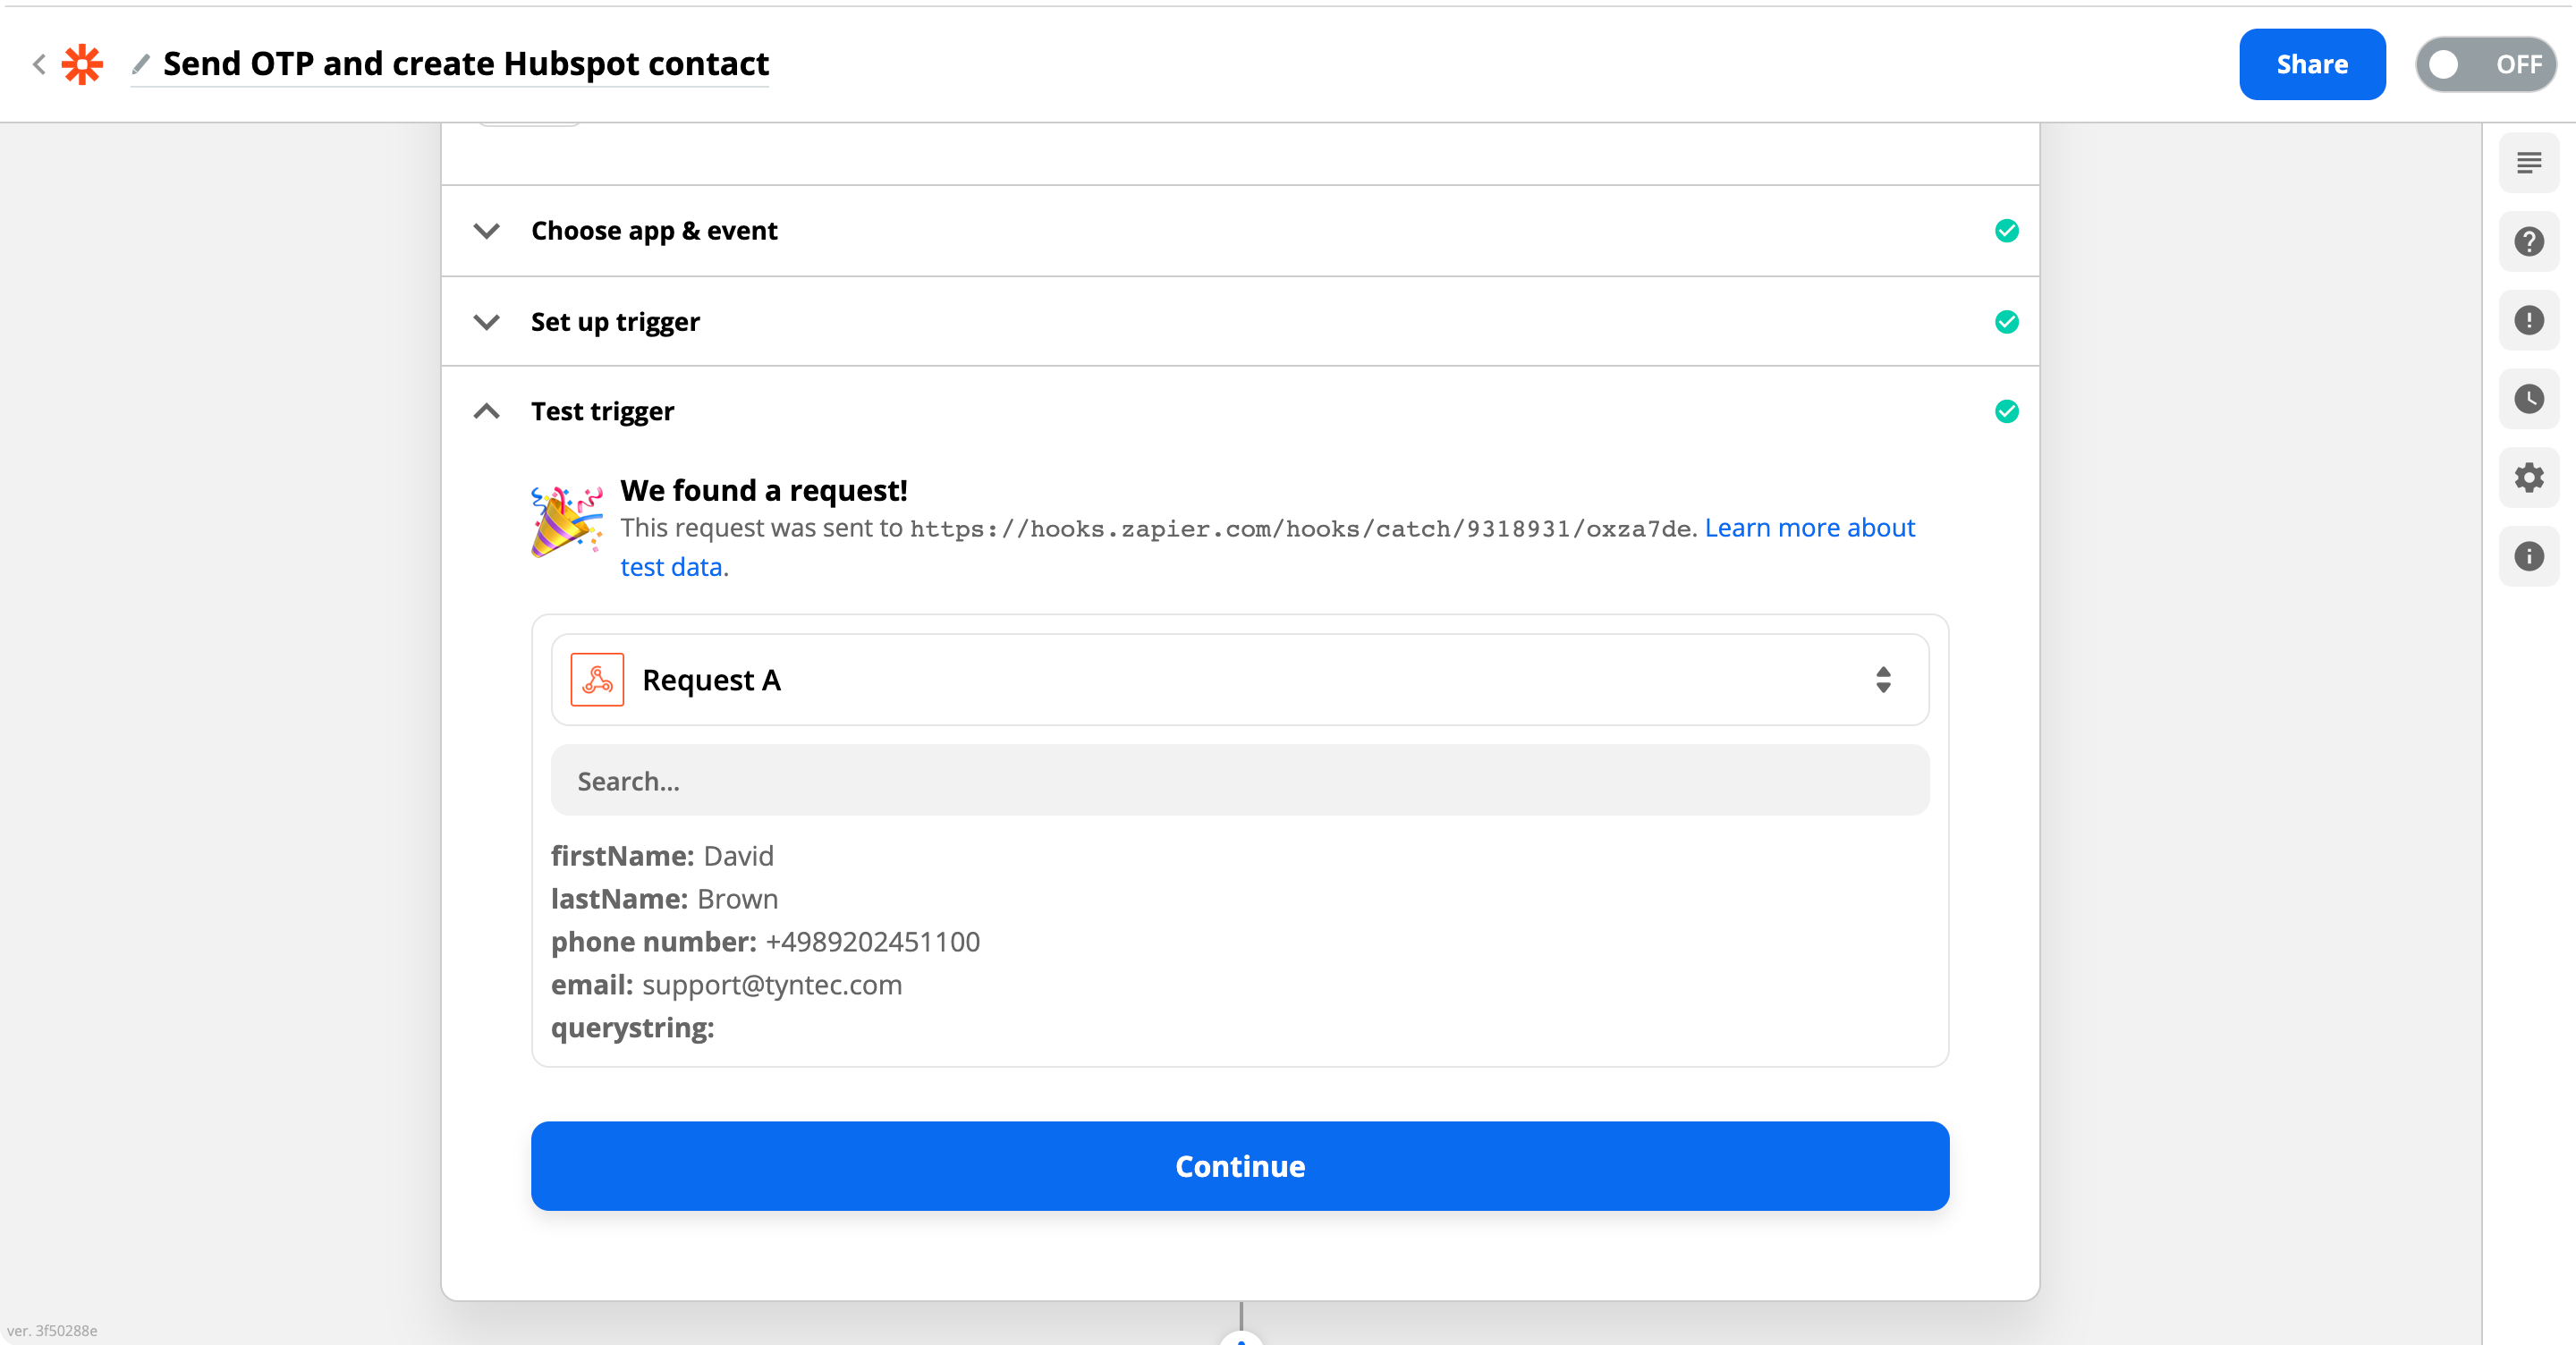
The Zap expects at least one value pair – the phone number.
4. Click the blue and white plus button to add the next Action. Search for tyntec Two-Factor Authentication and select it. In the Action Event select Send One-Time Password and click Continue.
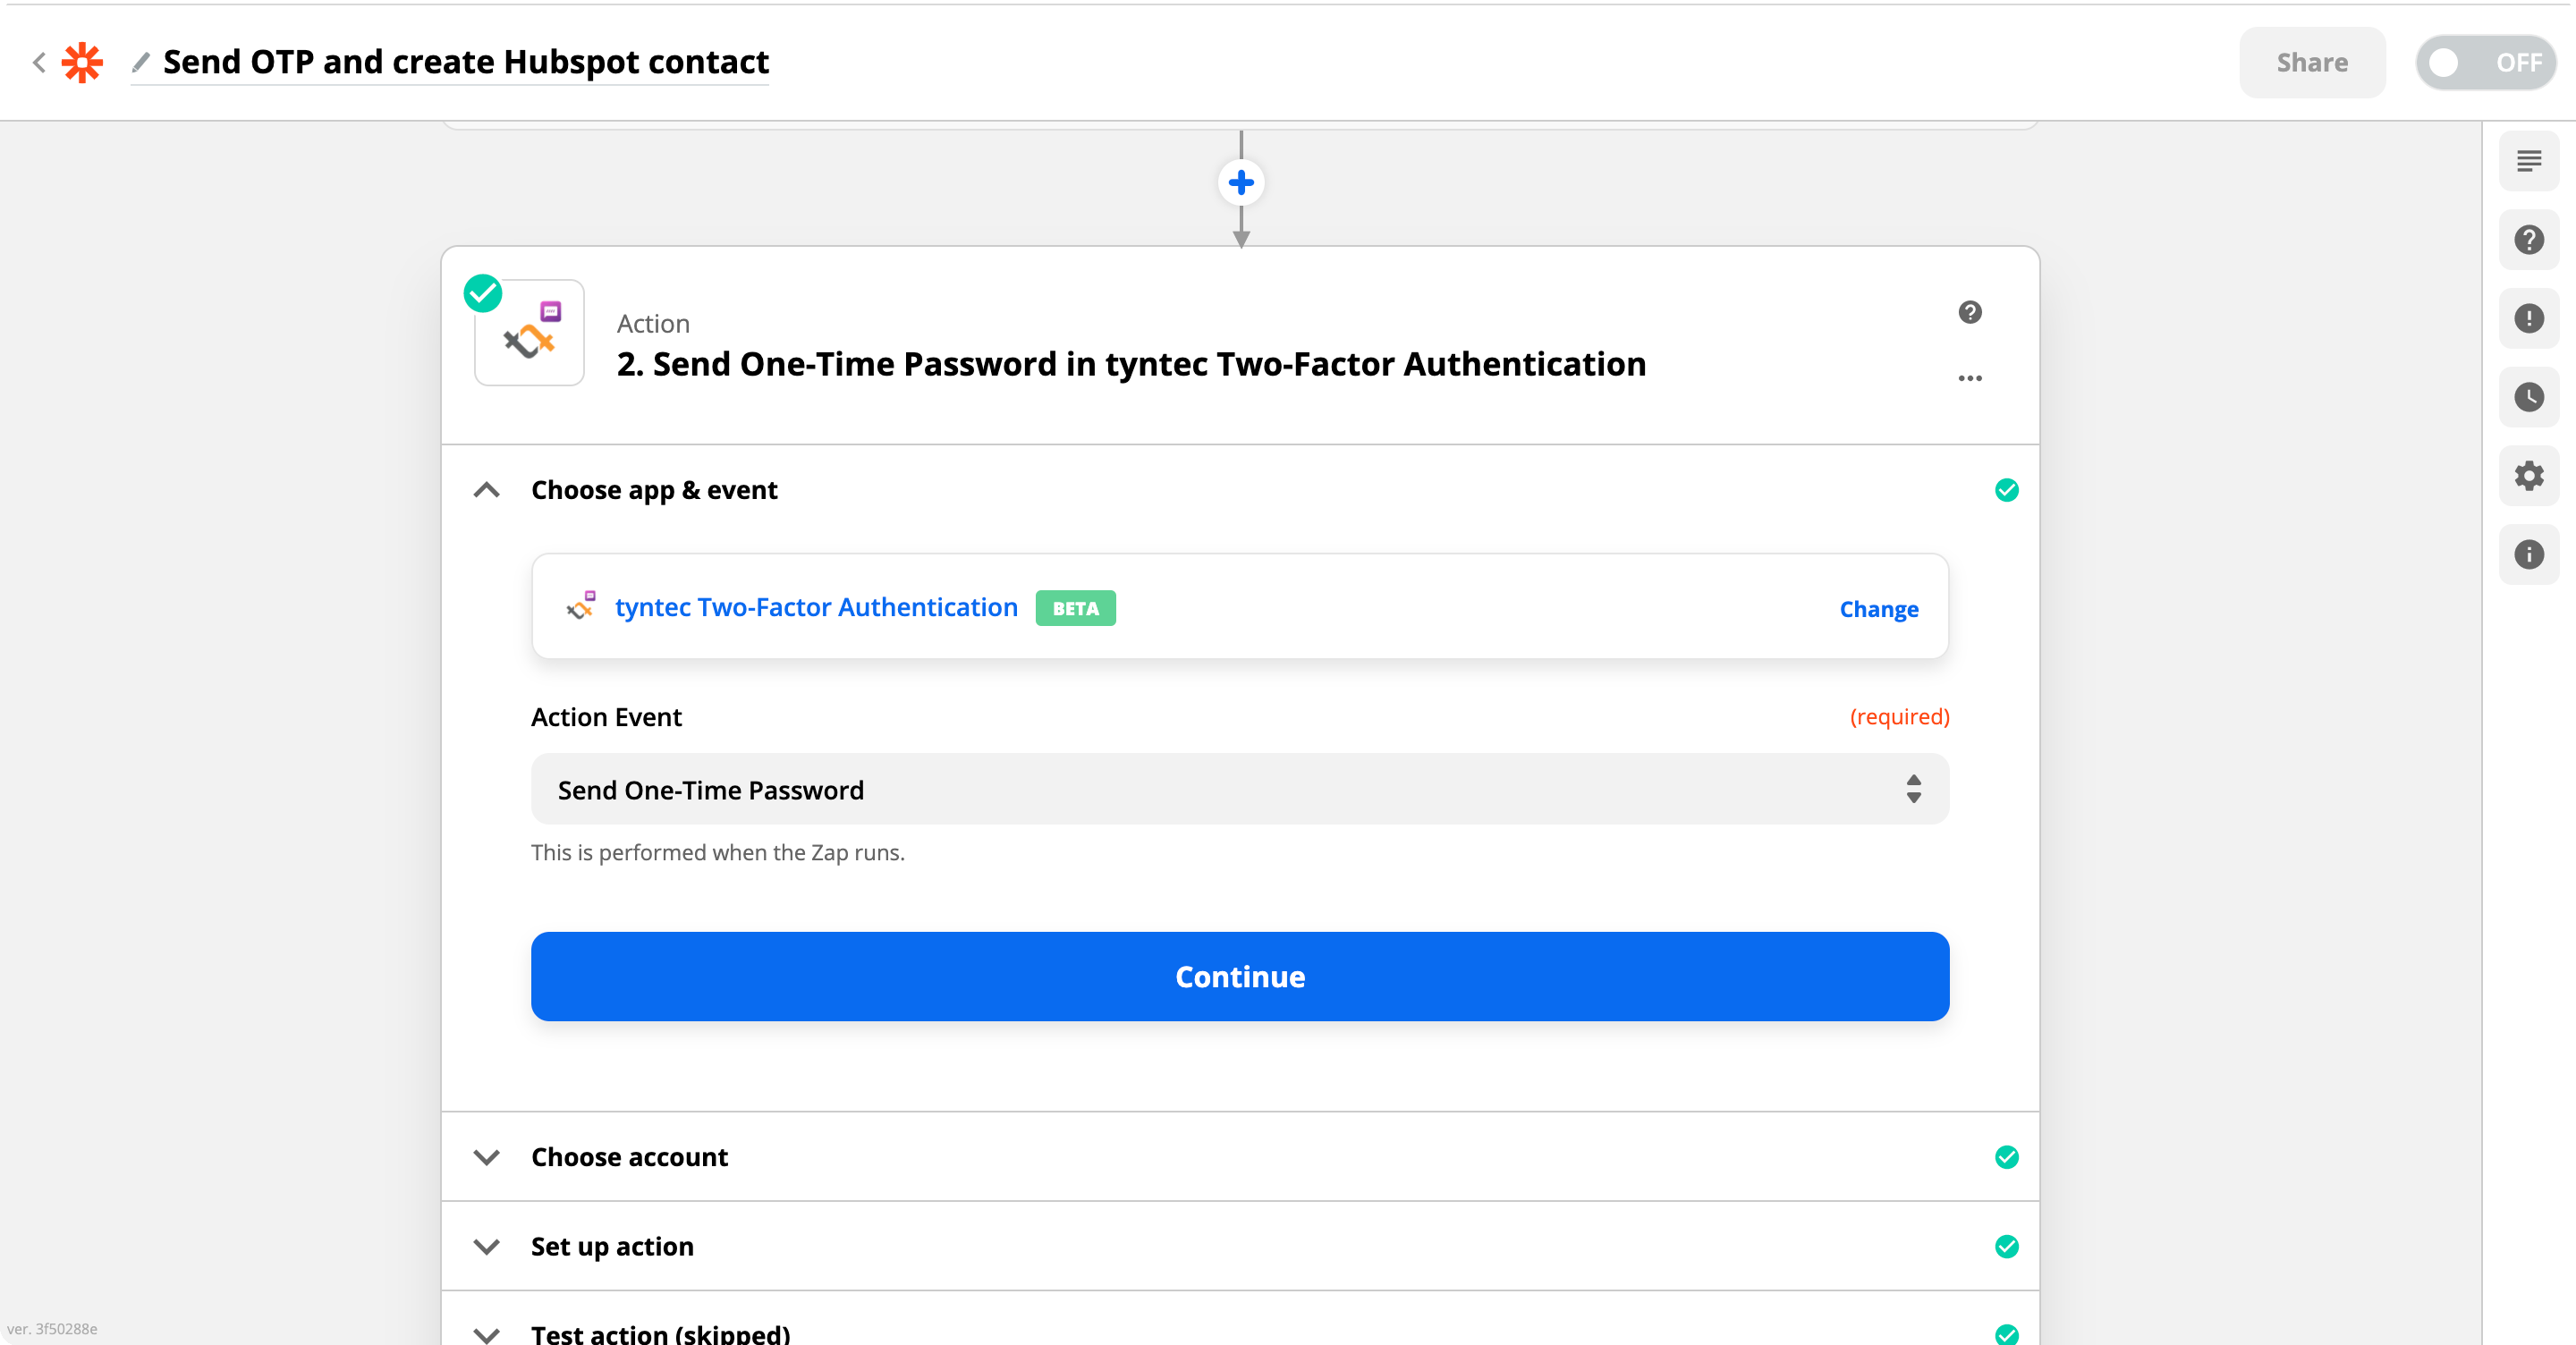
If this is your first time using the tyntec Two-Factor Authentication app, you will need to authorize it. Click on the Sign-in button and input your tyntec API key. Otherwise, select your account and click Continue.
5. In the Set up action step, click into the Phone Number field and select the Phone Number variable that holds the value from your Trigger. Click Continue.
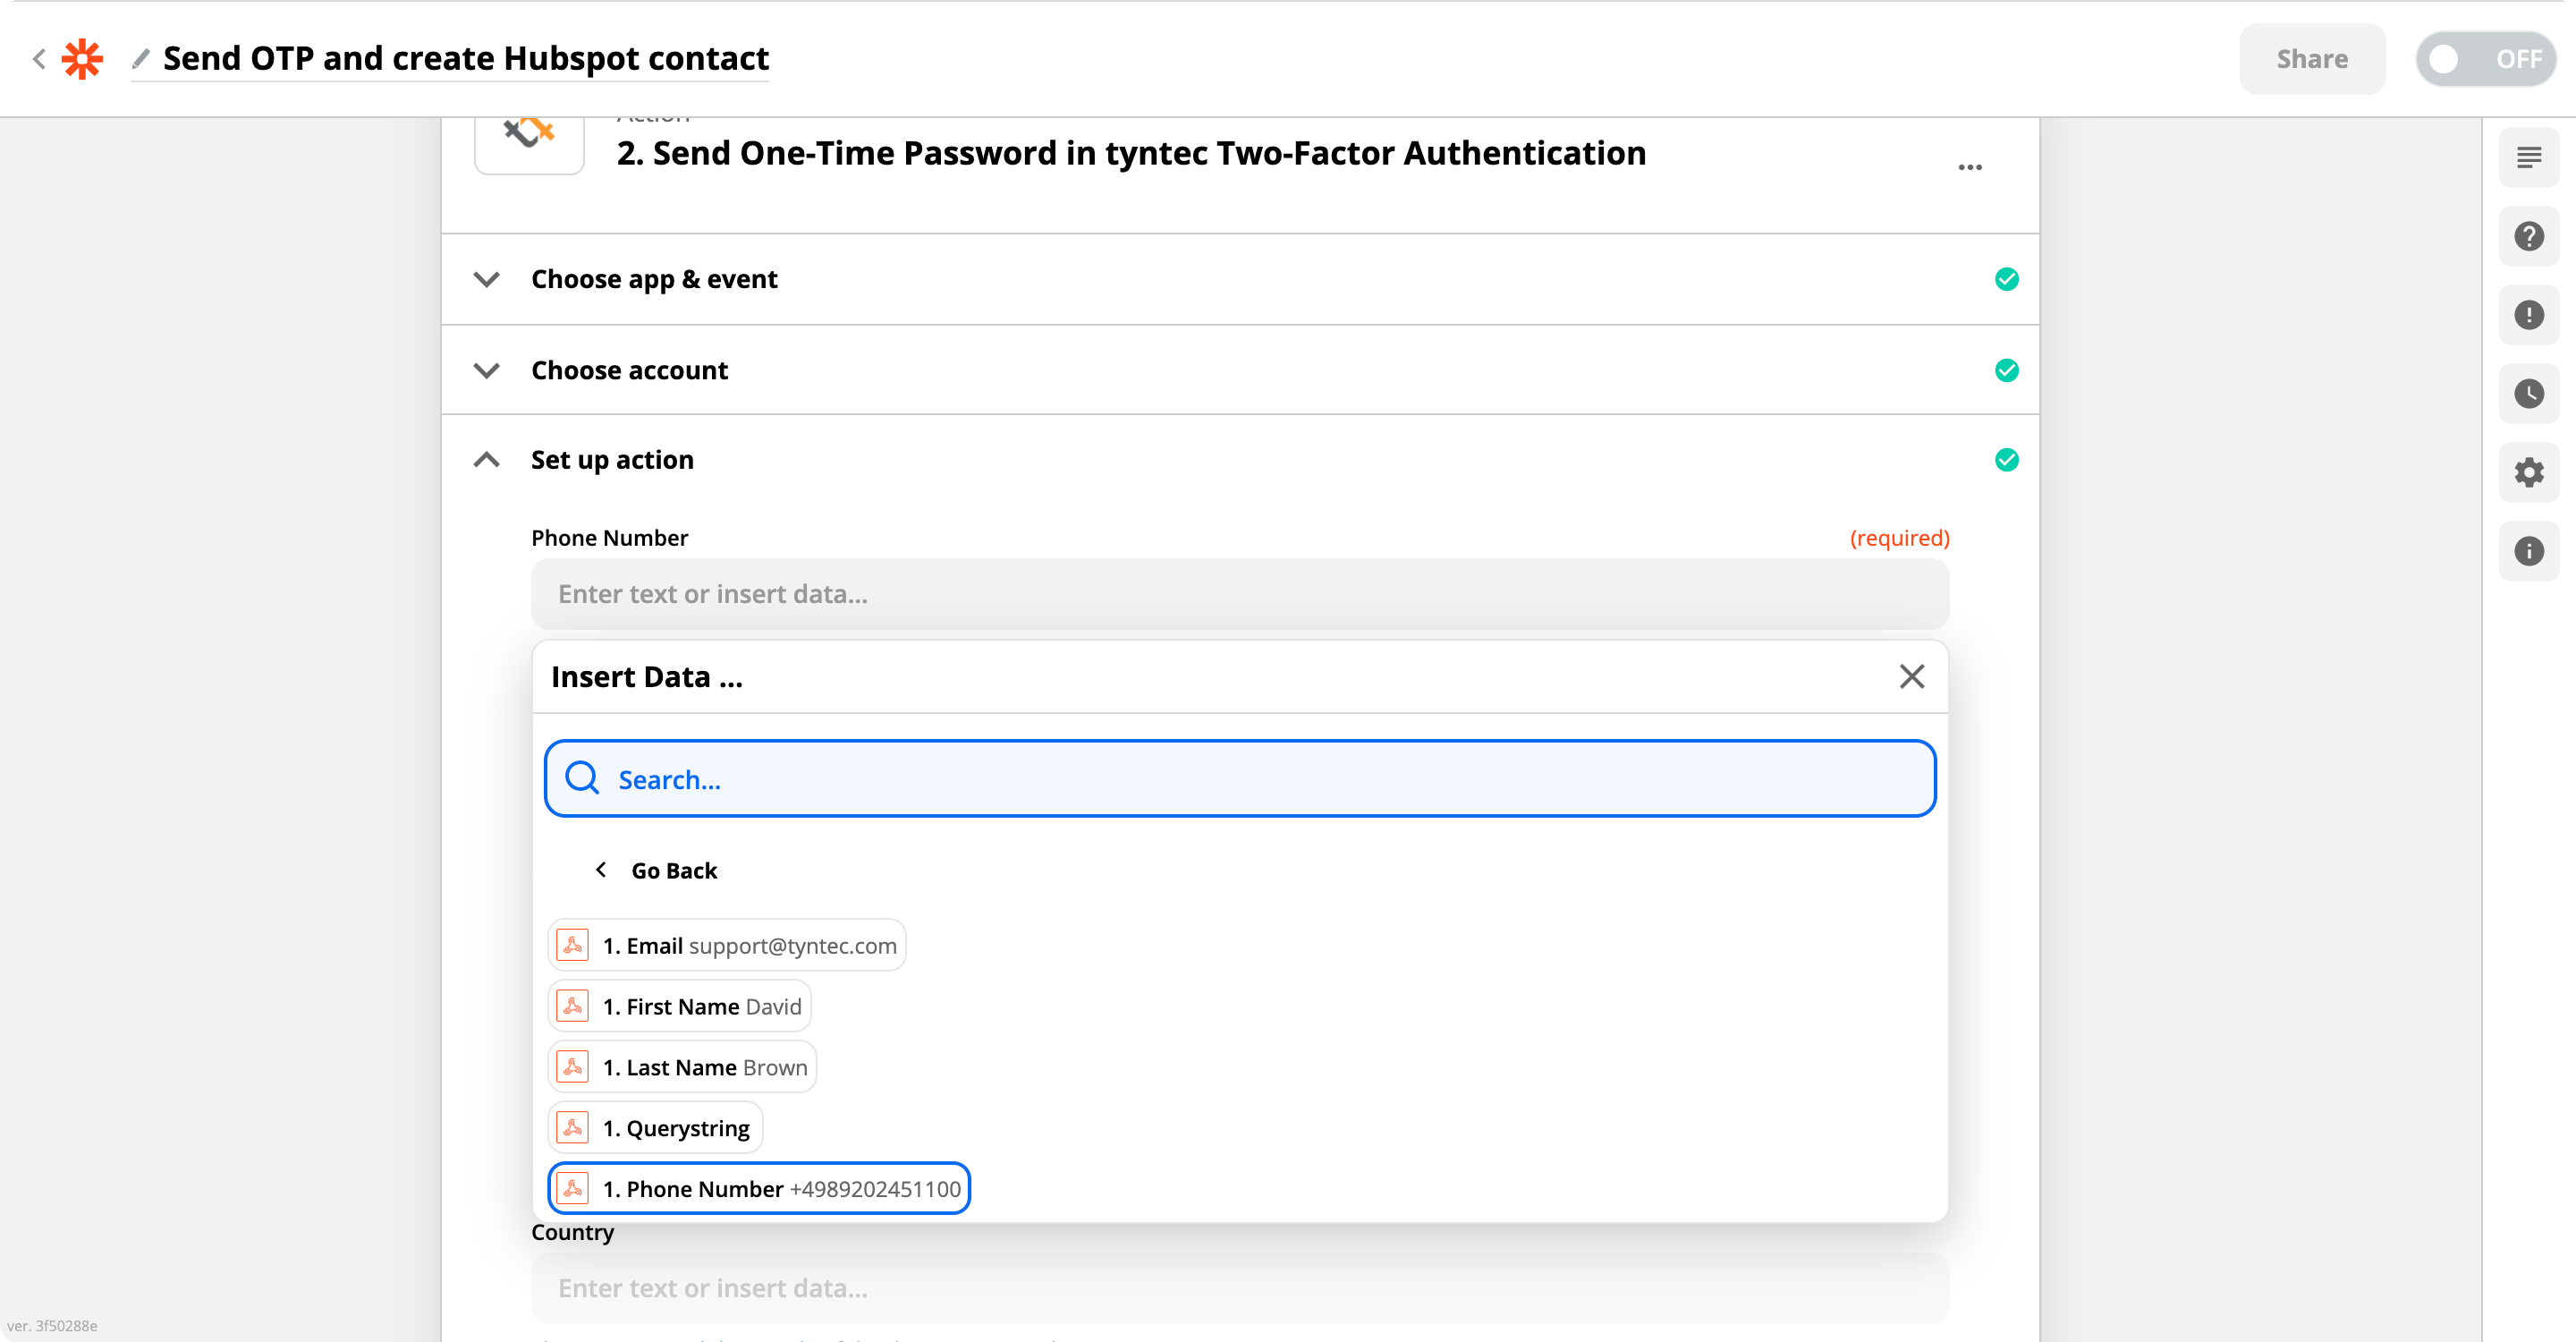
Now you may test your Action. In that case, Zapier sends an OTP to the number from the Trigger. Click Continue.
6. Click the blue and white plus button to add the next Action. Search for Hubspot and select it. In the Action Event, select Create Contact and click Continue.
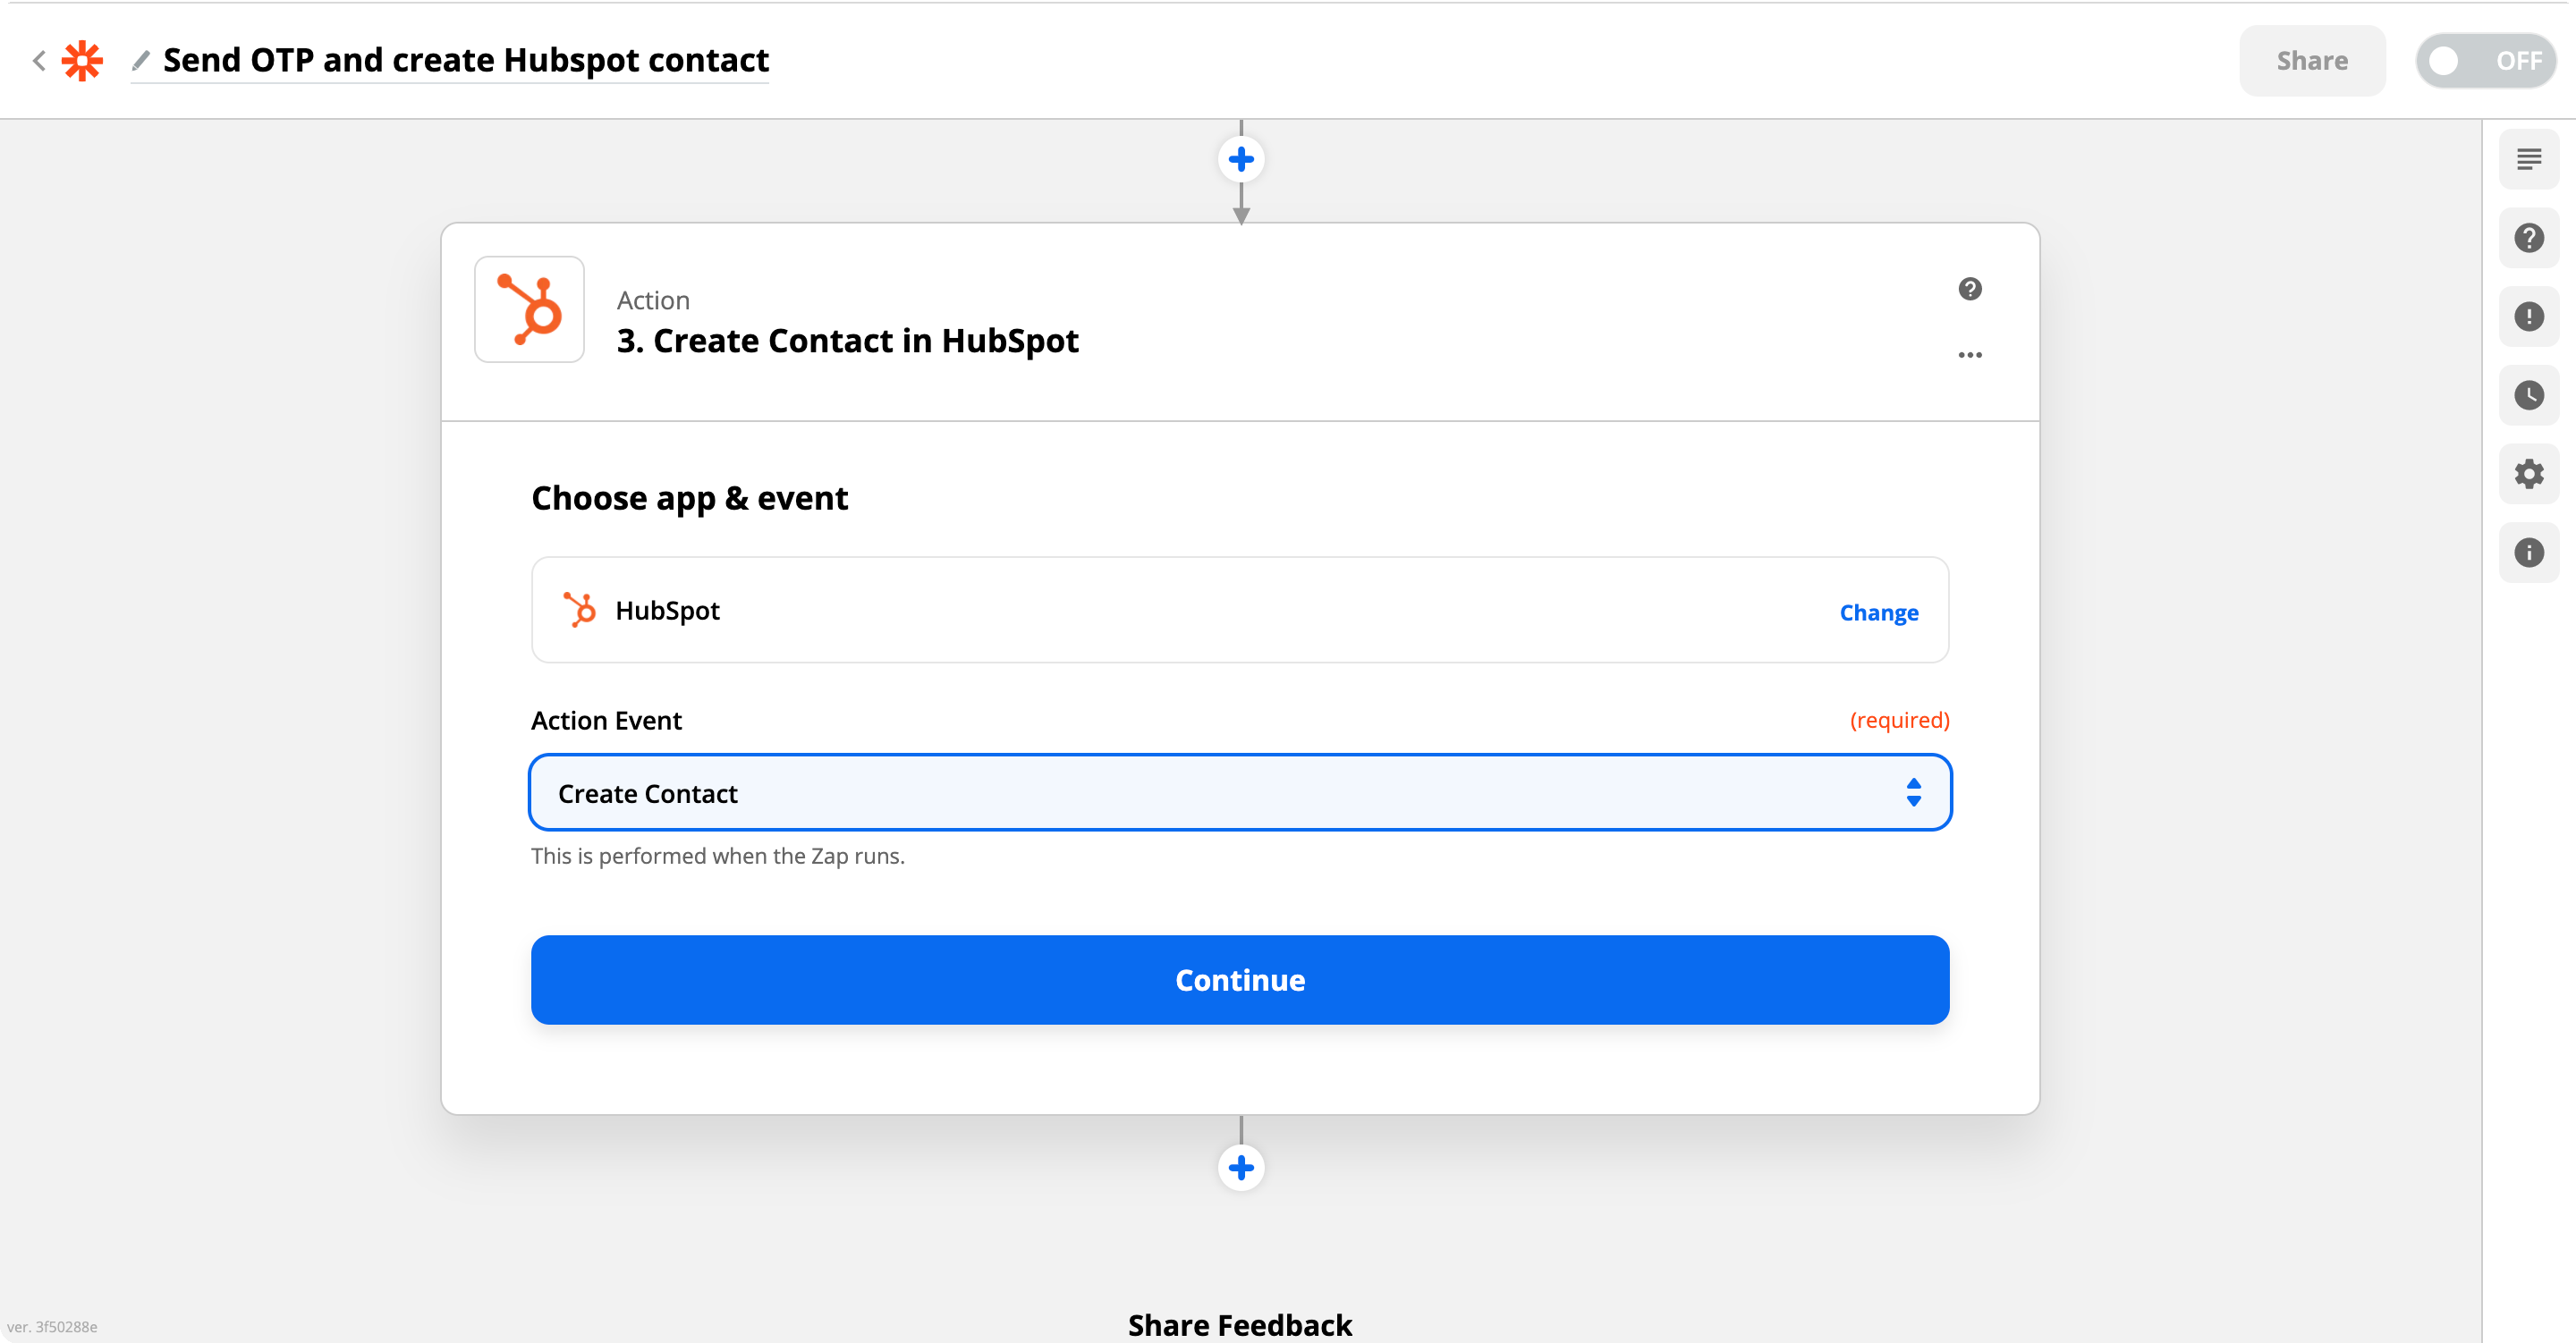
If this is your first time using the Hubspot app, you will need to authorize it. Click on the Sign-in button and log in to your Hubspot account. Otherwise, select your account and click Continue.
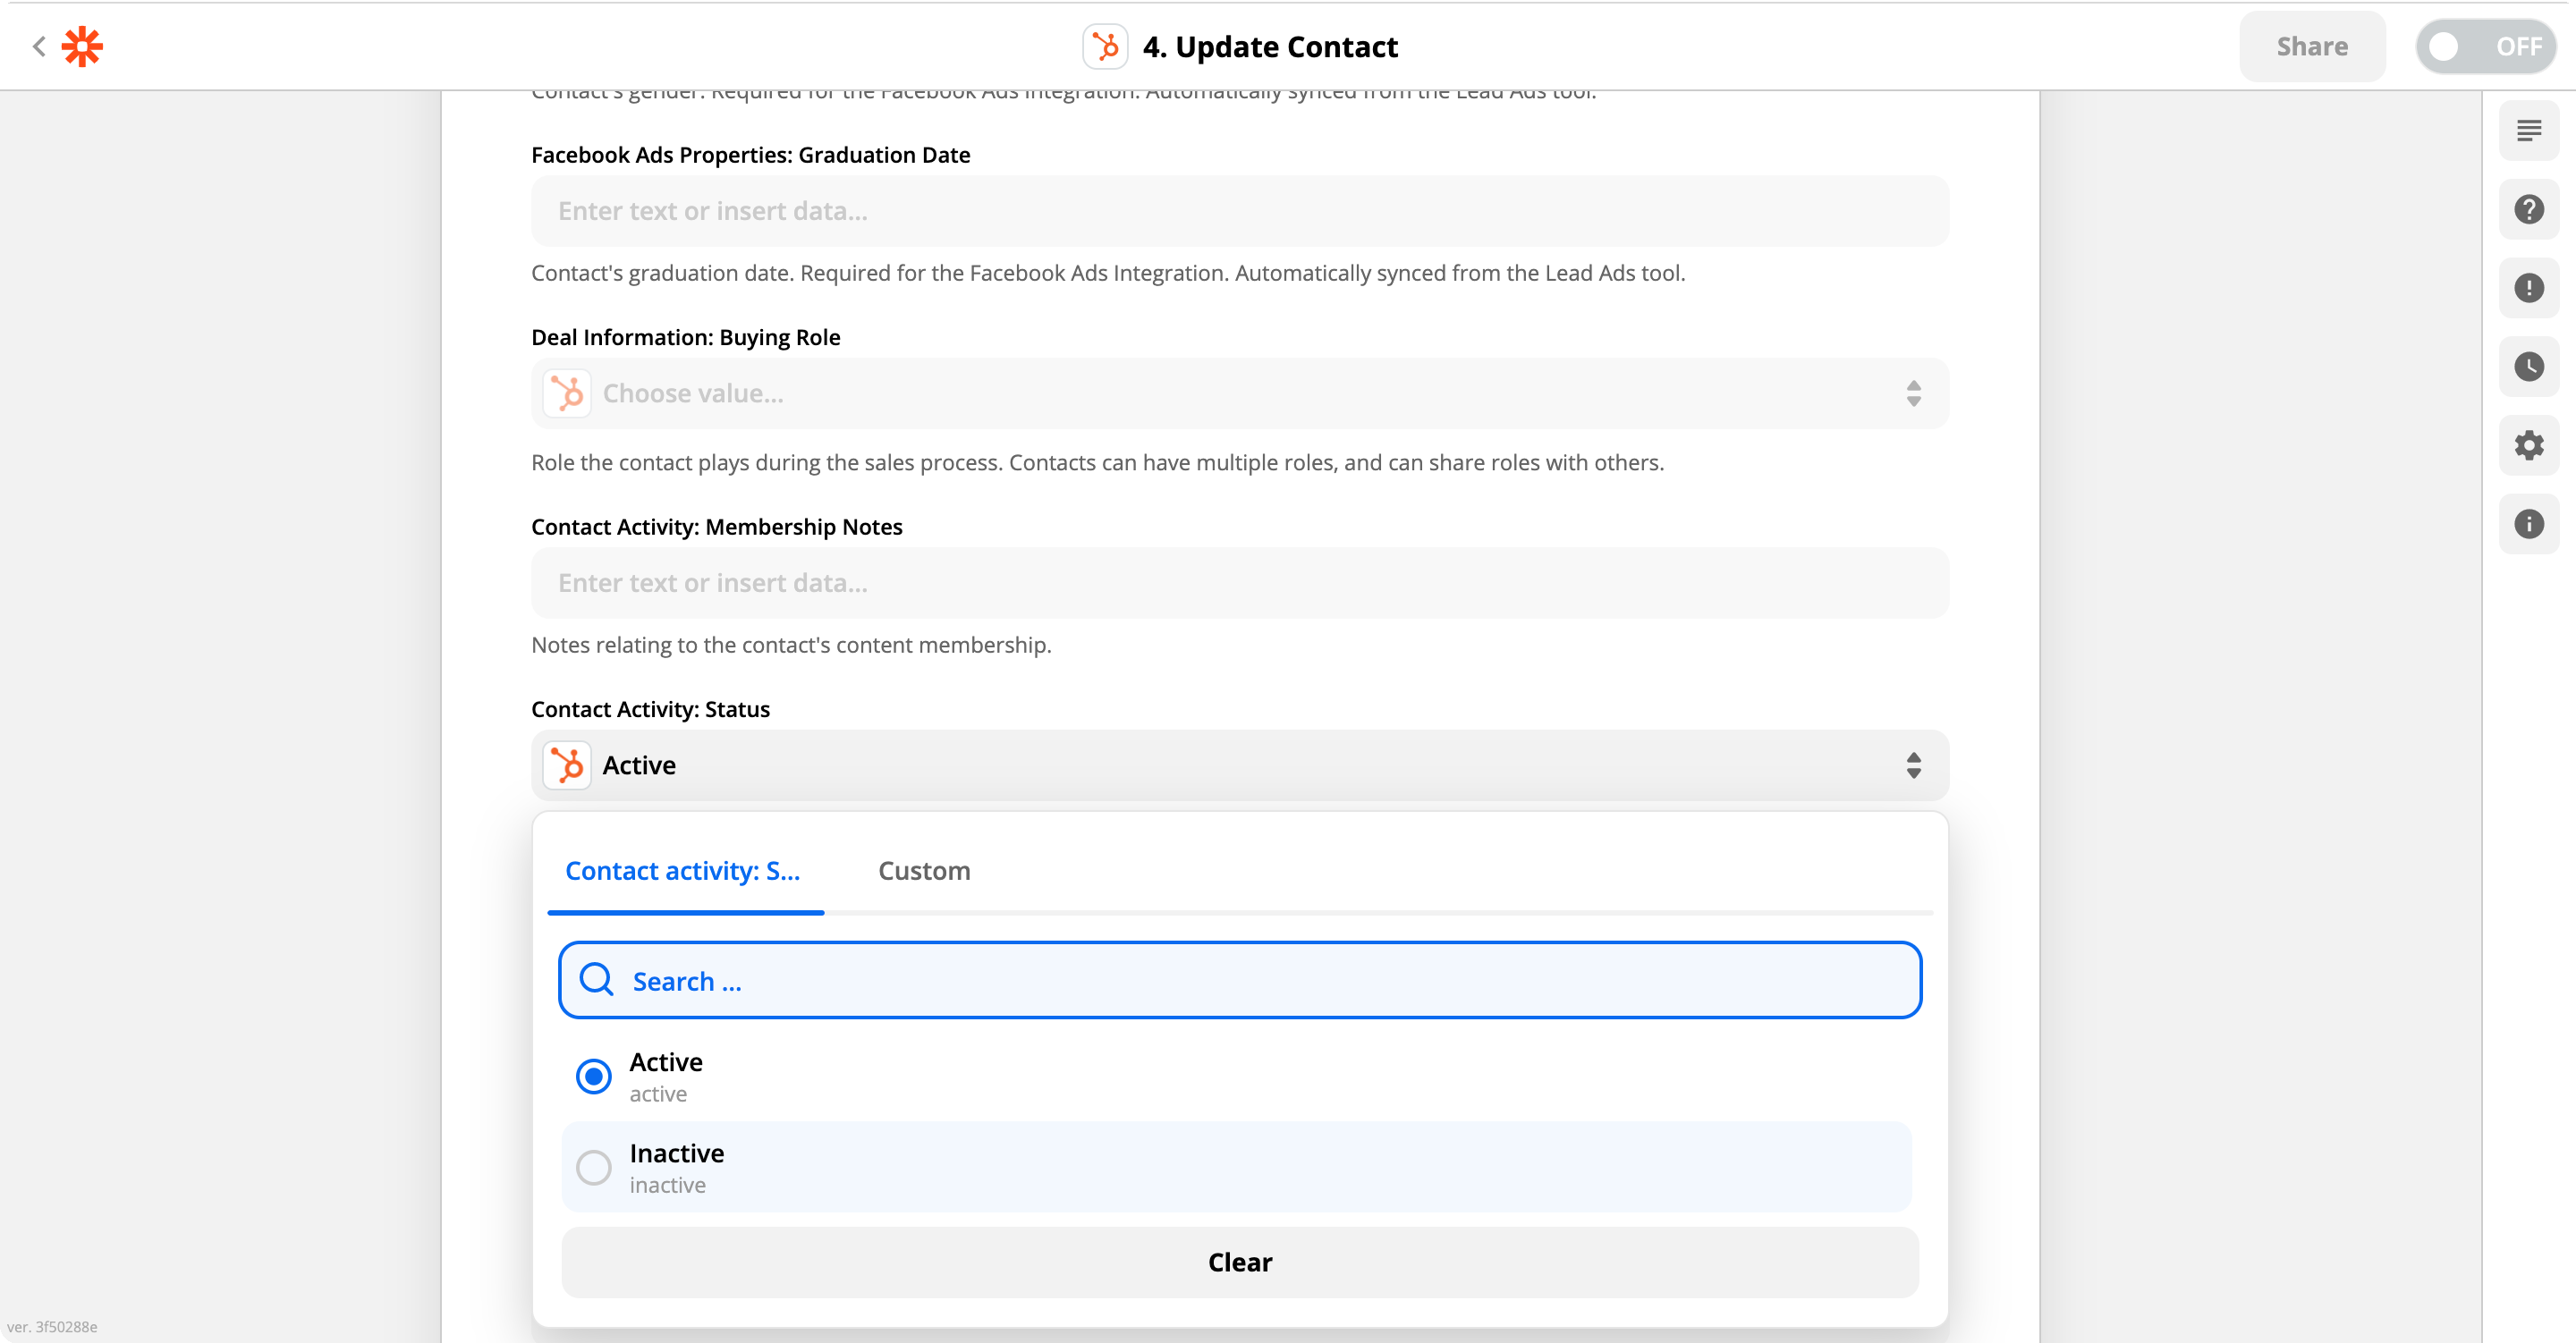
7. In the Set up action step, you will need to add which values should be saved into your Hubspot. Start with Contact Activity Status and set it to Inactive.
Then find the First name, Last name, Email, and Phone fields and populate them with the Trigger data.
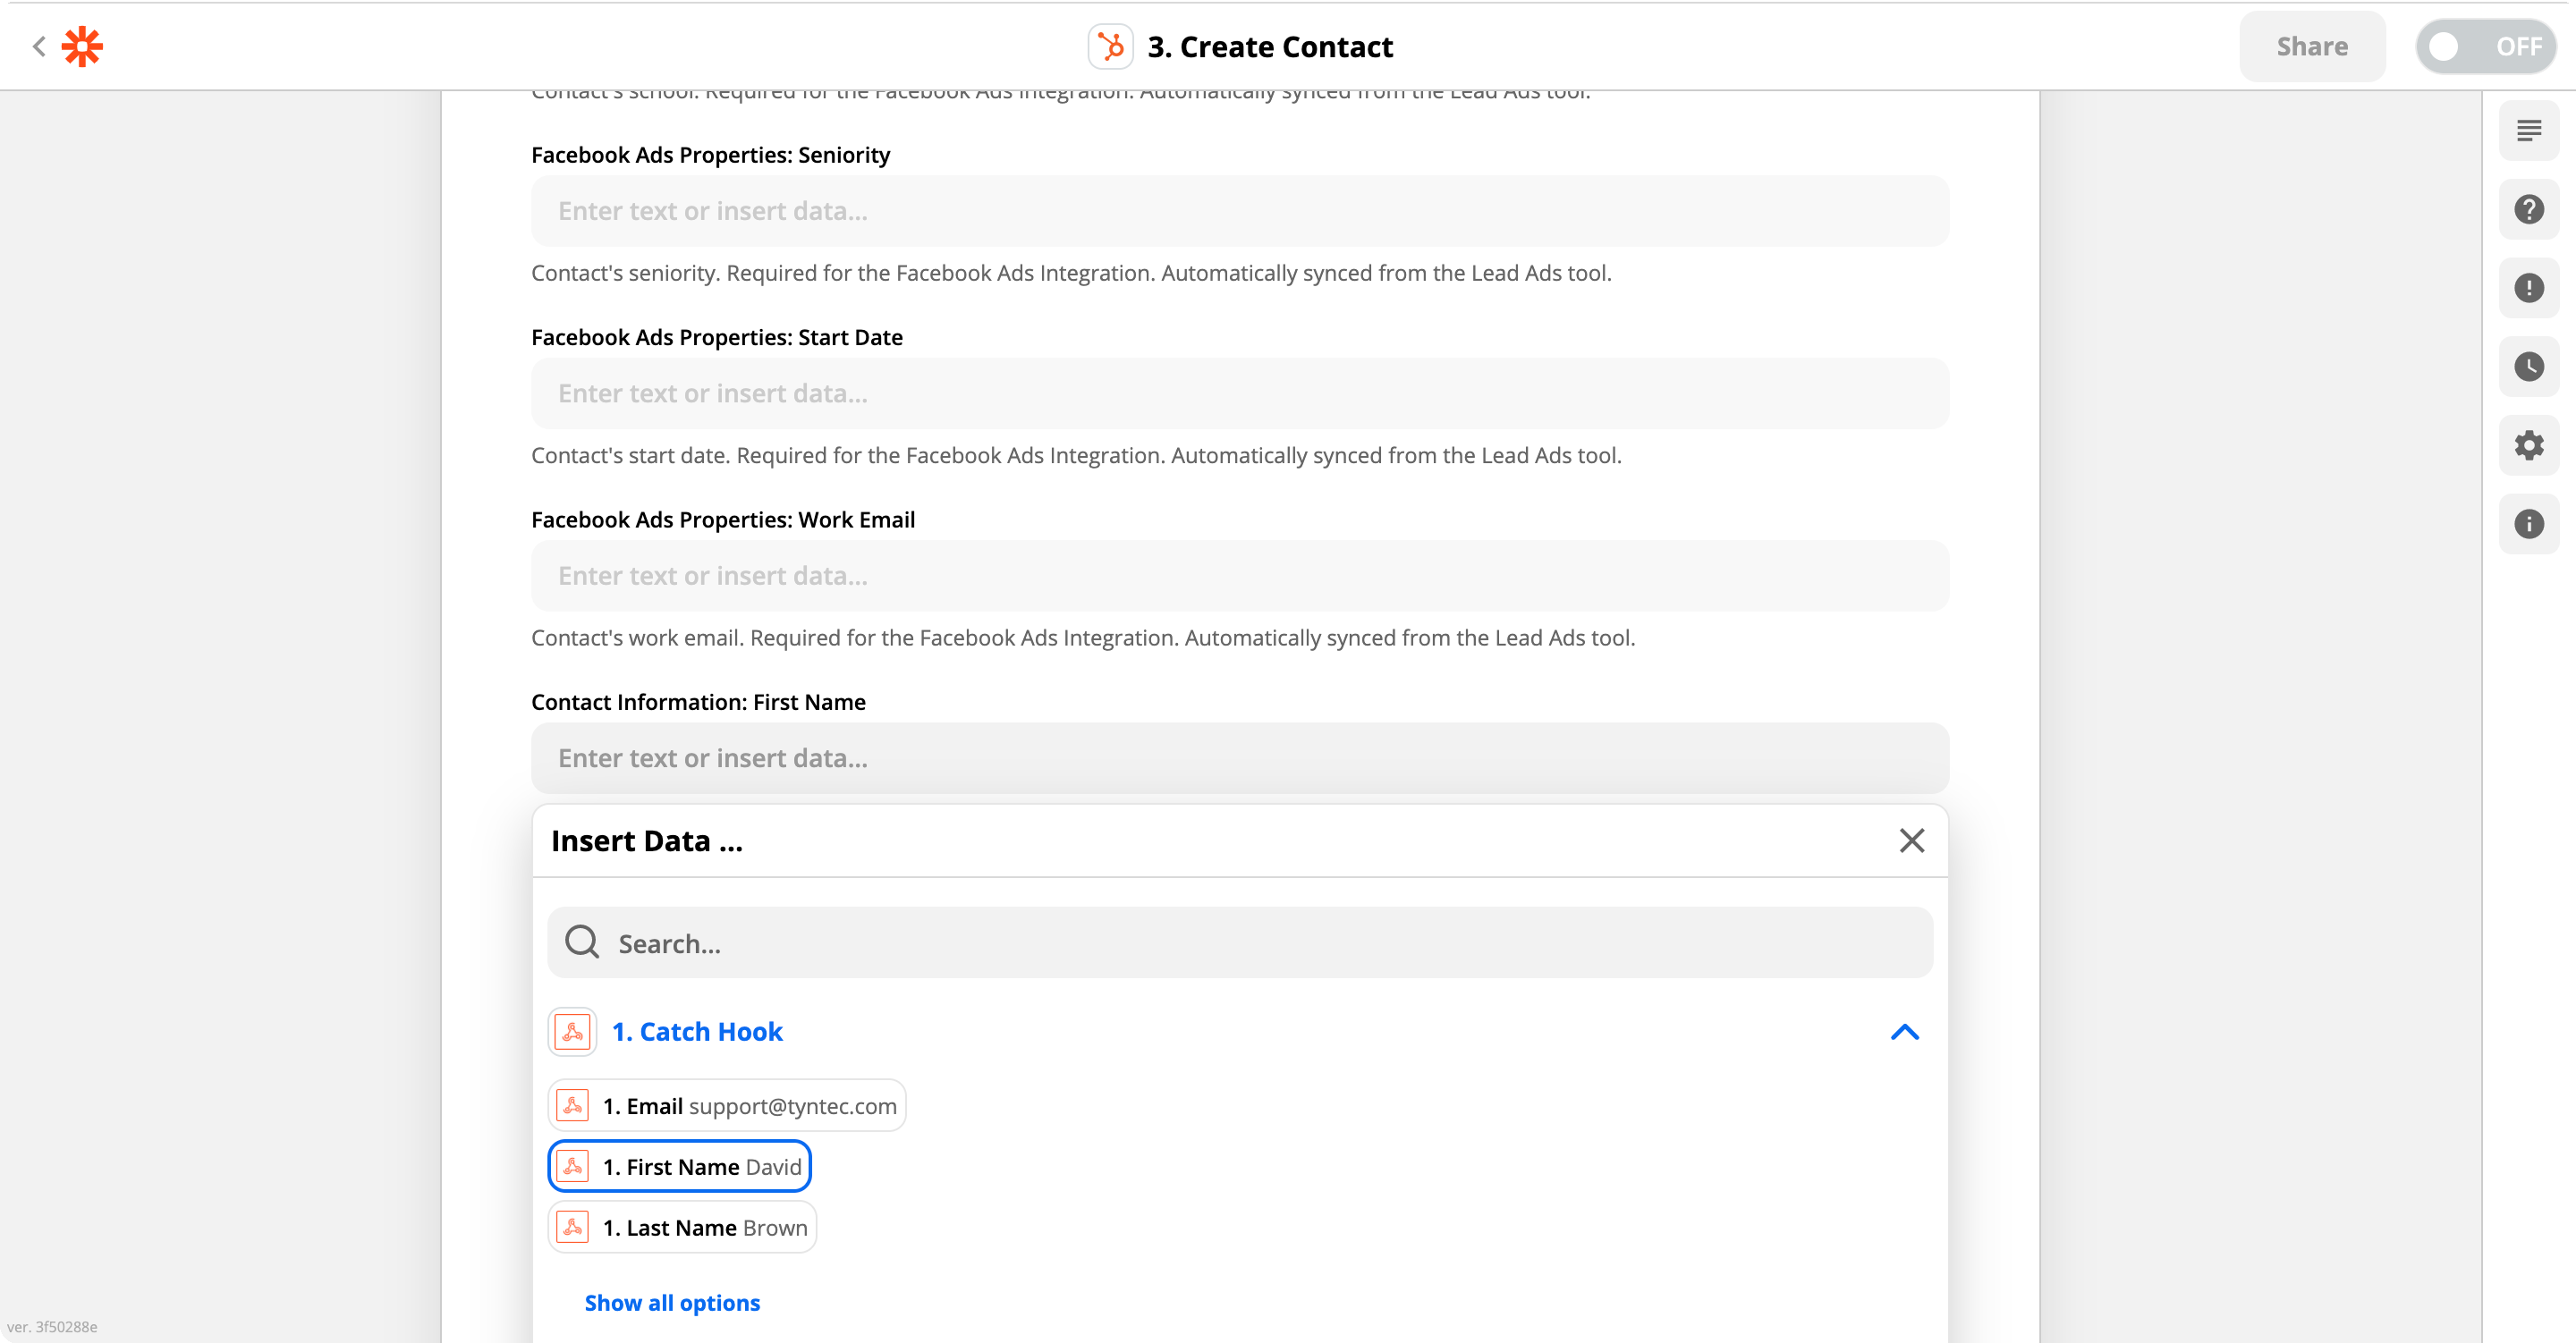
Lastly, you need to save the OTP ID. In this tutorial, we use the Fax number variable to hold it.
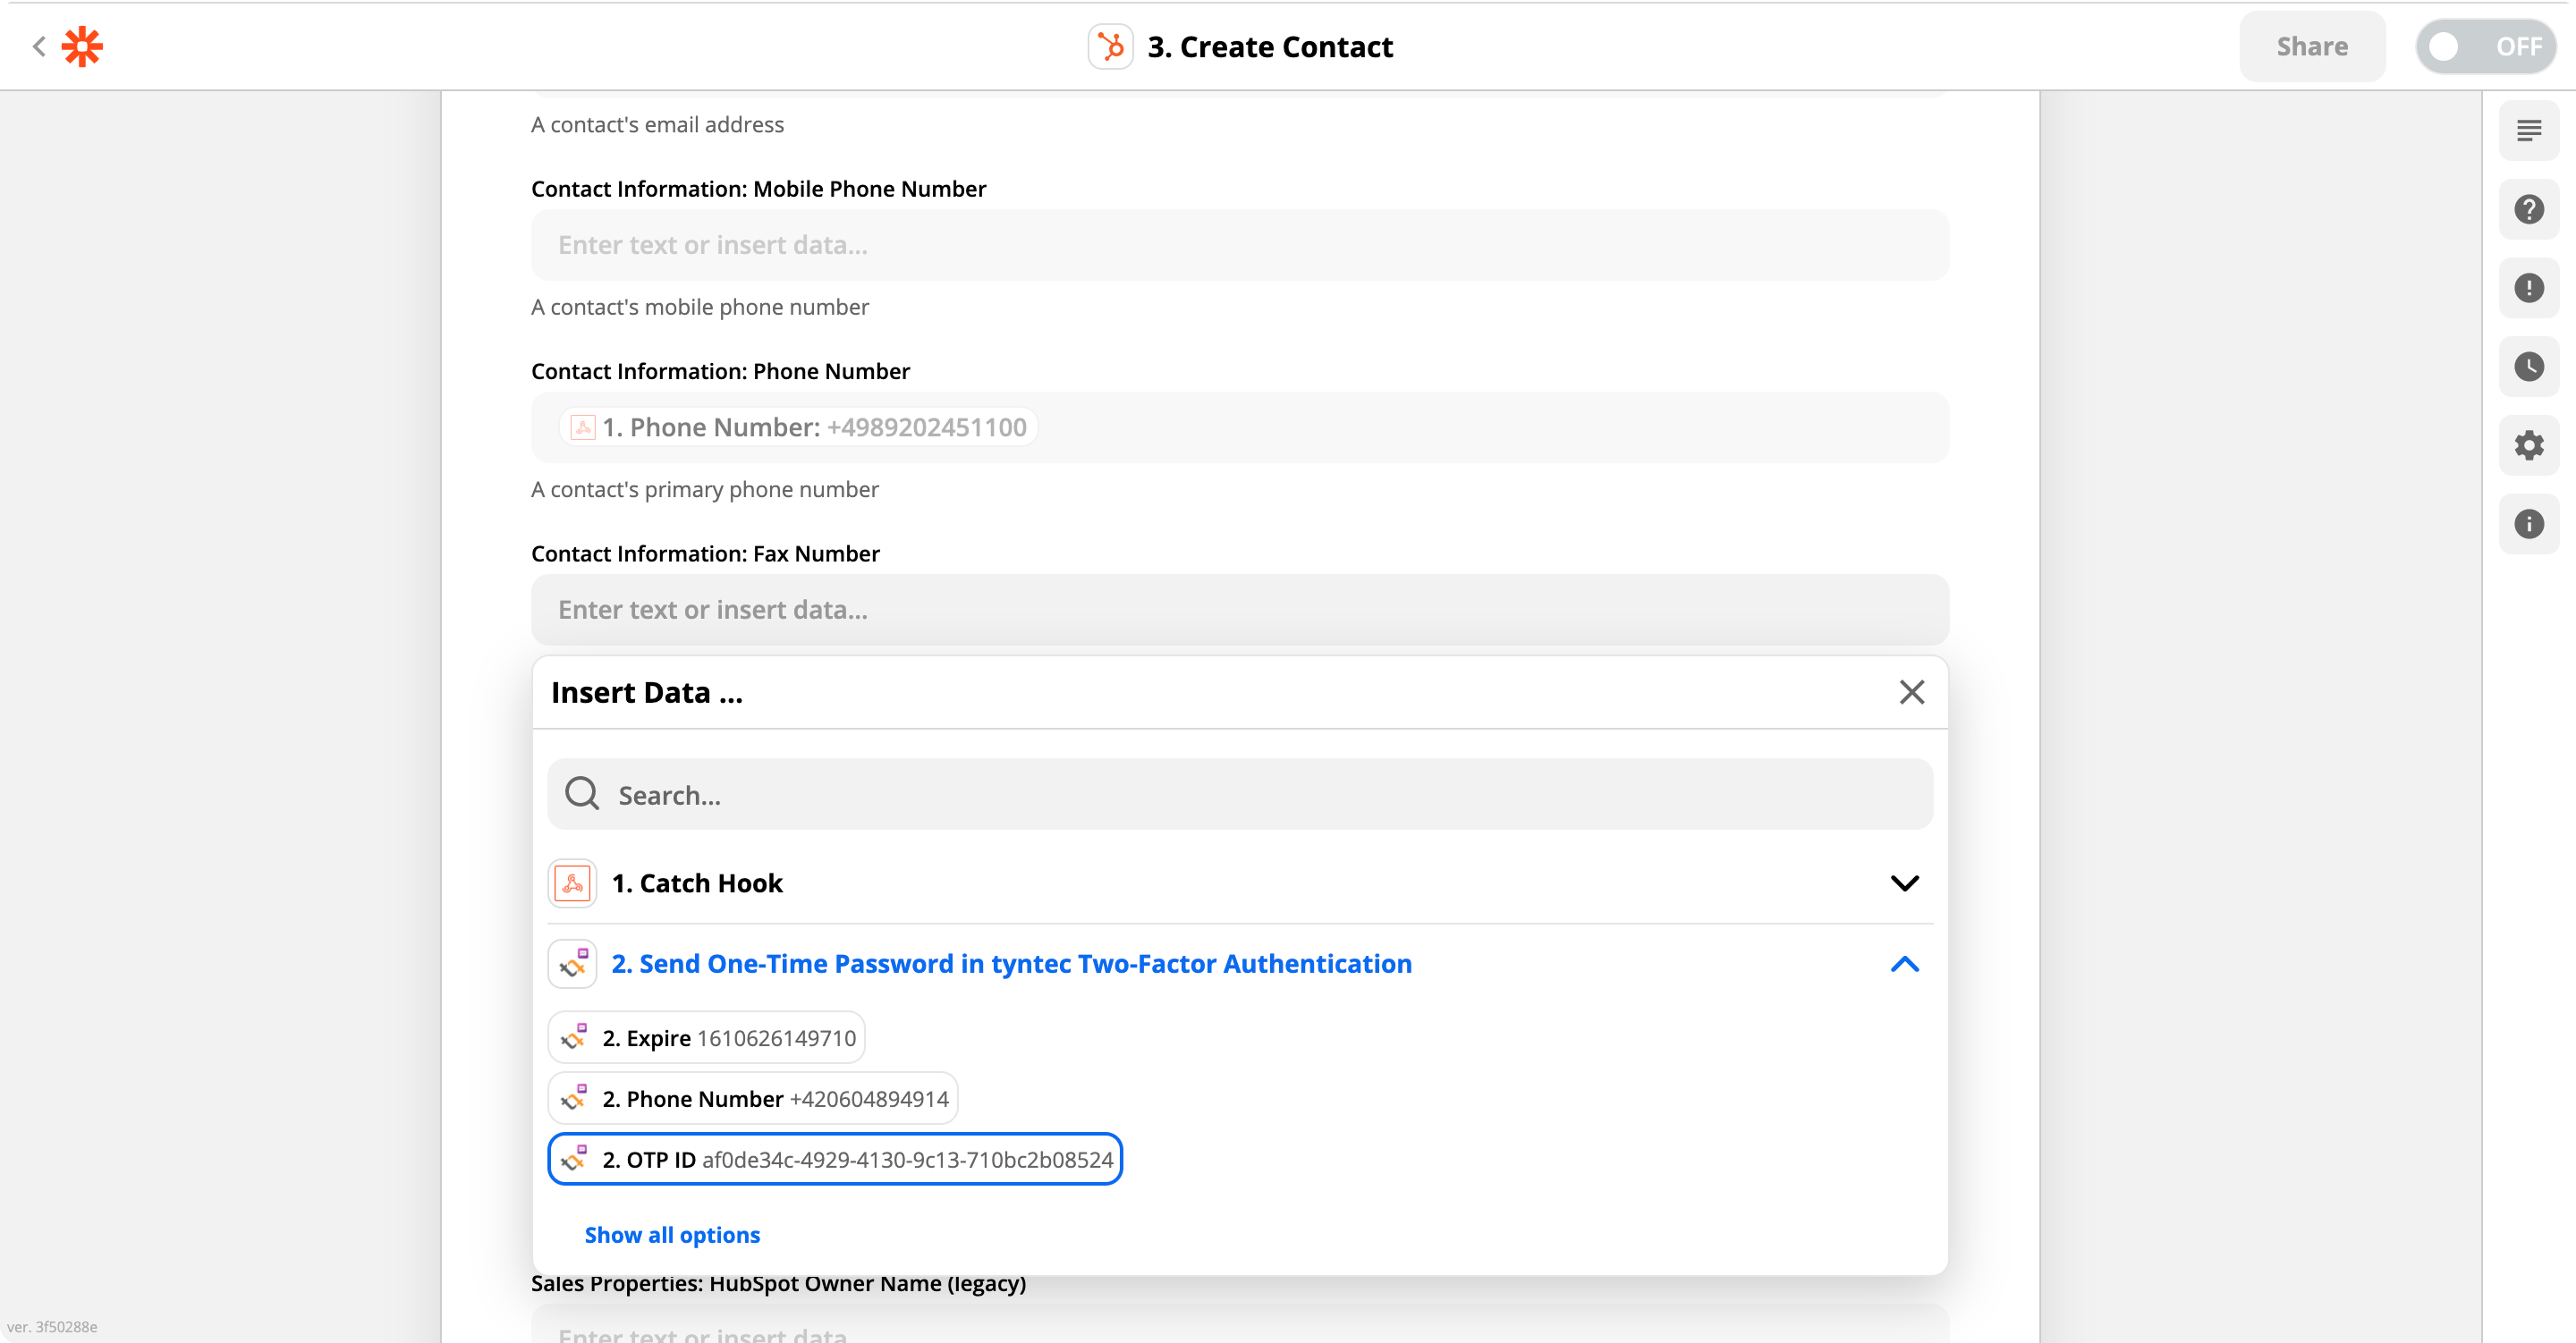
With all fields populated, click Continue. Now you may test your Action. In that case, Zapier creates a custom Contact in Hubspot. Click Continue.
8. Turn on your Zap.
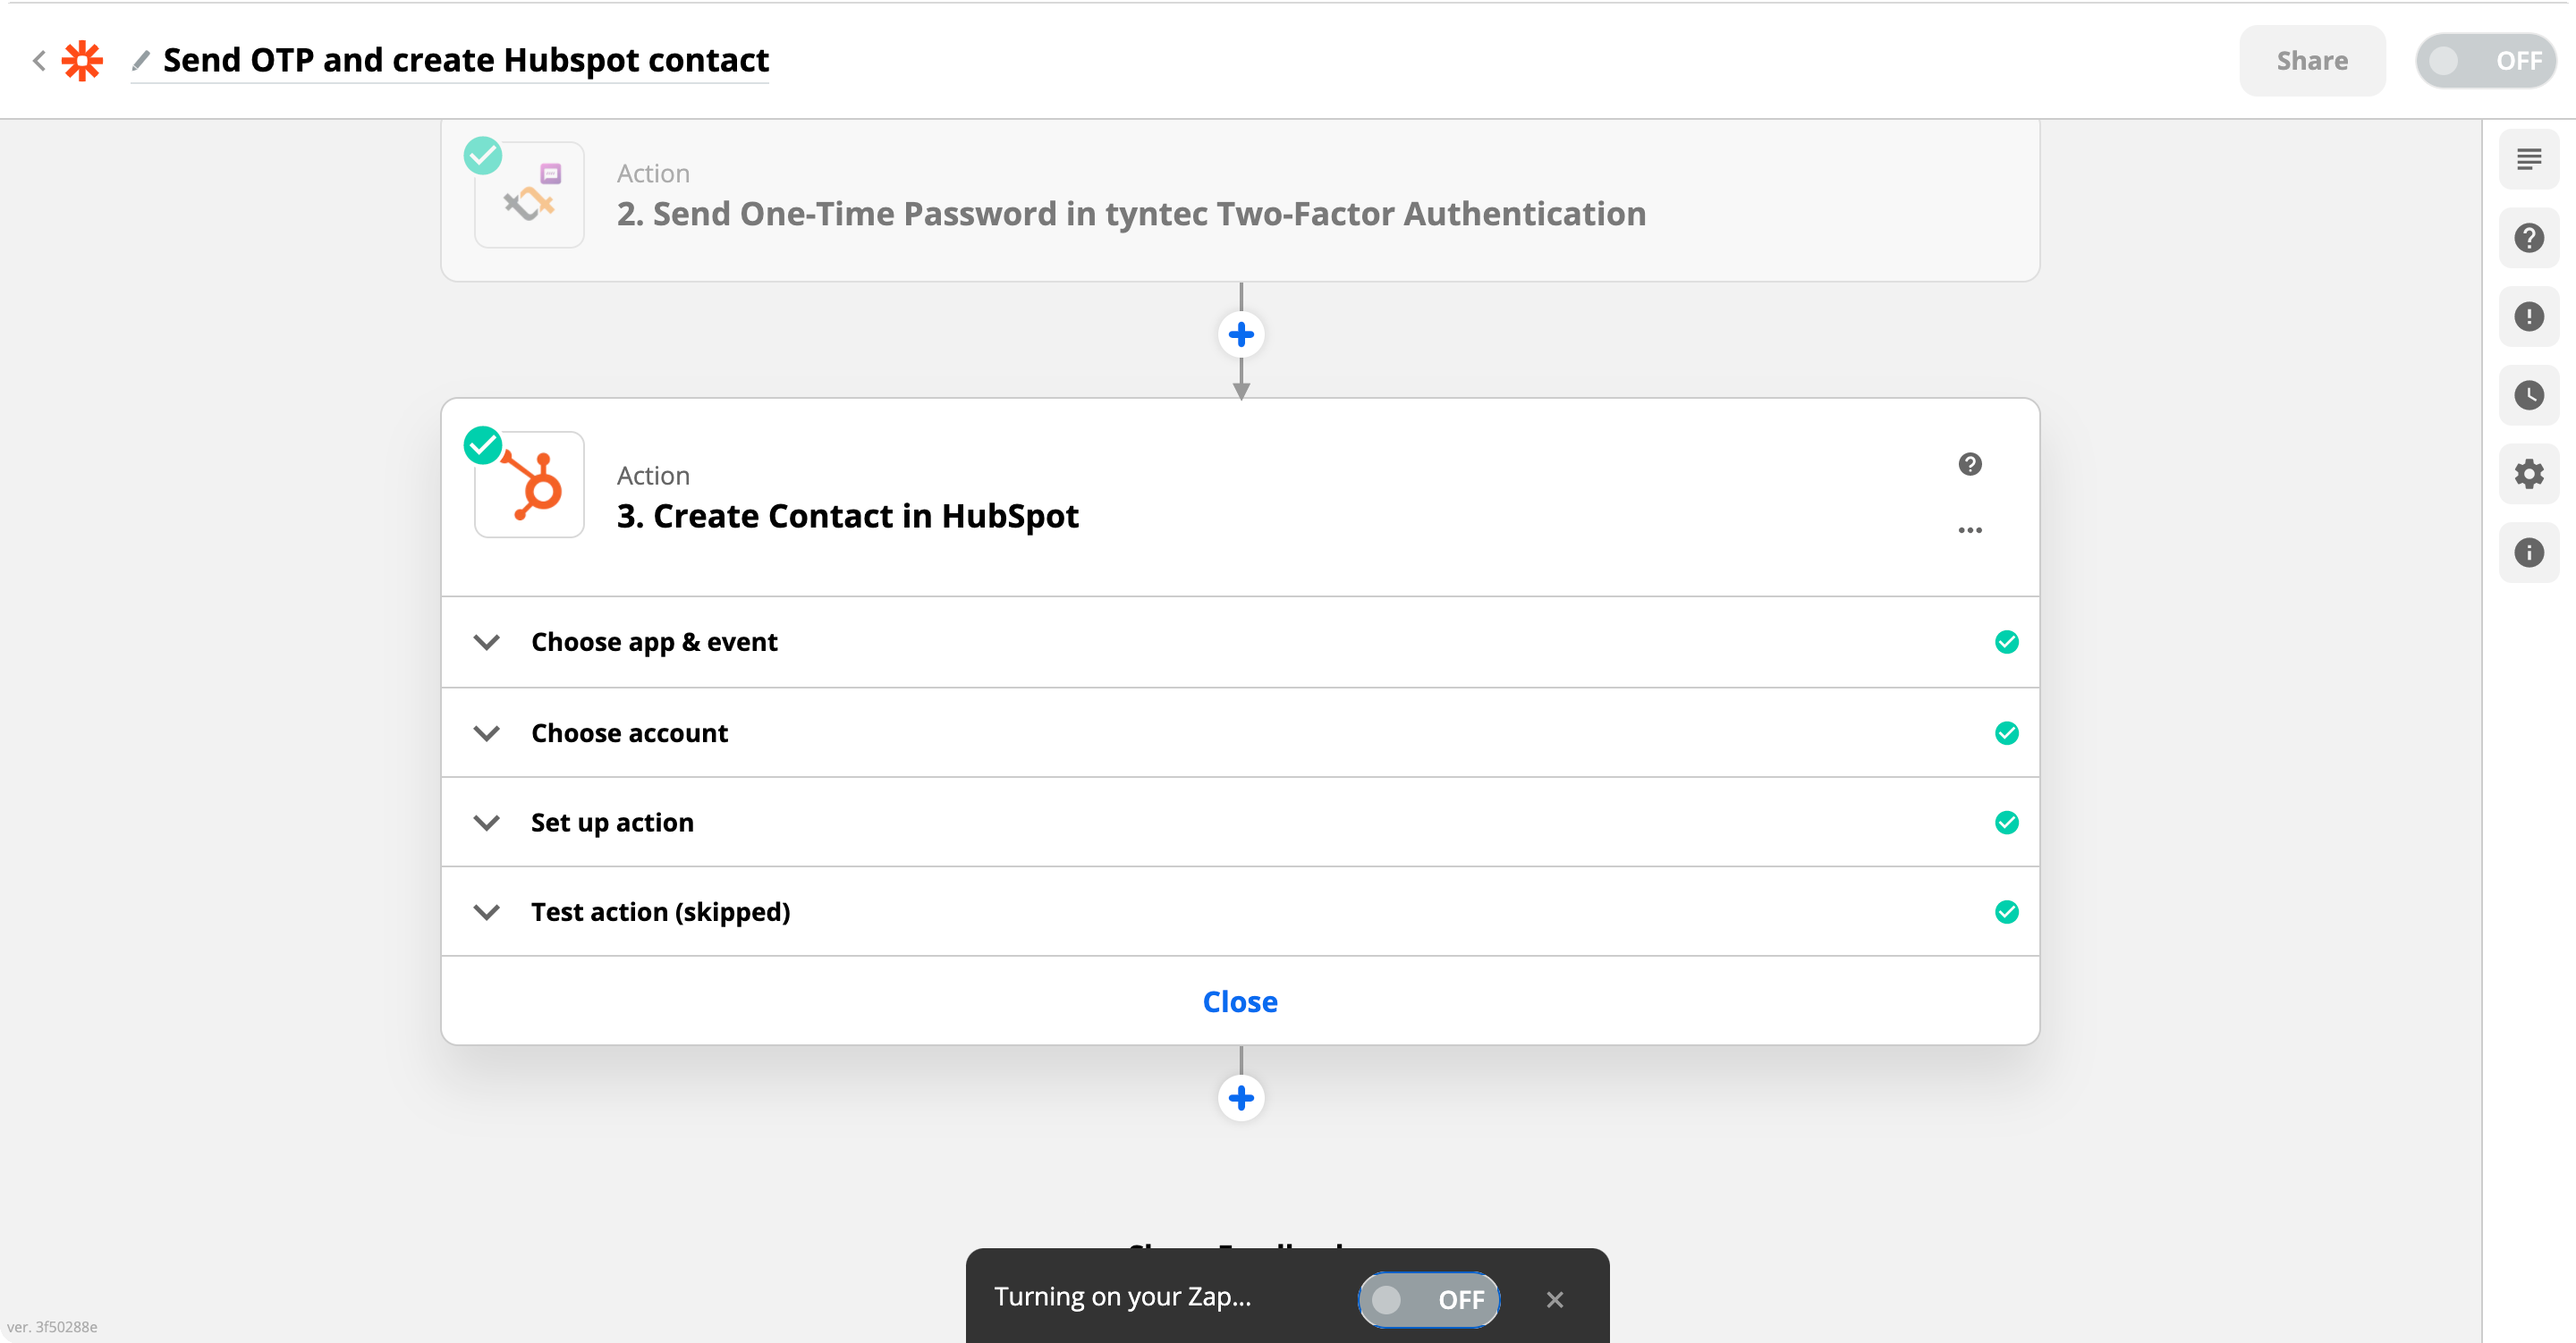
Congratulations! Your Zap will now automatically run when the Trigger detects a new Form submission via the Post Request.
Step Three: Create a second Zap for verifying OTP and updating the contact
Let’s start with creating Zap that handles verifying the user’s account and updates Hubspot contact.
1. Choose your Trigger. Select the premium Webhook app from Zapier in the right column. In the Trigger Event, select Catch Hook. Click Continue. In the Set up Trigger step, enable the Silent mode and copy the Custom Webhook URL. You will need it later to send your form data. Click Continue.
2. It is highly recommended to test this Trigger. You can use your form, Postman, or our testing form to send some dummy data to the Custom Webhook URL.
3. Click the blue and white plus button to add the next Action. Search for Hubspot and select it. In the Action Event, select Find Contact and click Continue. Choose your account and then click Continue. In Set up action, set the First Search Property Name to Contact information: Phone Number.
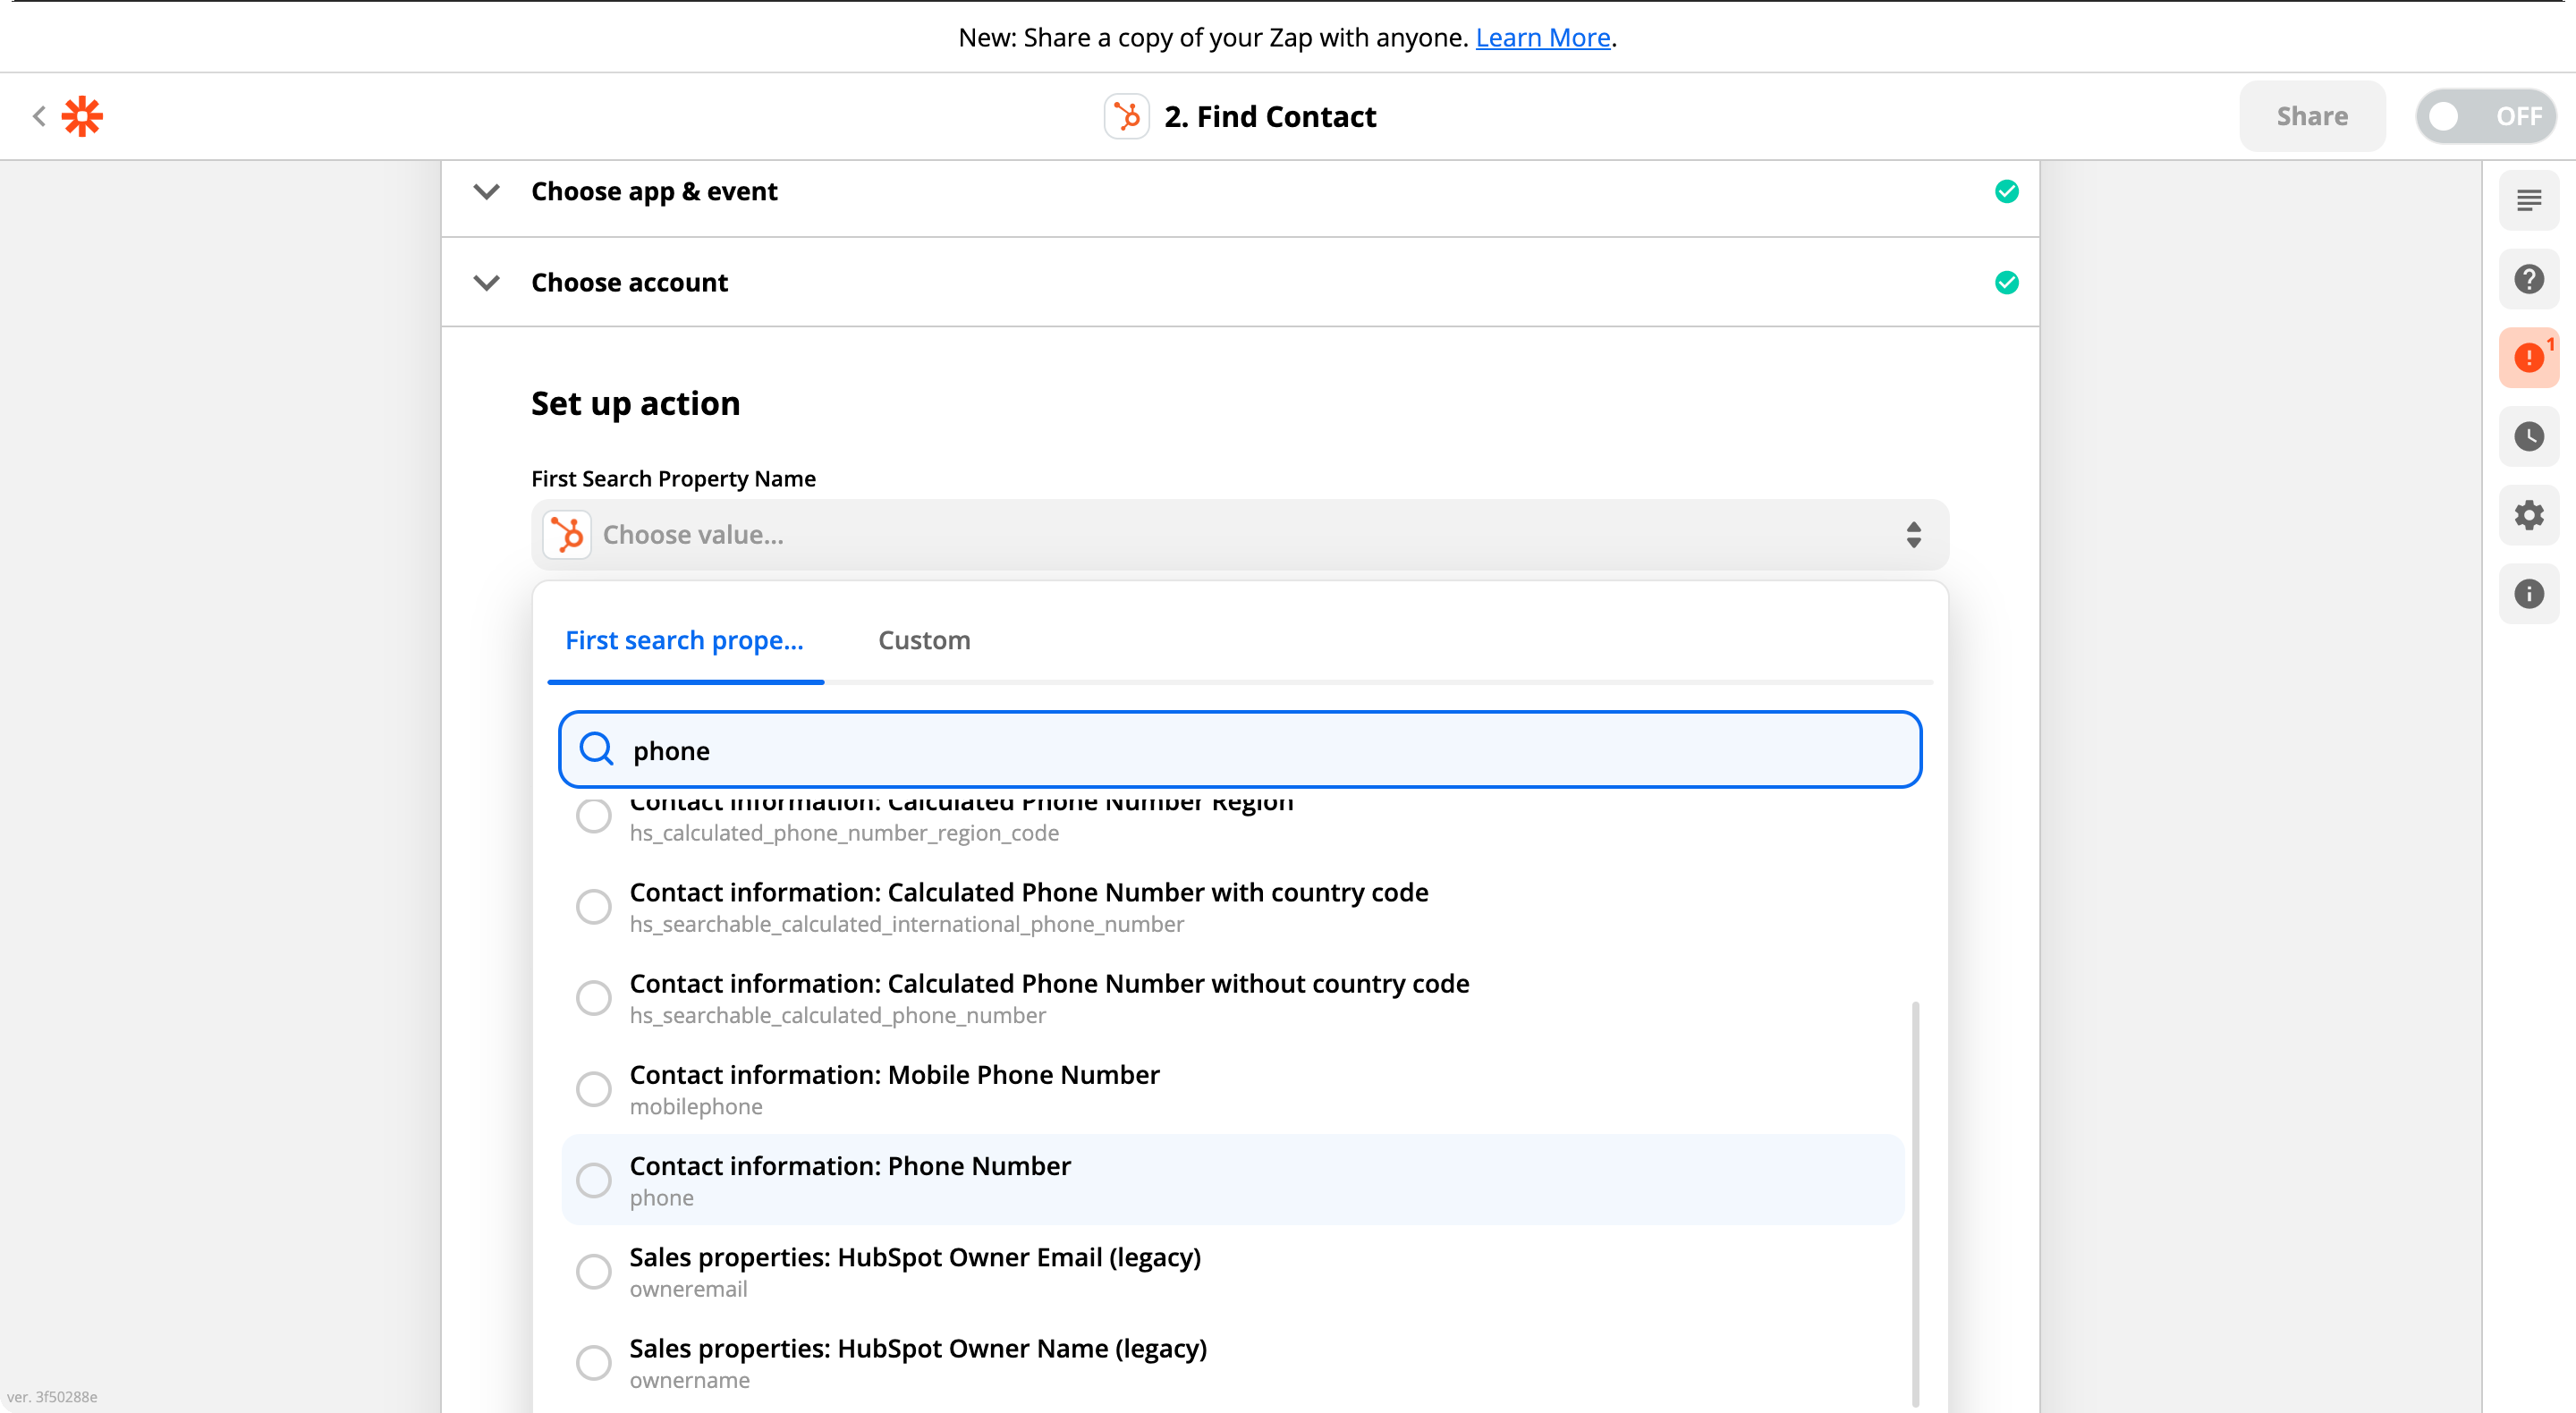
Click into the First Search Property Value and select the Phone Number variable from the Trigger.

4. Click into Properties To Retrieve and set it to Contact information: Fax Number. Then click Continue.
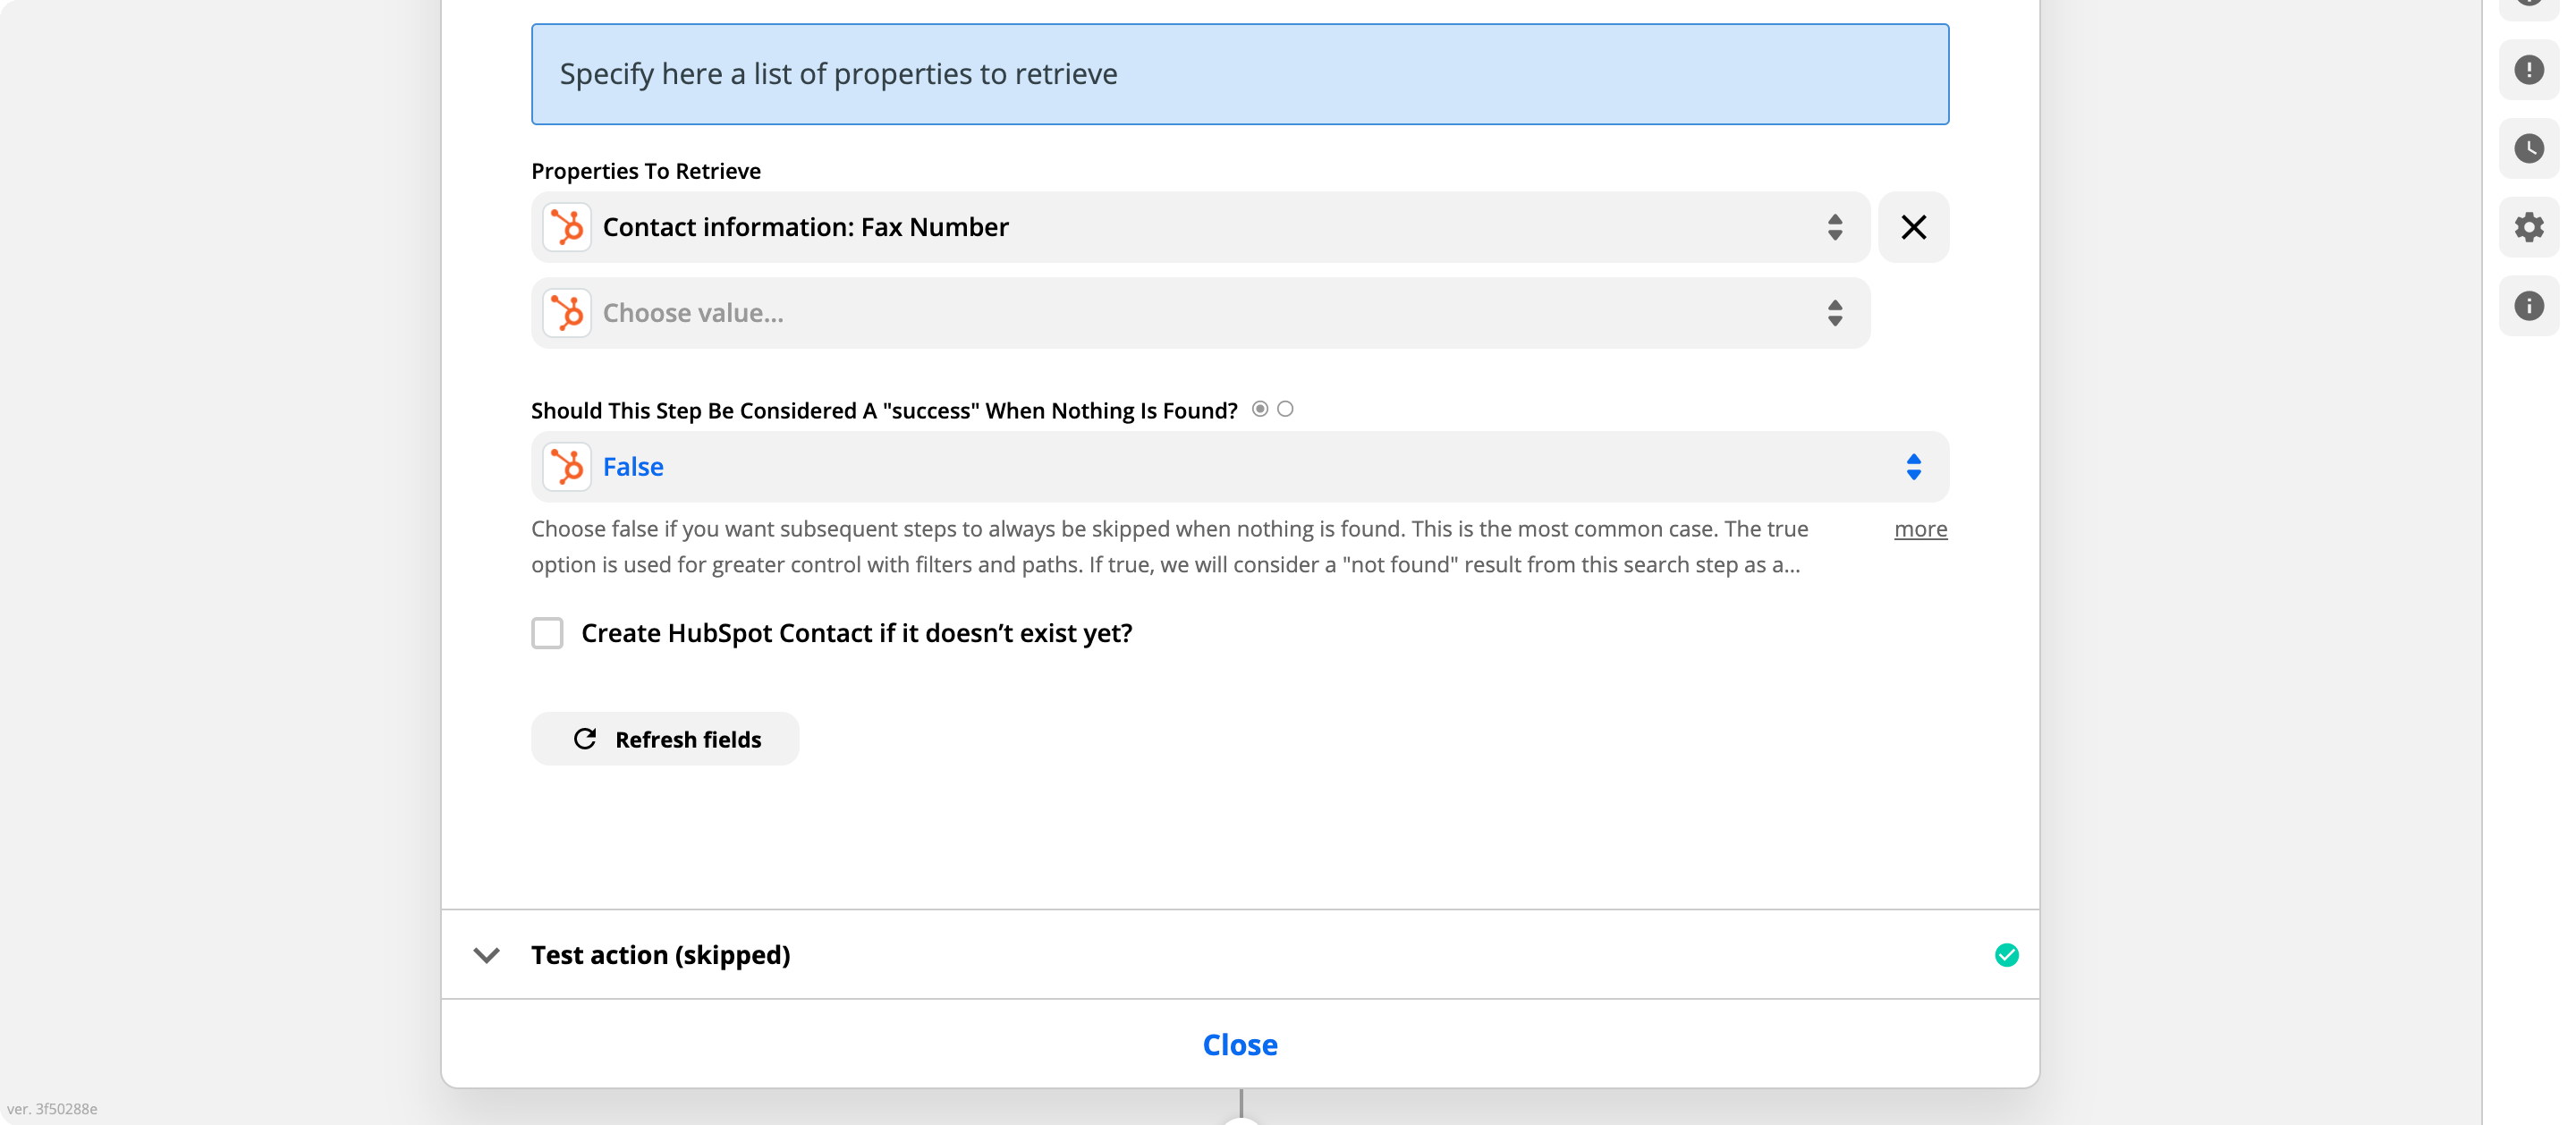
5. Now you may test your Action. In that case, Zapier will try to find a Contact by the given phone number. Click Continue.
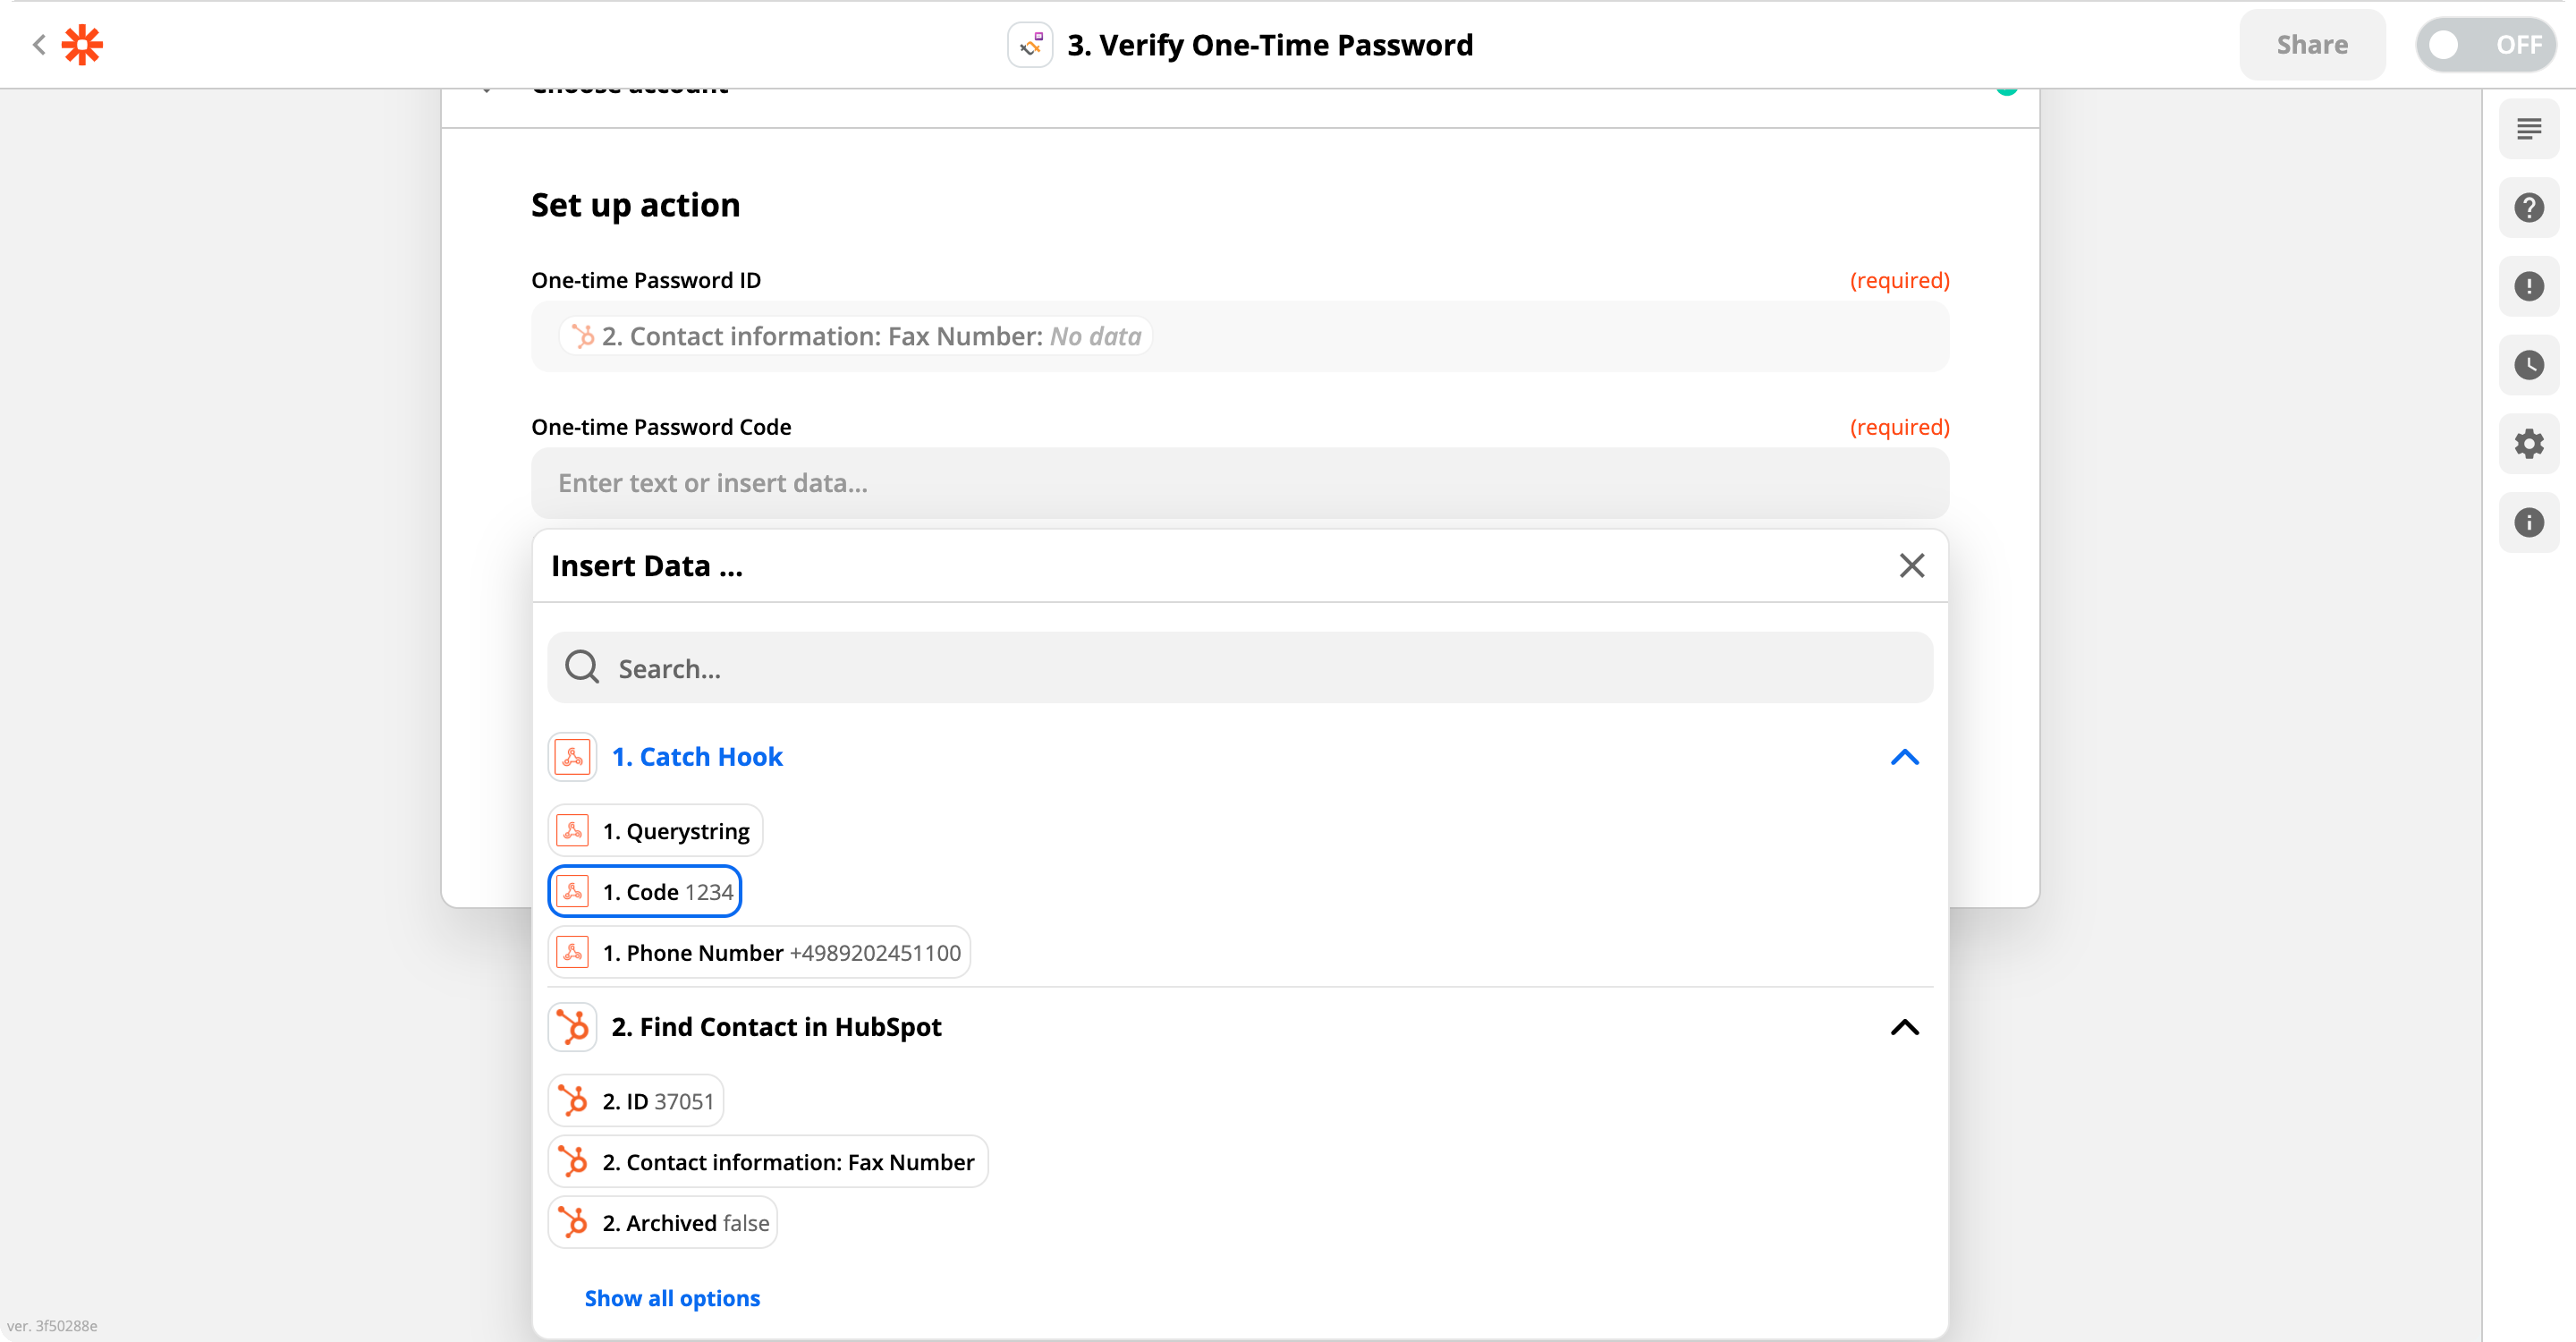
6. Click the blue and white plus button to add the next Action. Search for tyntec Two-Factor Authentication and select it. In the Action Event, select Verify One-Time Password and click Continue. Select your tyntec account and click Continue. In Set up action, set the One-time Password ID to Contact information: Fax Number and One-time Password Code to the Code variable from your Trigger. Then click Continue.
If the verification is successful, the Zap continues to the next step. If not, it fails here.
7. Click the blue and white plus button to add the next Action. Search for Hubspot and select it. In the Action Event, select Update Contact and click Continue. Choose your account, then click Continue.
8. In Set up action, set the Object ID to the ID variable from Find Contact.
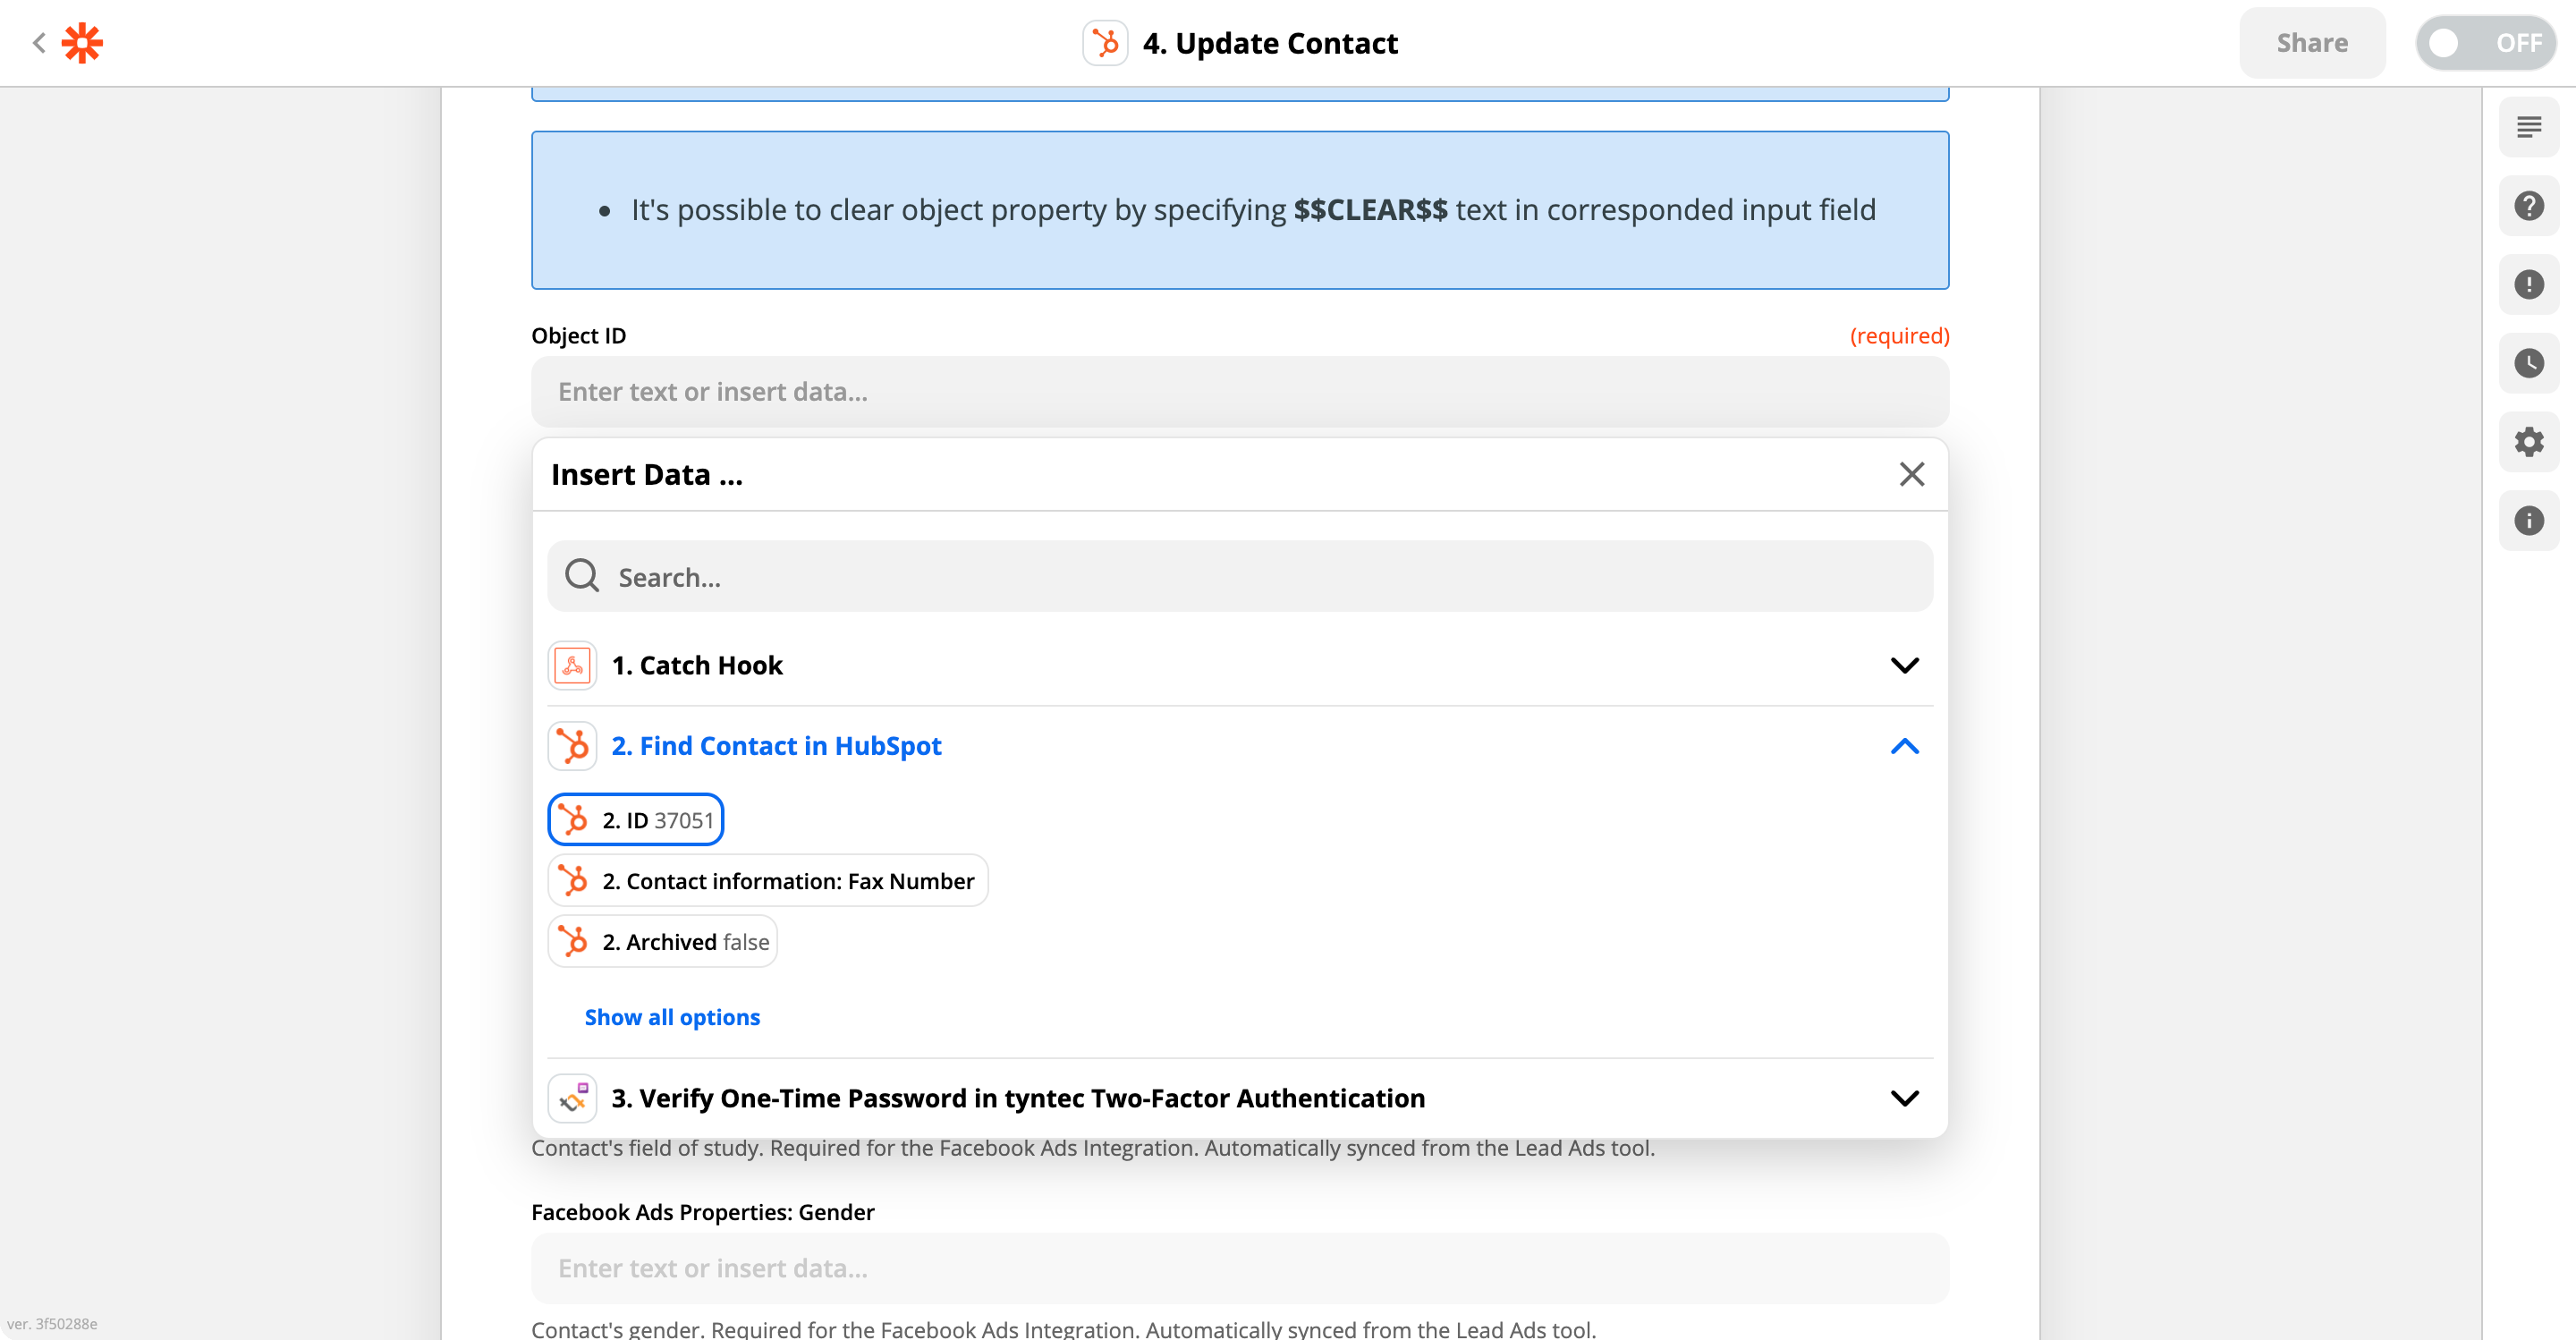
Then change the Contact Activity: Status to Active.
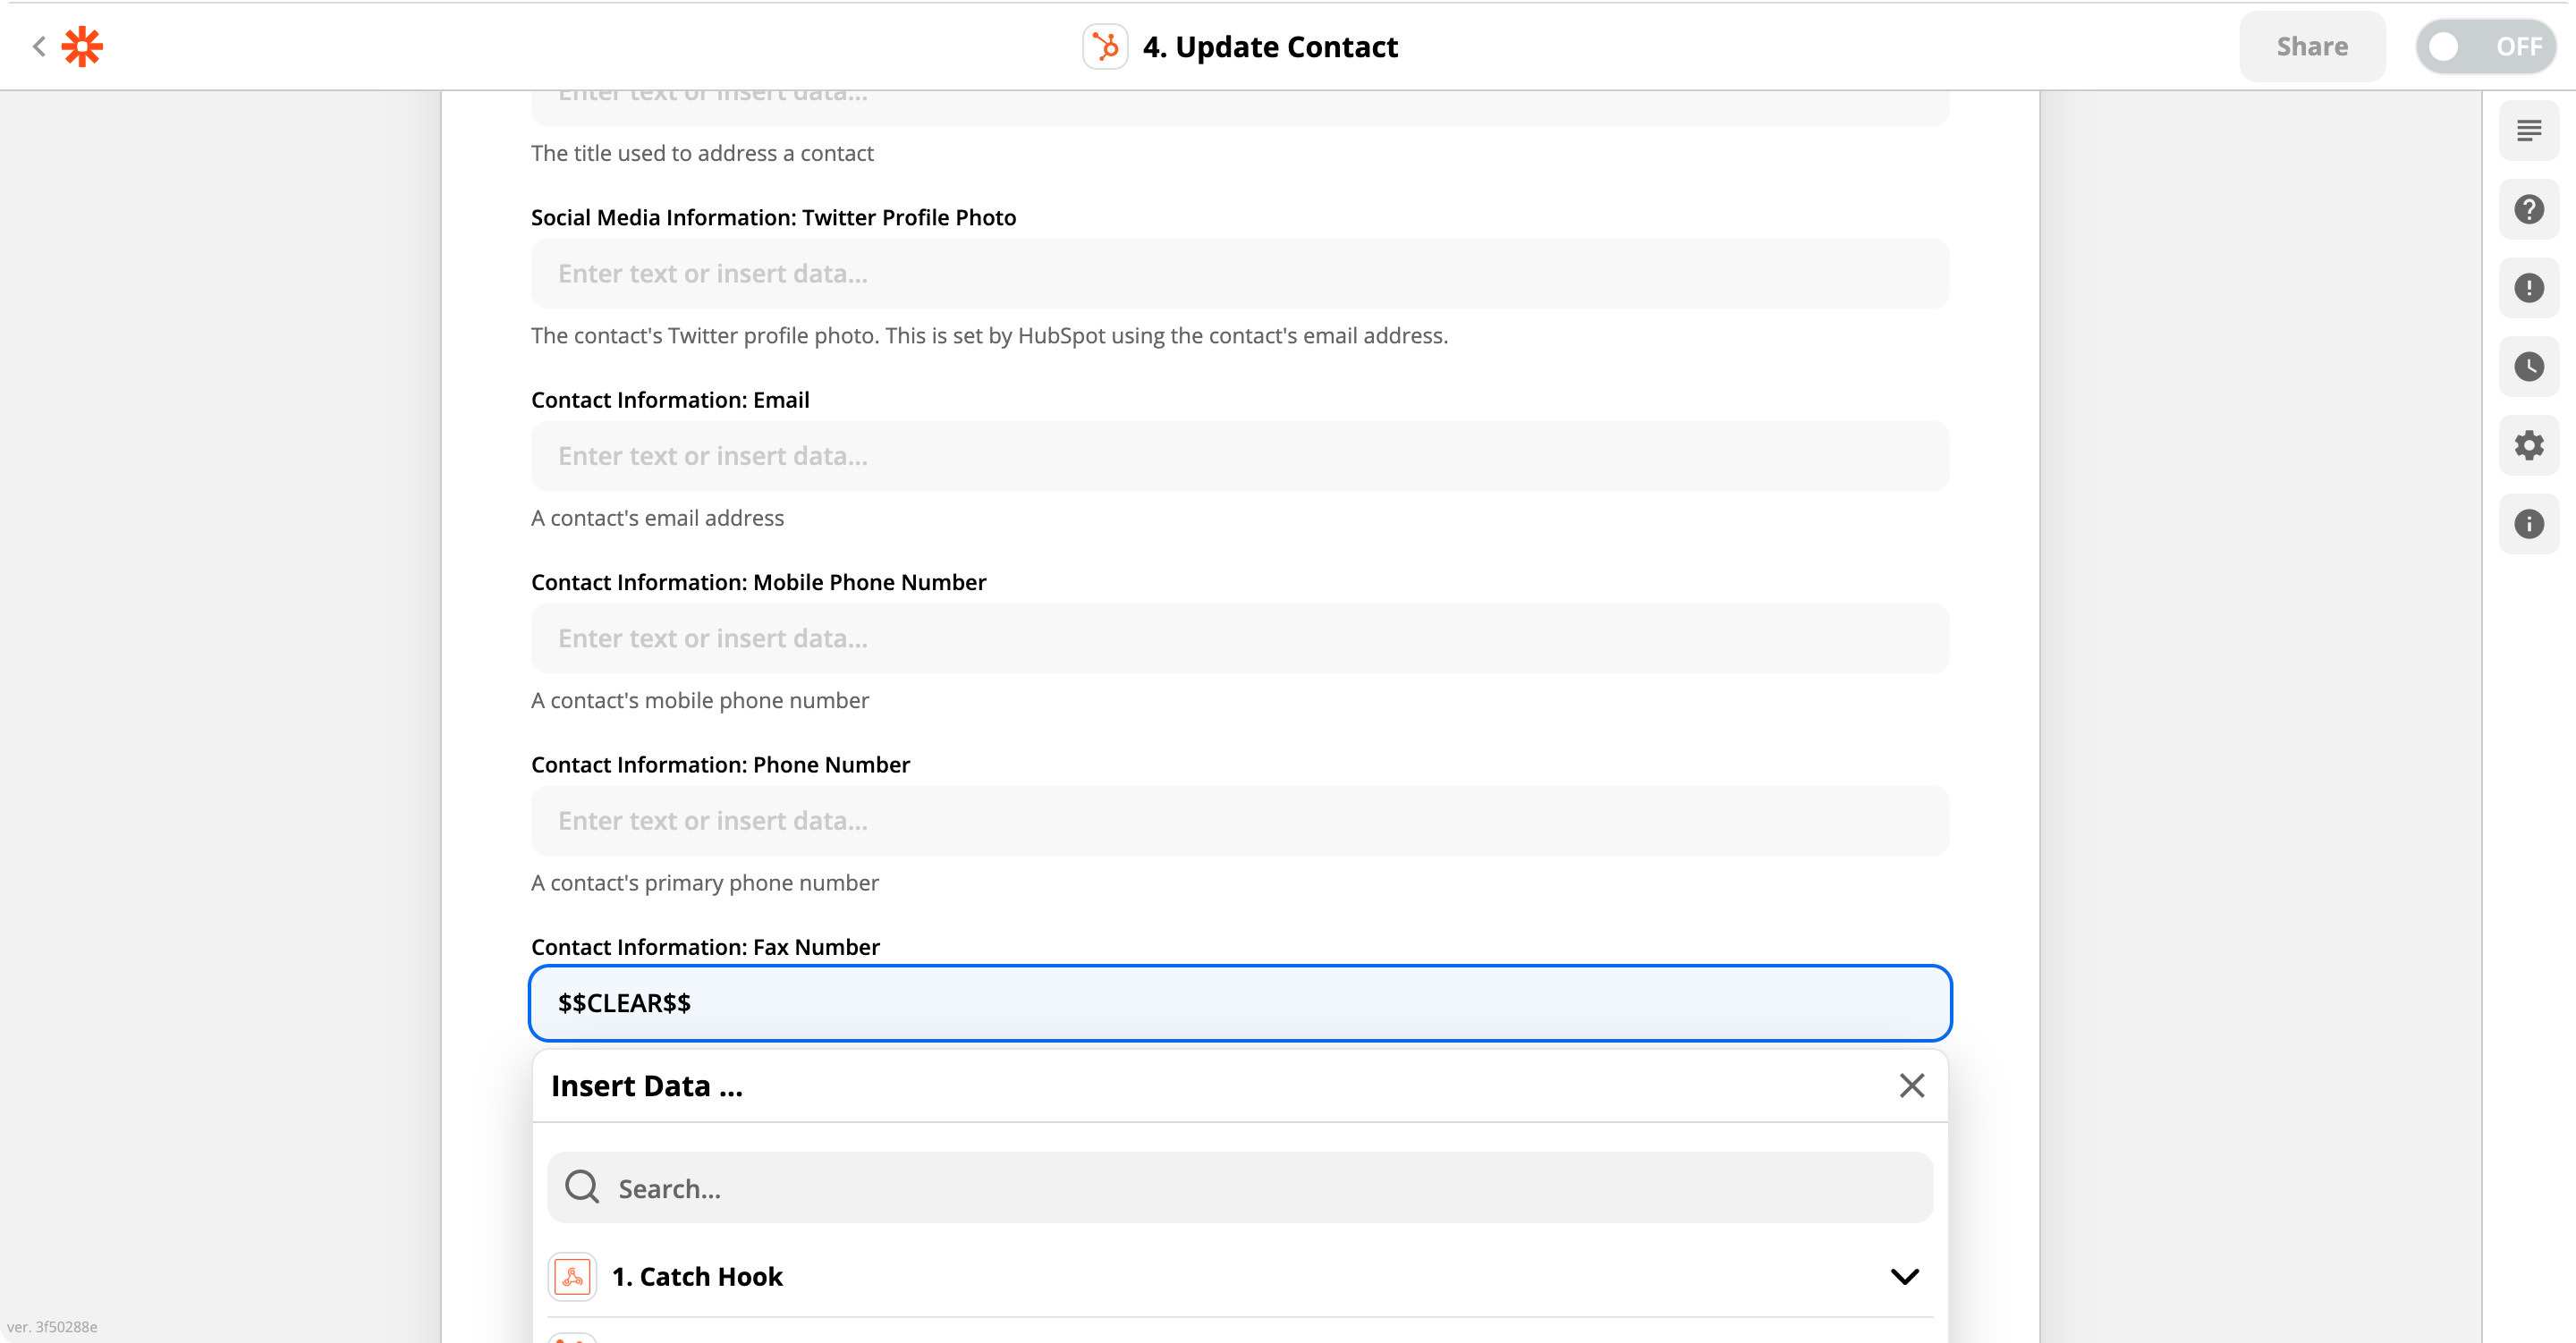
9. Lastly, it might be a good idea to clear the OTP ID from the Fax Number field. You can do it by changing the value to $$CLEAR$$. Then click Continue.
10. Now you may test your Action. In that case, Zapier will try to update the Contact with the Contact’s ID. Click on Continue.
11. Turn on your Zap.
Congratulations! Both of your Zaps are now online and waiting on new users.
Step Four: Test your Zaps
Let’s try triggering your Zaps.
Start with updating your forms with Zapier Custom URLs. Open the HTML file in your favorite editor and change the action value of the first form (sign up) to the First Zap Custom URL and also the action value of the second form (verify) to the Second Zap Custom URL.
<div class="geshifilter"><pre class="php geshifilter-php"><span class="sy0"><</span>form action<span class="sy0">=</span><span class="st0">"https://hooks.zapier.com/hooks/catch/XX/YYY/silent/"</span> method<span class="sy0">=</span><span class="st0">"POST"</span> target<span class="sy0">=</span><span class="st0">"_blank"</span> id<span class="sy0">=</span><span class="st0">"sign up"</span><span class="sy0">></span>
<span class="sy0"><</span>form action<span class="sy0">=</span><span class="st0">"https://hooks.zapier.com/hooks/catch/XXX/ZZZ/silent/"</span> method<span class="sy0">=</span><span class="st0">"POST"</span> target<span class="sy0">=</span><span class="st0">"_blank"</span> id<span class="sy0">=</span><span class="st0">"verify"</span> style<span class="sy0">=</span><span class="st0">"visibility: hidden;"</span><span class="sy0">></span></pre></div>
1. Go to the testing (or your own) form and fill in your testing contact information. When you are done, click on Submit.
2. As soon as you submit your form, Zap starts. Grab your phone and check your SMS.

3. Go back to your verification form, input your phone number and the verification code. Then click on Submit.
4. Your second Zap now verifies your account. Go to your Hubspot to see the results.
Congratulations, all your new sign-ups are now secured with two-factor authentication.
More?
The main power of the Zapier App is that you can connect it with any other Zapier App. You can add two-factor authentication to your Google Forms, Typeforms, or to e-commerce platforms (like Shopify).
To scale this integration, you could add a resend button to the verification form. That would use the Resend One-Time Password action. Alternatively, you can store the OTP ID as a cookie or on your website, which would allow you to move the creating contact action into 2nd Zap. Another quality of life improvement you could do is automatically delete inactive contacts in Hubspot if the verification fails.